Download

1 / 43
440 likes | 762 Views
Mobile App Testing. Mobile App Testing. Mobile apps are inevitable part of mobile industry and it has now grown to an inevitable part of millions of mobile users. Day by day thousands of apps are entering the market. Some with good features and with good and bad quality.

E N D
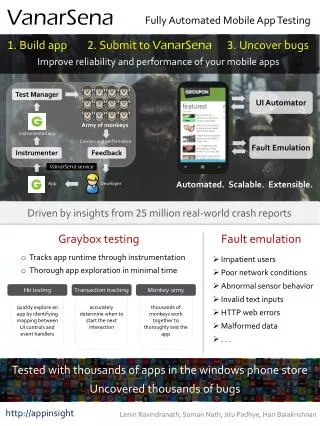
Mobile App Testing Mobile apps are inevitable part of mobile industry and it has now grown to an inevitable part of millions of mobile users. Day by day thousands of apps are entering the market. Some with good features and with good and bad quality. To deliver a good quality app for mobile customers, mobile app testing plays a great role in todays industry. Define the quality of an app? Lets see how the mobile app testing can be done to improve quality of the app.
Baseline Mobile app testing field is normally in Manual Testing and also we have some tools to partially automate the testing process. So the basic method used is Manual Testing and Automation tools are also used for some less extend. The test procedure will follow the manual testing approach and will use if any automation needed with the available tools.
Challenges in Manual Testing • Time consuming • Repetition causes tiresome experience • Human error due to lac of concentration & negligence • Reproduction difficulty • Less knowledge in code • Multi devices for multi platforms • Multi device specifications • Lac of sufficient requirement description • Lac of understanding for a requirement
Basic Preparation • Project Knowledge • Requirement Knowledge • System Knowledge • System Requirements • Tool Requirements • Device Requirements • Multi Device Support • Device Knowledge • Target Device • Compatible Devices • Device Specifications • Versions & Features • Device Platform • Platform Specified App Development Guidelines
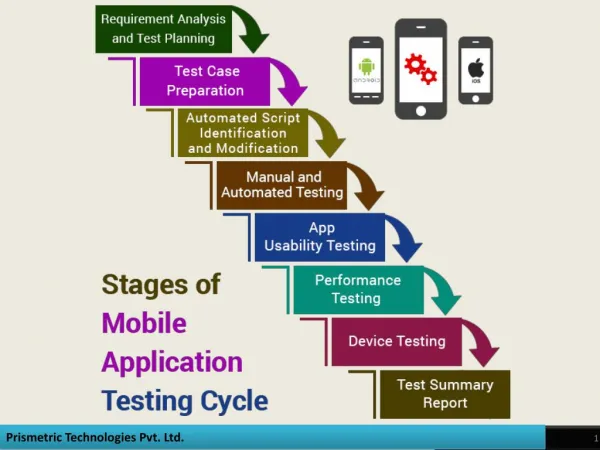
Testing Preparation • Gather all requirement documents • Complete basic preparation • Author test documents • Testing methods and levels • Write device use cases and test cases • Write project use cases and test cases • Set up testing environment • Hardware set up • Software set up • Service set up • Test execution • Bug reporting • Testing summary report • Final test summary and sign off
Testing Levels • Unit Testing • Smoke / Build Testing • Integration Testing • System Testing • Regression Testing • Adhoc Testing • UAT
Unit Testing Unit testing is normally done by developers before the app is given to the testing team. It may be done in several ways such as a code walk through, build creation, running in development environment, running in device environment (Emulators), Installing in real devices and testing. App will be given to the testing team only if the app passes the unit testing.
Smoke Test / Build Test • Smoke Test Smoke test is done by the testing team initially on the first release or version of the app to see whether the app is ready for testing. • Build Test Build test is basically a smoke test done for the acceptance of the build for testing process. It will verify the build whether it is ready to test in a device and to perform the next step of testing. It will also verify the contents and criteria's of the build and its associated files. If any of these test fails the app is returned to developers untested and otherwise moved to next level.
Integration / System Testing For mobile applications, integration testing and system testing can be done after build acceptance. If an app given for testing have several modules and only some of the modules are implemented in the release, then integration testing will be done for the particular modules only. Later on adding the modules integration testing will be done for those modules also. For an application having all the modules implemented in the release, system testing will be performed by testing all the application functionality, features and other areas by covering all the test cases authored. All the features in requirement traceability matrix should be tested.
General App Testing Criteria's • Download • Install • Uninstall • Launching / Exiting • Application start/ Restart/ Pause / Resumption • Graphics & UI • Security • Network Testing • Interrupt Handling • Error Handling • Mapped & Un mapped Keys • Memory • Battery Consumption • Interfaces • Visual Feedback • Display • Device Alerts • Incoming communication alert • Navigation • Transitions • Usability • Documentation
App Specific Criteria’s • App Icon • Splash Screens • App Title • Screens • Screen size in all display modes. • App Sounds • App Alerts • Text Edit Fields • Options / Settings • Lisibility • Control Specifications • Verbiage Consistency • Transition Consistency • Stability • Fonts & Colour • Login • App Timeout • Device features • Data Accuracy • Data Storage • Protocols • Performance • Functionality • Features • Feedback • T & C • User Interactions • Minimum Requirement • Localization • Translation
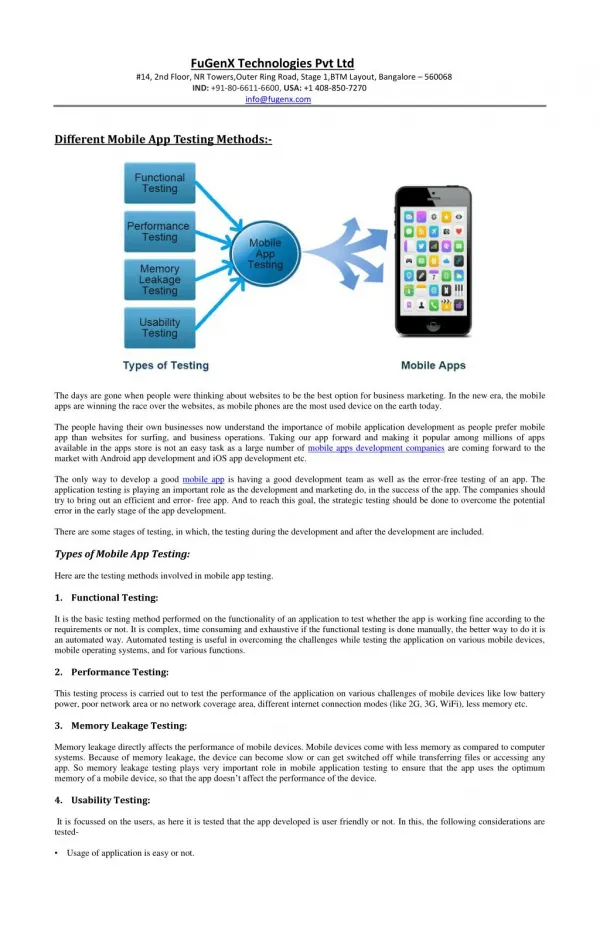
General System Testing • Usability Testing • Functionality Testing • Performance / Load Testing • Security Testing • Authentication checks • Input Validation checks • Session Management checks • Encryption checks • Application checks
Next Level • Regression Testing • Adhoc Testing • UAT
Mobile App Testing Tools For mobile application testing major problem is the vast range of platforms and devices with different specifications and features. So for a product supporting for a vast range of devices, testing cannot be done in all real devices due to time constraints or the device availability. We have to select some master device from the list and list all compatible devices and test on the master device and some other compatible devices if device is available and timeline is not exceeding. At this instance the testers can use mobile emulators for the devices which we have to test. How ever emulators wont be able to produce all the bugs as it is used from a desktop. So testing in a real device is better than testing in an emulator.
Mobile Emulators Emulators can be used instead to allow you to simulate testing on the real device or browser. The benefits of this approach are many-fold: • No data browsing charges are incurred, as all browsing is performed via your standard Web connection • Quicker access to devices – starting an emulator is faster than switching sim cards and rebooting devices • Provides access to a potentially large number of devices/browsers – the number of devices you can use is only limited by hard disk space and the number of emulators you can find • Inexpensive – many emulators are available for free
Emulator Types Mobile emulators fall into three main categories: • Device emulators - These are generally provided by device manufacturers and simulate the actual device. Device emulators are excellent for testing your site or application on a particular device or set of devices. • Browser emulators - These simulate mobile browser environments. Whilst useful for determining the functionality available in a particular mobile browser, they are useless for device-specific testing. • Operating System Emulators - Microsoft provides emulators for Windows Mobile, and Google provides an emulator for Android. These run within a simulated mobile device environment and provide access to applications running within the operating system, e.g. a Web browser.
Disadvantage Emulators are great, but you should not assume that just because your site works perfectly on an emulator, it will function in the same way on the real device. Emulators can often differ in subtle ways from the devices they simulate; this is especially the case if the developer of the emulator is not the original creator of the device. Use emulators to cover a wide breadth of devices that you wouldn’t have access to, and fix any bugs you find; but make sure you test the site on real devices too, just to be sure.
Popular Emulators There are a large number of emulators available. The following companies offer emulators for some or all of their mobile devices: • Research in Motion (BlackBerry) • Apple (iPhoney) • Samsung • Palm • LG • Motorola Operating system emulators are available from: • Microsoft (Windows Mobile) • Google (Android) • Nokia (Series 40 and Series 60) Some available browser emulators are: • Opera Mini • Openwave • Testiphone There are also some generic emulators – mobiForge, offers an emulator which can be skinned as a Nokia N70 or a Sony K750.
Downloading Emulators & Groups. Emulators can generally be found in one of three places: • On a manufacturer’s development portal • Bundled as part of an SDK • As part of a Web site The emulators outlined in this article are grouped as follows: • Web-based emulators • Installable emulators • Symbian-based emulators • Emulators that can only be used to test applications (Java Based Emulators)
Web Based Emulator • Web-based emulators are easy and quick to access – no installation, no fuss. Just enter the correct URL and start testing. Test Iphone • This provides a nice, quick way of testing your Web sites on a simulated iPhone. Just type in the URL of the site you want to test and hit ENTER.
Installable Emulators • Many device manufacturers offer free emulators; after all, they want you to develop for their platforms. More developers = more applications = more users = more revenue. Details about how to obtain, install, and use some of the more popular emulators can be seen here. • RIM In my opinion, RIM offers the gold standard in emulators (or “simulators” in RIM terminology). The RIM emulators are available from the RIM Developer Zone. You’ll need to sign up for an account
Downloading Blackberry Simulator • Once you’ve signed up, click on the Web Development Tools & Downloads link. You’ll see a section entitled BlackBerry Smartphone Simulator. Click the link and a page will be displayed, listing lots of different simulators. Simulators are grouped by the BlackBerry version number. Select the necessary device with OS Version and download and install.
MDS To start with RIM emulators to connect to network, you need to download at least two files: • BlackBerry Email and MDS Services Simulator Package - This program simulates the BlackBerry Enterprise Server. You will not be able to connect the simulator to the Internet without it. • Any BlackBerry Device Simulator - Clicking on a device simulator item in the drop-down list and clicking Next will display the simulators available in that group. You can download and install as many as you like.
Installing App in Android Emulator Installing the SDK: • After downloading the SDK, unpack the .zip archive to a suitable location on your machine. For the rest of this document, we will refer to the directory where you installed the SDK as $SDK_ROOT. Optionally, you can add $SDK_ROOT/tools to your path: • On Linux, edit your ~/.bash profile or ~/.bashrc file. Look for a line that sets the PATH environment variable and add the full path to your $SDK_ROOT/tools to it. If you don’t see a line setting the path, you can add one:export PATH=${PATH}: • On a Mac, look in your home directory for .bash profile and proceed as for Linux. You can create the .bash profile, if you haven’t already set one up on your machine. • On Windows, right click on My Computer, and select Properties. Under the Advanced tab, hit the Environment Variables button, and in the dialog that comes up, double-click on Path under System Variables, and add the full path to the tools/ directory under $SDK_ROOT to it. *Note* – Updating the SDK for newer releases means you might also need to update the PATH settings. • Go to $SDK_ROOT/tools directory and execute the file ‘emulator.exe’. You might need to also include android virtual device (AVD) to command line execution for example, ./emulator -avd TestDevice • Please wait couple of minutes until it loads. You should see the home screen of the android emulator. • Save/copy the APK file directly in the $SDK_ROOT/tools directory. • Goto Shell/Terminal/Command Prompt, adb install fileName.apk (You will need to shell/terminal/cmd sessions live) • or ./adb install fileName.apk • If there is ‘Path not found’ error then you need to add $SDK_ROOT/tools directory to your system PATH settings correctly. • After above command executions, you will be able to see installed apk into emulator.
Application Testing Emulators (Java Based Emulators) • Some SDKs provide emulators that can only be used to test mobile applications. Many of the J2ME SDKs are cases in point. Whilst this renders them useless for mobile site testing, it provides application developers with a useful and quick way to debug applications. • The J2ME SDKs are all re skinned versions of sdk Toolbar, a minimal but useful Java development environment. Installing this is easy; unzip the downloaded file, and keep clicking Next until installation is complete. Download size is around 60MB per version of the SDK. You need to be running the Java 2 SDK 1.6 or later to install any of the J2ME SDKs.
J2ME Emulators Samsung Emulator Summary Emulators give you access to many platforms and “devices” that you may not have been able to test on otherwise. Whilst it is wise to exercise caution when using an emulator (remember there may be slight differences between the emulator and the “real thing”), they generally give a good indication of whether something will work on the real device or not. Emulators can save you a lot of money and time, so try using them as part of your test plans.
Xcode Xcode is the SDK tool for the development and testing of I OS Apps. It can be used for I phone, I pod, I Pad different versions. Same like other SDK tools Xcode also offer emulation of the above mentioned devices to run the application for debugging. Apart from the emulators, Xcode also provide Instruments for testing the application for different scenarios.
Instruments Instruments is available as part of the Xcode Tools installation. • When you launch Instruments, the application automatically creates a new document for you. You can also create new documents by choosing File > New. • For each new document you create, Instruments prompts you to select a starting template. These templates define the initial set of instruments you plan to use in your trace document. Instruments provides several different templates, listed in Table 1-1, each geared toward different goals. You can use the Blank template if you want to add a specific set of instruments to your trace document manually. For any of the templates, you can also remove instruments you do not want.
Instruments Starting Templates • Activity Monitor Use this template if you want to correlate the system workload with the virtual memory size. • Allocation Use this template to monitor memory and object-allocation patterns in your program. • Automation Use this template to automate user interface tests of your iOS application. • CPU Sampler Use this template if you want to correlate the overall system workload with the work being done specifically by your application. • Energy Diagnosis Adds the Energy Diagnostics, CPU Activity, Display Brightness, Sleep/Wake, Bluetooth, WiFi, and GPS instruments to your document. Use this template to get diagnostic information regarding energy usage in iOS devices. • File Activity Use this template if you want to examine file usage patterns in the system. This combination of instruments monitors open, close, read, and write operations on files and also monitors changes in the file system itself, including permission and owner changes. • Leaks Use this template to monitor memory usage in your application and to detect memory leaks. • Sudden Termination Use this template to analyze sudden termination support. It reports unprotected file-system access the target process should be, but is not, guarding with calls to disable sudden termination. It also provides activity monitoring across all processes, including sudden termination status for each. • System Usage Use this template to record calls to functions that operate on files in a process running on an iOS device. • Threads Use this template to analyze thread state transitions within a process, including running and terminated threads, thread state, and associated backtraces. • Time Profiler Use this template to perform low-overhead time-based sampling of one or all processes. • Zombies Use this template to measure general memory usage while focusing on the detection of over-released "zombie" objects.
App Tools To test some of the functionality or features or usage of the test app in a device there are number of applications available in the market for different platforms. These apps provide services like. • Battery consumption • Screen shot • Memory Monitor • Generate random key event
Automation Tools For mobile application testing automation tools are available, but most of the companies go with manual testing only. The basic thing is that there is no complete automation tools for mobile app testing. How ever partial testing tools are available for mobile apps having functionality like recording process, performing recorded testing process, converting the recorded process to scripts for QTP, Python like testing tools. Other than these there are some service providers providing devices through online for testing purpose. An automated software testing tool is capable of playing pre-recorded and predefined actions. The results are mapped to the expected behavior and report the success or failure of these manual tests. Once automated tests are created they can easily be repeated. Having experienced the efficiency of automated software testing, it has become an important part of an application testing.
Remote Device Access Due to a large number of devices available in the market, it is not feasible to buy a new device every time. At the same time Simulators are not completely reliable enough to launch a mobile app based on testing conducted only on simulators. RDA (Remote device services) can be a good solution to deal with these challenges. The remote device access services enable access to a live device over the Internet. As a Mobile Apps Tester, you should be aware of such services and should suggest your managers about the capabilities of such Services. Other than device anywhere there are more providers of device now in the market. Each and every service differ from each other and giving an extreme platform for testing. Some Available RDA Services are: • Device Anywhere (Paid) • Perfecto Mobile (Paid) • Nokia RDA (Free, For Symbian Phones)
Common Automation Tools Mainly mobile testing is done manually on actual devices. Some of the following tools are available in to test the functionality as well as usability of application. • Seetest for I phone, Android, Windows, Symbian, Blackberry • Robotium for Android • Testquestfor Symbian • FoneMonkey for IPhones • Memory sweep for IPhone • Hopper • TestComplete • M-Eux • TestQuest Countdown • Test Quest Pro • VNC • Sikuli • Eggplant (iPhone) • TestiPhone • IBM® Rational® Performance Tester (RPT) • 3P Mobile • Expertest • MITE (A Mobile content testing and validation tool for Mobile Web app)
Seetest This is a multi platform testing tool which can be used for testing most of the mobile platforms. This is normally a recording based script generation tool. To record a test on a mobile phone, follow the steps below: Step 1:Launch Seetest and create a new project. To start recording a script on a mobile device, you need to have your mobile device connected by USB to your computer and have the device screen then appear on your computer screen. Step 2: In SeeTest, go to the Script tab and click on the Record button. Step 3: Go to the device screen appearing on your computer screen, and do the exact sequence of actions you want in the test. Step 4: Return to SeeTest and click on the Stop Record button. Step 5: You will see a progress bar indicating the record data is being analyzed, and the test script will then appear in the Script area. Step 6: Before clicking the Play button to run the script: (1) Set the tested application in the same starting mode as the one you have recorded the test on: a) Same start screen b) Same items in the tested application are highlighted or not highlighted, as was the situation when you recorded the test. c) Text boxes are empty/filled in with same text as was when you recorded (2) Check that the elements have been extracted accurately and if not Edit/ ReLearn the element: a) Edit an element that was extracted too widely (e.g. several buttons instead of one) or too narrowly (e.g. part of the image, image cut in the middle) b) ReLearn an Element that was not identified during runtime because it may have several appearances (such as with or without mouse over) and was extracted in the wrong appearance. For example, sometimes, an element is captured when it is in mouse-over mode (highlighted) and you need to ReLearn it in the non mouse-over mode (not highlighted). To do so, set the tested application screen in the right mode, bring it to the clipboard of the computer using Print Screen. Then go to SeeTest, right-click on the element and select ReLearn and then select Clipboard from the dropdown list. The corrected element will appear. Click OK to finish. c) If you have ReLearnt an element as described in b above but it has still not been identified during runtime, reduce sensitivity of the element that has not been identified (reduce by 5% every time and try to run the test then and see if it has been identified successfully) (3) Add, if there is need, synchronization commands (such as Sleep, WaitForElement) to ensure that each test step is executed on the correct application window (follow the Edit> Add Element&Command section for explanation how to add a command) Step 7: Once the test has been executed, you will receive a report indicating for each test step if it was executed successfully or not, including a screenshot of the tested application in run time. Step 8: You can run the test script from QTP, TestComplete, RFT, JUnit , Python, Perl or C# and other frameworks. To do so, click the Export code button, copy the code into your framework and run it from the framework.
Conclusion Thus to achieve high quality in mobile applications the testing practices are made in such a way that it can be opted for vast range of mobile devices. So as far as quality is concerned, there is no compromise in mobile app also like other software applications. A good software tester must be good observer, creative and dependable person with necessary skills.