Download

1 / 8
80 likes | 88 Views
If you want to know How To Install Windows 7 Ultimate 32-Bit or 64-Bit, read this PPT step-by-step.

E N D
How To Install Windows 7 Ultimate 32-Bit or 64-Bit www.lappysoft.in
Pre Installation Information that Should do One thing must be kept in mind that whenever you delete any data from your computer, make a backup in USB port like USB pen drive or CD and DVD, apart from this transfer your important files to pen drive or USB driver, And you can copy your important data from your computer or laptop and paste it in USB drive Let me tell you a one more important thing, before installing any kind of software on your computer, to keep the necessary data present in your computer safe, as we said, you should make a backup through a medium like a pen drive, apart from this you can also save the computer program. Keep a list of important applications or installed files. This is important because you need to know what important data is available on your computer. Also, for professional applications like office projects, it is very important to keep the activation code serial number in mind.
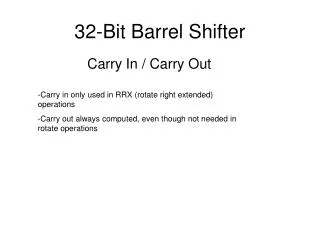
Installing Using a Windows installation DVD Step-1- Enter the computer’s BIOs The first step is to turn off your computer, then turn it back on, after that the BOI window will appear on the monitor, there you have to press the key given on the motherboard like Del, Esc, F2, F10 or F9
Step-2-Finding BIOs boot option – Let us tell you that the position of the BIOs boot options menu may be different, first of all, you have to find the BIOs boot option. The boot search menu is easily found in most computers, if not, you will need to search for the computer’s BIOS name. Apart from this, you can search for this option with the help of the internet. Step-3- Select your Drive as the first boot device Through today’s advanced technology, a lot of change is seen in the computer, that’s why things have changed a lot according to different brands of computer, although you have to set your computer’s CD CD-ROM drive in the boot divide before you boot. Menu option A list of drives will appear from which you can easily set the order of the boot. And if you want to get better help in this matter then Laptop Repair in Noidais ready to help you who have deep knowledge of the computer field and can provide you with the best services in this matter.
Step-4- Save the changes and exit You have to press the button that appears on the screen of your computer and set your configuration and click on Exit. Step 5- shut off your computer You all know that the shutdown option is easily available on the computer, so you have to choose the option of shutdown and press the power button until your computer shuts down.
Step-6- Give power to your computer and insert the window 7 disks into the hard disk of the computer Step-7- Turn ON your computer from the disk Afterward, it is an easy process, you have to put the CD in the hard disk, later you have to start the computer, after that when you put the CD inside the hard disk, then after starting the computer, you will see an option in it that will be written whether If you want to boot from this disc then you have to press any key after that window setup will appear loading. Apart from this, if you have any kind of computer-related problem in your mind then you can avail the services of the Laptop Repair in Noidaand get all your computer-related problems solved easily.
Step-8- Select language, time, and keyboard Later when the window is loaded, after that on the screen you will see the option to set manual In which you have to type on the next after selecting the option like preferred language, keyboard type, Step-9- Then click on Install Now button Step-10- Select license term The most important thing to installing Microsoft on your computer is to read the Microsoft software license term carefully. After you finish this process, you will see the option “I accept the license” Click on that box to accept the license. If you want to know more details about the process of installing Microsoft software or other software then the Laptop Repair in Noida is ready to assist you.
Thank CONTACT US you! +91-9990903241 www.lappysoft.in Lappysoft@gmail.com Shop No.LGF 19 A square Plaza Sec-73 Noida