Download
1 / 42
420 likes | 427 Views
Booster Low Level. Modules, Timing and some Measurements. Three parts to Booster RF cycle. Injection and Capture modules and parameters. Acceleration and Cogging modules and parameters. Extraction modules and parameters. Injection and Capture.

E N D
Booster Low Level Modules, Timing and some Measurements
Three parts to Booster RF cycle Injection and Capture modules and parameters Acceleration and Cogging modules and parameters Extraction modules and parameters
Injection and Capture VXI card: generates Paraphase Curve – Tuned from page B26, Timers B9 • Adds DC offsets to PP curve: B:PC1OFF & B:PC2OFF • Ability to add Aux curve to output – Tuned from page B26 • Ability to add external curve to output • B:TPPP Triggers Paraphase curve • The paraphase curve takes about 600 us. Paraphase Turn-on Mod: Shifts the Vector phase of ‘A’ and ‘B’ stations • Uses cosine rule to generate relative phasing. 10 v = 180 delta “A” “B” • Also used at transition • Bandwidth ~ 1MHz VXI DDS card: generatesboth the accelerating RF and BPM RF • Tunable injection Frequency B:VFINJ • Tunable Injection Frequency Decrement: # of cycles to converge to curveB:VFIDR Balancer Network: Used to balance “A” and “B” stations drive amplitudes • B:RFBLON,B:RFBLOF : RF Station ‘A’ and ‘B’ Inj Balancer enable & disable • B:POTAIN, B:POTBIN : Gain Pots used for tuning group “A” and “B” anode
Beam Gate • The paraphase curve takes about 600 us but the Beam has enough bunching by ~100us to enable FB. • The beam gate generator box uses an AM detected signal and a CAMAC trigger B:TFBON to produce a logic high TTL signal. • The generation of the beam gate valid will depend upon intensity and paraphase timing relative to injection timing. • The beam gate signal enables the feedback. • Feedback gate requires both B:TFBON and bunch beam intensity > 100mv • Can we accelerate less than one turn – yes and no. • Linac current is critical for 1 turn beam. • If your notching one turn beam, the gate signal may not be stable. • If there are small losses at one turn, the gate signal may not stay on.
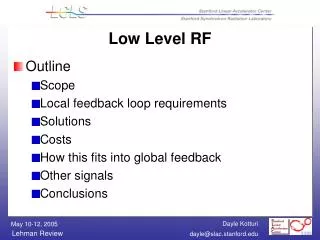
Start of Acceleration • Feedback is enabled on valid cycles when Beam Gate appears. • The Frequency sweeps starts at ~ 37.9 MHz • The Booster revolution time at injection is 2.22 us. • The Booster synchronous phase at injection is ~35kHz • The bias and frequency programs start to play at BDOT level crossing. • The low level VXI program is triggered on all $11, $12, $10. ( B:DDSCTG ) • A revolution marker is reset with the chop on trigger. The marker is used to keep track of bunch # 1 and sampling.
Bdot Trigger to LL room If RF and Bias curves not playing - problem may be out at GMPS
Acceleration Feedback • Booster sweeps from ~ 38MHz to 53.814MHz in 33ms. • Peak accelerating rate occur around 8ms into the cycle. • There are two acceleration feedback systems; radial position and phase feedback. • The VXI DDS card uses the phase error to correct the Frequency. • The Phase Shift Controller uses the RPOS signal to control position. • A gap detector at long 18 provides the beam phase information. This signal is also sent to the MCR – Displayed on Tek602. • A resistive wall (BPM) at long 20 provides the position feedback. • Two feedback systems working on the beam can cause problems. Tuning on the system gains can cause stability issues • The gain settings of the VXI is B:VAPLGN. • The gain of the radial position is done through the RAG curve. • A sample and hold module used for notch beam reduces notch (ringing in phase detector) noise in the phase feedback.
Note the very high dF/dT RF PLOTS
VXI - LOW LEVEL RF • This system replaced the VCO about 7 years ago. • It also replaced the BPM frequency offset module. • It generates the Bias, LO Frequency, BPM Frequency and phase lock Frequency trigger. • We have two working modules and one that may be made to work. • It runs on a 25 MHz clock. • An application program loads a two 1000 point curves ( Bias and Frequency.) • The frequency curve is updated every 1 us. • The Bias is updated every 4 us. • The firmware is written in assembly code due to timing constraints.
Response of Old VCO DDS has similar response
Radial Position Det. (L20) RAG / ROF Curves L18 pickup Wideband Gap Trans. Trig Phase Shifter Controller Bdot Beam Delay Phase Shifter Phase Det. VXI PGM Generator Paraphase Turn-on Module Trans. Trig Phase Det. MI RF ‘A’ ‘B’
Acceleration Phase Detector • Type – Overlap • Bandwidth - ~1MhZ • Modified TEV Phase Detector • Other types could work but would require phase adjustments • Being Replaced with log det on VXI card.
Mt. Range Pickup Long 18 Gap Detector – Phase Feedback L18 BPM
RPOS Feedback Path Phase Matched AMPS Block Diagram Long 20 BPM “A” “B” Aux 2 (AC RPOS Damper) Bdot Transition Trigger RAG ROFF Paraphase turn-on Module RPERR BPM Mod Phase Shifter Drive Module PSDRIVE Phase Shifter Module PSDRIVE Aux 1 input (Cogging Feedback) BPM LO 28.8 MHz above RF ~ 1 MHz Bandwidth DDS RF (from dist. Box )
Phase Shifter Drive • Feedback path for Radial Position • Several Inputs: RPOS,ROF,RAG,BDOT,AC Damper,and Cogging Control • Uses transition trigger to flip phase
What we do know….what can we do? • Mis-time transition – Why, because it gives beam a slight energy kick pre-transition. • Quad Damper…but only works after transition so will not help bucket reduction at transiton. • More Anode voltage at transition…no voltage available. • More RF…means more available volts at transition. • Slow down ramp…make GMPS work harder. • Play games with the ROF curve. This does two things: It changes the chromaticity quickly and it also reduces the effects of beam loading by reducing the phase jump at transition.
Transition Timing • Two modules involved in transition jump: • Phase Shift Controller • Paraphase Turn-on Module They both get a transition trigger which is an ‘or’ of all transition triggers. Question How do we get through transition with high beam current?
Answer? • At transition we have a situation where we’re current limited but need to drive a large reactive load. • Tuners are not designed to be fast enough (they are slow compared to synchronous period) so the reactive component needs to be handled by the tetrode. But since we’re running the stations at full voltage, there is not enough power (or current) to switch the reactive power. Like a filter, the rate at which the circuit cavity responds can be overdriven….if we had more current!
RF INPUT Analog Circuits Produce proper transition curves Trigger at Transition Trans 0 90 0 90 LO LO INJ X r r X X r r X Trans INJ B A
Scope Picture 4.5E121)Phase Error 2)Phase Ctrl 3)RPERR 4)Paraphase Jump Ramp
Scope Plots of Transition 4.5E121) DDS Phase Error2)Phase CTRl Error 3) RPERR 4)Paraphase Turn-on Jump Note the error that developes In Rpos Like Rpos – An Error In Phase Developes !
Extraction – Phase lock • The phase lock process is enabled by a CAMAC timer B:BMIPLT. • The VXI puts out a pulse when it reaches a frequency set by B:VPLFRQ. • The pulse triggers a one-shot that begins the Booster to MI phase lock process. • Extraction will occur about 2.8ms later. • The error signal B:PLERR is the main diagnostic on the process.
Extraction –Phase Lock Start of Phase Lock RPOS PLERR Beam FPERR
Extraction PL Phase Detector • This is a complex phase detection system • A baseband error signal is compared against an op amp generated exponential curve • Lots of pots to tune • Timing is a challenge • Large RPOS swing • Less than +/-5deg. jitter • Bunch Rotation also can occur at the end • New RF anode balancer pots used during rotation • B:POTABR, B:POTBBR
Scope Display B-Rotation • The bunch rotation is done by setting a voltage in the VXI paraphase card B:PBROFF. The voltage is applied to the paraphase turn – on module. This again will change the relative phasing of “A” vs. “B” stations. • The Bunch Rotation voltage is a step function – unlike the capture curve. RF Sum Signal Rotated Bunch Gives a Reduced Amplitude Diode Detected Beam Signal (“Peak Detected”)
Cogging • Why do we cog? • In multi batch operation, MI tells Booster in what bucket they want beam. Booster kickers extract on the “OAA” marker. • Booster Kickers have a rise time > than the bunch spacing of 18 ns. More like two bunches. • Two bunches will be kicked into the Booster extraction elements! • A notch is created so that the rise of the kickers field occurs when there is no passing beam. • Losses at extraction would be about 10x what they are now! • The notch is ~ 3 buckets wide. More than the kicker rise time. • Cogging makes sure that the notch an the “OAA” are synced.
Cogging Scope picture BES Pulse OAA Marker Override Marker Notched Beam
Cogging - Parameters • There are several gain settings • Projected Gain • Cog Gain • Cog flat feedback Gain • Each cycle has a gap delay • Number of points • Override Count Delay.
Typical Booster Cogged Cycle Notch Calculation Pre-Transition Calculation
Cogging Issues The magnitudes of the bucket errors calculated from typical Booster variables: 1 us timing error results in a slippage of 15 buckets, 1mHz frequency error results in a slippage of 7 bucket, a 1/10,000 variation on injection magnet current results in a 10 bucket slip and a 1/10,000 variation in extraction magnet current results in 7 bucket slip. The above cycles all used the same reference.
Cogging and Tuning • Gap Delays….try +/- 1 count and watch extraction losses for a supercycle. • Tweak kickers verniers. Look at average loss over a super cycle. Small changes will make a big difference in the average loss. • Play with RPOS position to minimize beam size and scraping. • RPOS changes may require local position tuning. • Rpos will create a dispersion wave…that may result in localized scraping/losses. • Beam size will determine the “DC” loss level. • A limited extraction aperture requires tuning on the transverse beam size. • Sextupoles • Quadrupoles • Injection matching • Harmonics
Dampers – Just a Note • Quad damper is used only to damp a bucket mismatch that occurs at transition. • This is due to fact that we have an accelerating bucket – non spherical • Quad correction is summed with Anode drive • Mode 1 damper correction signal is fed back through the RF fanout. • Susceptible to variations in RF station tuning • Mode 48,49,50,51,(52) have a separate power supply and cavity. • Cavity tuned to 81MHz • Bandwidth of about 8 MHz
Damper Info Damper Pickup Mode 16 Damper Not yet used 81 MHz Damper Tank -48,49,50,51 Mode 48 Mode 49 Mode 50 Mode 51 Chg0 Toroid
Now You Be The Expert • Not covered – Curves, High Level Fanout Fanback, LL signal distribution, Extraction Timing and software.