Download
1 / 18
180 likes | 190 Views
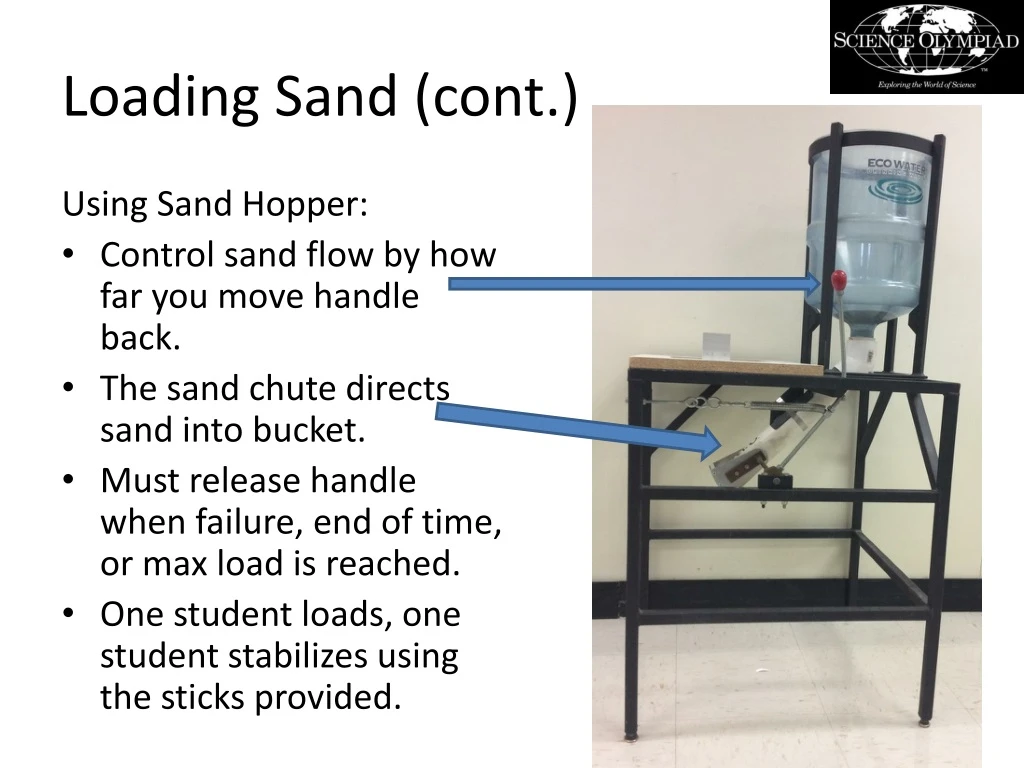
Loading Sand (cont . ). Using Sand Hopper: Control sand flow by how far you move handle back. The sand chute directs sand into bucket. Must release handle when failure, end of time, or max load is reached. One student loads, one student stabilizes using the sticks provided.

E N D
Loading Sand (cont.) Using Sand Hopper: • Control sand flow by how far you move handle back. • The sand chute directs sand into bucket. • Must release handle when failure, end of time, or max load is reached. • One student loads, one student stabilizes using the sticks provided.
Bucket Stabilization Rule 5.b. vii. • Team members must be allowed to safely and effectively stabilize the bucket from movement caused by loading of the sand. • Direct contact not allowed. • Must use stabilization sticks provided by event supervisor. • A bucket stabilization stick is made up of one piece of ½” dowel approximately 18 to 24 inches long with a spring type door stop screwed into one end. Two (2) sticks will be provided.
Bridge Scoring Score = Load Supported (g) / Mass of Bridge (g) Ties are broken by: 1. Lowest Bridge Mass 2. Widest bridge (measured at the widest point prior to loading) Load Supported includes: loading block, eye-bolt, washers, wing nuts, chain, hooks, bucket, sand Does not include: Pieces of Bridge, sand loaded after end is reached
Scoring Tiers Within each Tier, teams are ranked by highest score: • Tier 1- Bridges meeting all construction parameters and having no competition violations. • Tier 2- Bridges with one or more competition violations. • Tier 3- Bridges with construction violations or both construction and competition violations. • Tier 4- Bridges unable to be loaded for any reason (cannot cross the clear span, cannot accommodate loading block, failure to wear eye protection) must be ranked by lowest mass.
Test Stand Sand Hopper Sand Release Handle Test Base Test Supports ~15 kg of sand will be loaded into the sand hopper beforethe test.
Test Base Test base to be > 55.0 cm long x > 32.0 cm wide Clear Span Lines are lines parallel to the Center Line. • For Division B it is 17.5 cm away. • (35.0 cm total width) Opening to be ~ 20.0 cm x ~20.0 cm For Division C it is 22.5 cm away. (45.0 cm total width) Bearing Zones are the areas beyond Clear Span Lines (ex. For C Division) Bearing Zones are the areas beyond Clear Span Lines (ex. For B Division)
Test Supports Supplied by Event Supervisor. There is only 1 (one) this year. Must be 5.0 cm x 5.0 cm x 2.0 cm. Must sit on one of the 2.0 cm x 5.0 cm faces. Set up for Division C
Testing • Students place bridge on scale to measure mass to nearest 0.01 g. • Event supervisor measures bridge width prior to loading. • Students get 6 minutes to test bridge. • Students place bridge on Test Support that they set in the Bearing Zones. • Test supports must sit on a 2.0 cm x 5.0 cm face. • Students will place loading block approximately in the center of the bridge. • Students assemble the loading block assembly themselves. • Students may adjust bridge and bucket/chain assembly until they start loading . • While loading sand, students may only touch bucket with Stabilizing Sticks.
Testing • Bridge is loaded until it fails, the load is supported by something other than the bridge, the end supported by the Test Support touches the testing surface, or time has elapsed. • If sand is loaded after failure, the Event Supervisor must remove the extra sand. • Parts of the bridge that fall into the bucket must be removed prior to weighing the load. • The load supported will include the sand, bucket, chain, loading block. • Maximum load recorded will be 15,000 g. • If an appeal is going to be filed, the bridge must stay with the Event Supervisor.
Event Considerations • Bridge Types • Wood • Glue • Building Tips • Testing Day
Beam Bridge • Direct descendant of the log bridge. Same as many interstate overpasses • In structural terms, the simplest of the many bridge types • May be heavier than other bridge designs
Truss Bridge • Composed of connected elements (typically straight) • Oldest types of modern bridges. • Efficient use of materials
Arch Bridge • Efficient use of materials • Need to stabilize
Web Design Support Have students check out the Building Big web site at: http://www.buildingbig.com Design your own bridge at: http://www.jhu.edu/~virtlab/bridge/bridge.htm http://www.jhu.edu/~virtlab/bridge/truss.htm And have them try the following: http://www.pbs.org/wgbh/buildingbig/lab/forces.html
Wood, Part 1 • All parts of the Bridge must be made of wood and bonded by adhesive. • No limits to sizes of cross section or length • No other materials are permitted: no particle board, wood composites, bamboo, grass, commercial plywood, sawdust-adhesive members, paper price labels, or paper. • Check for grain defects, cuts, chips, other damage.
Wood, Part 2 • Consider laminating thin layers of wood to take advantage of multiple wood grains but REMEMBER that glue is heavy. • Unlimited lamination by students is allowed. • Check like-size wood pieces for consistency of density, especially balsa. • Use wood of higher density in compression applications
Wood, Part 3 Balsa, strongest wood, pound for pound! STRENGTH OF BALSA WOOD COMPARED TO OTHER WOODS Weight Stiffness Bending Compression Species Lbs./Cu. Ft. Strength Strength Strength Balsa 8 72 70 75 Balsa 10 100 100 100 Balsa 14 156 161 149 Spruce 28 230 260 289 Yellow Pine 28 222 277 288 Douglas Fir 30 241 291 341 Hickory 50 379 638 514 Oak 48 295 430 366 Basswood 26 261 288 288 Black Walnut 37 301 506 512 NOTE ABOUT CHART: The strength of balsa varies in direct relation to its density or weight - the heavier the wood the stronger it is. The above chart was designed with 10 lb./cu. ft. balsa as the median. In other words, balsa at IO Ibs./cu. ft. has been tested given a value of 100. The other woods were then tested in the same way and given a figure that is numerically in proportion. By comparing the relative strength figures in the chart, it will be seen that balsa is as strong or stronger, pound for pound, than most of the species shown.