Download
1 / 60
630 likes | 679 Views
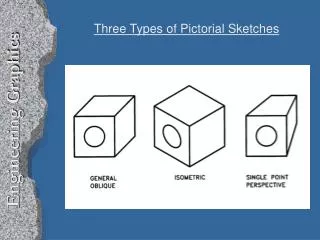
Engineering Graphics, Class 5 Geometric Construction. Basic Geometric Elements - Points. A point: Represents a location in space or on a drawing and has no width, height, or depth.

E N D
Basic Geometric Elements - Points A point: Represents a location in space or on a drawing and has no width, height, or depth. A point is represented by the intersection of 2-lines, a short crossbar on a line, or by a small cross.
Basic Geometric Elements - Lines A line is defined by Euclid as “ That which has length without breadth" A straight line is the shortest distance between two points and is commonly referred to simply as a “line” If the line is indefinite in extent, the length is a matter of convenience, and the end points are not fixed If the end points are significant, they must be marked by means of small mechanically drawn crossbars. Horizontal lines have constant distance from the lower edge of the drawing sheet, vertical lines have constant distance from the right side and left side edges of the sheet.
Basic Geometric Elements - Lines Straight lines or curved lines are parallel if the shortest distance between them remains constant. The symbol means parallel lines. 2-perpendicular lines might be marked with a box to indicate perpendicularity, the symbol ⊥ means perpendicular lines. The symbols and ⊥ and might be used on sketches, but not on production drawings. Other common forms of lines are arcs and free curves.
Basic Geometric Elements - Angles An angle is formed by two intersecting lines. The symbol ,, < means an angle. There are 360º in a full circle. A degree is divided into 60 minutes, 60'. A minute is divided into 60 seconds, 60". 27º 30' 17" is read 27 degrees, 30 minutes and 17 seconds When minutes are alone indicated the number of minutes should be preceded by 0º. e.g., 0º 30'.
Basic Geometric Elements - Angles 2-Angles are Complementary if they total 90º. 2-Angles are Supplementary if they total 180º.
Geometric Construction - Triangles A triangle is a plane figure bounded by three straight sides. The sum of the interior angles is always Any triangle inscribed in a semicircle is a right triangle if the hypotenuse coincides with the diameter.
Geometric Construction - Quadrilaterals A quadrilateral is a plane figure bounded by 4-straight sides. If the opposite sides are parallel, the quadrilateral is also called parallelogram
Geometric Construction - Polygons A polygon is any plane figure bounded by straight lines. Regular Polygons have equal sides and angles Regular Polygons can be inscribed in or circumscribed around a circle.
Geometric Construction - Circles & Arcs A circle is a closed curve with all points at the same distance from a point called the center Circumference is referred to the circle or to the distance around the circle. Circumference = Diameter x π
Geometric Construction - Polyhedra A polyhedron is a solids bounded that is bounded by plane surfaces. These surfaces are called faces A regular Polyhedron is a solid with faces equal a regular polygon
Geometric Construction - Polyhedra - Prisms A prism is a polyhedron with two parallel equal polygon bases, three or more lateral faces, which are parallelograms. If the bases are parallelograms, then the prism is called parallelepiped If one end is cut off to form an end and not parallel to the bases, the prism is said to be truncated
Geometric Construction - Polyhedra - Pyramids A pyramid is a polyhedron with a polygon for a base and triangular lateral faces intersecting at a common point called the vertex. If a portion near the vertex has been cut off, the pyramid is truncated, or it is referred to as a frustum
Geometric Construction - Cylinders A cylinder is a solid generated by a straight line, called the generatrix, moving in contact with a curved line and always remaining parallel to its original position or to the axis. Each position of the generatrix is called element
Geometric Construction - Cones A cone is a solid that is generated by a straight line moving in contact with a curved line and passing through a fixed point, the vertex of the cone. Each position of the generatrix is called element
Geometric Construction - Spheres A sphere is a solid that is generated by a circle revolving about one of its diameters. The diameter becomes the axis of the sphere. The ends of the axis are poles.
Bisecting a line or a circular arc From A & B draw equal arcs with radius greater than half AB Join the intersections D & E with a straight line to locate the midpoint.
Bisecting a line with a triangle & T-Square From endpoints A & B, draw construction lines at 30, 45, or 60 degrees with the given line. Then through their intersection, C, draw a line perpendicular to the given line to locate the center C
Bisecting an angle Angle BAC is to be bisected Strike large arc R From intersection points C & B, strike equal arcs r with radius slightly larger than half BC, to intersect at D Draw line AD, which bisect the angle
Transferring an angle Angle BAC is to be transferred to the new position A' B' Use any convenient radius R, and strike arcs from centers A and A' Strike equal arcs r, and draw side A' C'
Drawing a line through a point and perpendicular to a line When the point P is not on the line AB Method (a) Draw from P any convenient inclined line as PD. Find the midpoint C of line PD. Draw arc with radius CP. The line EP is the required perpendicular. Method (b) With P as center, strike an arc to intersect AB at C and D. With C and D as centers, and with a radius slightly greater than half CD, strike arcs to intersect at E. The line PE is the required perpendicular.
Drawing a line through a point and perpendicular to a line When the point P is on the line AB Method (a) With P as center and any radius, strike arcs to intersect AB at D and G. With D and G as centers, and radius slightly greater than half DG, strike equal arcs to intersect at F. The line PF is the required perpendicular. Method (b) Select any convenient unit of length, for example 5 mm. With P as center, and 3 units as radius, strike an arc to intersect the given line at C. With P as center, and 4 units as radius, strike arc DE With C as center, and 5 units as radius, strike an arc to intersect DE at F. The line PF is the required perpendicular.
Drawing a line through a point and perpendicular to a line Whether P is on or off line AB Method (c) Preferred Method Move the triangle and T-square as a until one leg of the triangle lines up with AB. Slide the triangle on the T- square until its other leg passes the through the point P, and draw the required perpindicular.
Drawing a triangle with sides given Draw one side, as C, in desired position, and strike arc with radius equal to side A. Strike arc with radius equal to side B. Draw side A and B from intersection of arcs, as shown in III.
Drawing a right triangle with hypotenuse and one side given Given sides S and R, with AB as a diameter equal to S, draw a semicircle. With A as a center and R as a radius, draw an arc intersecting the semicircle at C. Draw AC and CB to complete the right triangle
Drawing a right triangle with hypotenuse and one side given Many angles can be laid out directly with the triangles or with the protractor Tangent method relies on tangent tables. Sine method and chord method rely on sine tables.
Laying out an angle Many angles can be laid out directly with the triangles or with the protractor Tangent method relies on tangent tables. Sine method and chord method rely on sine tables.
Drawing an equilateral triangle By a compass By a 30º - 60º triangle
Drawing a circle tangent to a line at a given point At P, erect a perpendicular to the line Set off the radius of the required circle on the perpendicular Draw a circle with radius CP
Drawing tangents to two circles Move the triangle and T-square as a unit until one side of the triangle is tangent, by inspection, to the two circles. Then slide the triangle until the other side passes through the center of one circle, and lightly mark the point of tangency. Then slide the triangle until the slide passes through the center of the other circle, and mark the point of tangency. Finally, slide the triangle back to the tangent position, and draw the tangent lines between the two points of tangency. Draw the second tangent line in a similar manner
Drawing an arc tangent to two lines at acute or obtuse angles
Conic Sections A cone is generated by a straight line moving in contact with a curved line and passing through a fixed point, the vertex of the cone. This line is called the generatrix. Each position of the generatrix is called element The axis is the center line from the center of the base to the vertex
Conic Sections Conic sections are curves produced by planes intersecting a right circular cone. 4-types of curves are produced: circle, ellipse, parabola, and hyperbola. A circle is generated by a plane perpendicular to the axis of the cone. A parabola is generated by a plane parallel to the elements of the cone. An ellipse is generated by planes between those perpendicular to the axis of the cone and those parallel to the element of the cone. A hyperbola is generated by a planes between those parallel to the element of the cone and those parallel to the axis of the cone.
Drawing an ellipse by the pin and string method. An ellipse can be generated by a point moving such that the sum of its distances from two points (the foci) is constant. This property is the basis of the pin and string method for generating the ellipse. An ellipse may be constructed by placing a looped string around the foci points and around one of the minor axis end points, and moving the pencil along its maximum orbit while the string is kept taut. The long axis is called the major axis & the short axis is called the minor axis. The length of the major axis is equal to the constant distance from the foci of the ellipse.
Finding the Foci points of an ellipse The foci points are found by striking arcs with radius equal to half the major axis & with center at the end of the minor axis (point C or D)
Drawing an ellipse by the four-center method Given major and minor axes, AB and CD, draw line AD connecting the end points as shown. Mark off DE equal to the difference between the axes AO - DO. Draw perpendicular bisector to AE, and extend it to intersect the major axis at K and the minor axis extended at H. Mark off OM equal to OK, and OL equal to OH. The points H, K, L and M are the centers of the required arcs. Using the centers, draw arcs as shown. The four circular arcs thus drawn meet in common points of tangency P at the ends of their radii in their lines of centers.
Drawing an ellipse by the concentric circles method. If a circle is viewed at an angle, it will appear as an ellipse. This is the basis for the concentric circles method for drawing an ellipse. Draw two circles with the major and minor axes as diameters. Draw any diagonal XX to the large circle through the center O, and find its intersections HH with the small circle. From the point X, draw line XZ parallel to the minor axis, and from the point H, draw the line HE, parallel to the major axis. Point E is a point on the ellipse. Repeat for another diagonal line XX to obtain a smooth and symmetrical ellipse.