Download
1 / 15
190 likes | 621 Views
The Vibrating String. During the last lab you explored the superposition of waves. When two waves or more occupy the same region of a medium at the same time, they will interfere with each other.

E N D
During the last lab you explored the superposition of waves. • When two waves or more occupy the same region of a medium at the same time, they will interfere with each other. • In the last lab you learned about constructive interference, destructive interference, and partially constructive interference. • Today you will continue to study interference by looking at standing waves on a string.
Standing Waves When two sets of waves of equal amplitude and wavelength pass through each other in opposite directions, it is possible to create an interference pattern that looks like a wave that is “standing still.” It is a changing interference pattern. Today you will create such patterns on a vibrating string.
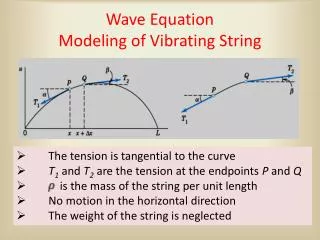
Parameters of a Standing Wave There is no vibration at a node. There is maximum vibration at an antinode. l is twice the distance between successive nodes or successive antinotes. l
When you pluck a stringed musical instrument, the string vibration is composed of several different standing waves. • The lowest frequency carried by the string is called the first harmonic. • Its standing wave pattern looks like this. First Harmonic Fundamental • This frequency is also called the fundamental.
The next higher frequency standing wave pattern looks like the following. Second Harmonic First Overtone • Since this frequency is twice the first harmonic, it is referred to as the second harmonic. • Since this frequency is the next higher frequency appearing on the string, it is called the first overtone. (It is the first tone above the fundamental.)
The next higher frequency standing wave pattern looks like the following. Third Harmonic Second Overtone • Since this frequency is three times the first harmonic, it is referred to as the third harmonic. • Since this frequency is the next higher frequency appearing on the string, it is called the second overtone. (It is the second tone above the fundamental.)
In the experiment today you will adjust the tension in a vibrating string so that you create different standing wave patterns. (Adjusting the tension in the string changes the speed of the wave.) • Important Note: The frequency of vibration on your string will remain constant. By changing the wave speed you will be changing the wavelength and therefore the harmonic number of the standing wave.
First Harmonic Fundamental To show this let’s put a first harmonic on the string.
Second Harmonic First Overtone Next let’s loosen the string which will slow the wave down yielding a shorter wavelength.
Third Harmonic Second Overtone Loosening the string some more results in an even shorter wavelength.
Thus your frequency of vibration will be a first harmonic for a high tension in the string and different harmonics for lesser tensions.
Note that a more accurate method of obtaining the frequency of a standing wave on a string could be accomplished by using a strobe light to make the wave appear to be “standing still.” • All you would have to do is read the frequency from the variable frequency strobe light.
The lab assistant will now give you an overview of the experimental apparatus The electric oscillator is located here. Masses are added here. When the apparatus is turned on and with the proper mass on the hanger, standing waves can occur. This is considered to be one segment. Points of no vibration are called nodes. Three are shown here. (Where are they?) The large vibration areas are called antinodes. Antinodes Node One Segment Electric Oscillator Hanger and Masses
By varying the mass on the mass hanger one can create standing waves with differing numbers of segments.