Download

1 / 48
490 likes | 659 Views
Spring Semester, 2010. Ubiquitous Computing Practice - Part I (Introduction, NesC) -. Laboratory of Intelligent Networks @ KUT ( http://link.kut.ac.kr ) Heon-jong Lee. Application. Customer. API. Security 32- / 64- / 128-bit encryption. Zigbee Alliance. Network

E N D
Spring Semester, 2010 Ubiquitous Computing Practice- Part I (Introduction, NesC) - Laboratory of Intelligent Networks@ KUT (http://link.kut.ac.kr) Heon-jong Lee
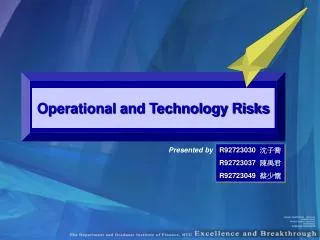
Application Customer API Security 32- / 64- / 128-bit encryption Zigbee Alliance Network Star / Mesh / Cluster-Tree MAC IEEE 802.15.4 PHY 868MHz / 915MHz / 2.4GHz Stack Silicon App Zigbee 802.15.4 - radio hardware 사용법 - RF channel and signaling protocol Zigbee - 802.15.4 의 상위 layer 정의 - 디바이스 간 통신 프로토콜 정의
Hanback ZigbeX • Computing • ATmega128L microcontroller • 128KB Flash program memory • 4KB SRAM, 10bit ADC • Radio Transceiver • Ti(Chipcon)사의 CC2420 • Radio range: 130m (30m) • Data rate: 250 Kbits/sec • Frequency range: 2.4 GHz (ISM)
옵션 장비들 기상 보드 릴레이 보드 홈 보드 GPS 블루투스 보드 모터 제어보드 LCD 보드 초음파 보드
Cygwin 설치(1) • Cygwin • Windows용 리눅스 에뮬레이션 • Cygwin-1.2a.tgz 다운로드(cygwin-1.2a.tgz) • Windows login id는 공백이 없는 영문이어야 함 • 본 자료에서는 c:\cygwin에 설치함 • Setup.exe 실행
미리 설치된 Cygwin 삭제 • 시작 -> 설정 -> 제어판 -> 프로그램추가/제거 -> Cygwin이나 TinyOS 삭제 • 시작 -> 실행 -> regedit -> HKEY_CURRENT_USER-> Software -> cygnus Solutions 삭제 • 시작 -> 실행 -> regedit-> HKEY_LOCAL_MACHINE-> Software -> cygnus Solutions 삭제 • Cygwin 폴더 삭제
Cygwin 설치(3) Default 로설치함
Cygwin 설치(4) • 처음 cygwin을 실행했을 때의 화면
TinyOS2X 및 ZigbeX 프로그램 설치 • TinyOS and ZigbeX program • 다운로드(Hanback_TinyOS2X.zip) • 압축 푼 후 \Install_TinyOS2X 폴더에 있는 Install_TinyOS2X.sh 와 Install_TinyOS2X.zip을 c:\cygwin\opt\ 에 복사(폴더가 없으면 생성) • Cygwin 실행 후 다음 명령어 수행 • cygwin을 종료하고 압축 푼 폴더\bin의 5개 dll 파일을 c:\cygwin\bin에 덮어쓰기 함 $ cd /opt $./Install_TinyOS2X.sh
Graphviz 설치 • Graphviz • 그래픽 기반 자바 애플리케이션(make docs 명령) 실행 위한 프로그램 • 전 장의 압축 푼 폴더\Tools\graphviz-2.12.exe 실행하여 설치 • TinyOS2.X가 설치된 폴더
Download 프로그램 설치(1) • USB-ISP • Cygwin의 TinyOS 를 통해 원하는 USN 애플리케이션을 컴파일 후 컴파일 된 결과를 실제 센서 노드에 포팅(다운로드)하기 위한 보드 • 두개의 스위치 존재(ISP/UART) • ISP(In System Programming) • 프로그램(다운로드) 기능 • UART • 시리얼통신 기능
Download 프로그램 설치(2) • 다운로드 (USB_ISP.zip) 후 CMD2.00.00.zip을 압축 품 • USB-ISP 보드와 ZigbeX를 결합한 후 PC의 USB 포트와 연결하여 새 하드웨어 검색창이 뜨면 CMD2.00.00.zip 파일이 풀린 폴더를 선택(2번 설치됨) • AVR Studio • 압축 푼 폴더(또는 http://www.atmel.com다운)에서 1. AVR studio 4.12(build 460) 설치 후 • 2. AVR studio 4.12 Service Pack 4(build 498) 설치(서비스팩)
Download 프로그램 설치(3) • 첫 화면은 cancel누름 • Tools->Program AVR->Auto Connect 이용(장치관리자를 통해 포트를 확인하고 connect 이용가능) • 아래그림과 같이 나온다면모든 설치 성공!
TinyOS • TinyOS • 미국 UC Berkeley 대학에서 개발된 무선 센서 네트워크를 위한 전용 운영체제 • 무선 센서 노드의 일반적인 특징(최소한의 하드웨어, 작은 메모리, 낮은 CPU 성능, 한정된 에너지)을 고려하여 설계된 운영체제 • 클래스 형태의 컴포넌트 구조를 갖는 nesC로 구현됨 • Event driven 기반 • 단일 스택, 커널 없음, 동적 메모리 관리 없음 • 사용하지 않는 CPU 사이클 동안 Sleep 상태로 들어가 불필요한 전력소모 줄임(“Hurry up and Sleep”) • 함수 단위의 task, 비선점형 FIFO 스케줄링
TinyOS Process Categories • Event • Time Critical • Interrupts cause Event (Timer, Sensors) • Small / short duration • Suspend Tasks • Task • Time Flexible • Run sequentially by TOS Scheduler • Run to completion • Interruptible
TinyOS 디렉토리 구조 하드웨어 칩셋과 관련된 컴포넌트들이 모인 폴더 여러 종류의interface 선언 파일들이 모인폴더 다양한high level 라이브러리들이 모인 폴더 센싱과 관련된 컴포넌트들이 모인 폴더 일반적이고 다양한 커널 컴포넌트 및 몇 개의 유틸리티 하드웨어 플랫폼에 관련된 컴포넌트들이 모인 폴더
NesC • nesC(networked embedded systems C) • TinyOS의 실행 모델과 구조적 개념을 표현하기 위하여 C언어를 확장하여 만든 새로운 언어 • 여러개의 컴포넌트 블록(block)들을 연결하여 하나의 애플리케이션 형태로 조합
Interface(1) • Interface • Provider와 user component를 연결하는 port 역할 • Command와 event타입의함수로 정의 interface identifier { command result_t funtion_name( … ); event result_t funtion_name( … ); }
Interface(2) • 예) TimerMilliC component의 interface인 Timer interface Timer<precision_tag> { // 밀리초 단위의 시간마다 주기적으로 알려주도록 설정하는 함수 command void startPeriodic(uint32_t dt); // 밀리초 단위의 시간 후에 한 번만 알려주도록 설정하는 함수 command void startOneShot(uint32_t dt); // 설정한 시간을 취소하는 함수 command void stop(); // 시간이 만기되었음을 알려주는 함수 event void fired(); … } BlinkTimerM component command event interface TimerMilliC component
Interface(3) • Interface 종류 • Read.nc ADC 인터페이스 • I2CPacket.nc I2C버스 프로토콜 인터페이스 • Leds.nc LED 추출 인터페이스 • LogWrite.nc 저장장치에 logging 데이터 위한인터페이스 • Radio.nc 무선 하드웨어를 위한 비트 레벨인터페이스 • Send.nc 일반적 메시지 인터페이스 수신 • Receive.nc 일반적 메시지 인터페이스 송신 • Timer.nc 일반적 타이머 제어 인터페이스 • StdControl.nc 표준 component 제어 인터페이스
Component • Component • 다른 컴포넌트와의 연결에 대한 내용을 정의 • 연결에 사용할 컴포넌트를 나열하고 그들 간의 연결을 기술 • Configuration • 자신이 사용할 하위 컴포넌트들을 선언하고, 그들간의 연결을 정의한 파일 • <컴포넌트 이름>.nc 또는 <컴포넌트 이름>C.nc • Module • 자신의 구현내용을 기술하고 있는 파일 • <컴포넌트 이름>P.nc 또는 <컴포넌트 이름>M.nc
Component-configuration(1) • 예) LED를 제어하는 Leds 컴포넌트의 configuration configuration LedsC { provides { interface Leds; } } implementation { components LedsP, PlatformLedsC; Leds =LedsP; … LedsP.Led0 → PlatformLedsC.Led0; LedsP.Led1 → PlatformLedsC.Led1; LedsP.Led2 → PlatformLedsC.Led2; } 모듈 파일 실제 하드웨어적 코드 Wiring
Component-configuration(2) • LedsP.Led0 -> PlatformLedsC.Led0; • LedsP에서 사용하는 Led0 인터페이스가 PlatformLedsC의 Led0 인터페이스와 Wiring • LedsP에서 프로그래밍을 할 때 PlatformLedsC에서 제공하는 Led0 인터페이스를 호출해서 사용하겠다는 의미 • LedsP는 Led0, Led1, Led2 인터페이스 함수를 통해 PlatformLedsC에 명령을 내리고 원하는 LED 제어 • Wiring 종류: ->, <-, = • d
Component-module(1) • Module 파일 • Define how the component work • Module의 기술 방법은 다음과 같다. (두 방법 모두 같음) • module identifier { • provides { • interface a; • interface b; • } • uses { • interface x; • interface y; • } • } implementation { • ... • ... • } • module identifier { • provides interface a; • provides interface b; • uses interface x; • uses interface y; • } implementation { • ... • ... • }
C1 C2 C3 Component-module(2) • provides & uses module C1 { uses interface triangle_1; } implementation { ... } module C2 { provides interface triangle_1; uses { interface triangle_2; interface rectangle; } } implementation { ... } module C3 { provides interface triangle_2; provides interface rectangle; } implementation { ... }
Component-module(3) • 예) Leds component의 module인 LedsP.nc Module LedsP { provides { interface Init; interface Leds; } uses { interface GeneralIO as Led0; interface GeneralIO as Led1; interface GeneralIO as Led2; } implementation { //LED 하드웨어 초기화 함수 command error_t Init.init () { … return SUCCESS; } //0번 LEDOn 함수 async command void Leds.ledOn () { call Led0.clr(); } //0번 LED Off 함수 async command void Leds.led0Off(){ call Led0.set(); } //0번 LEDToggle 함수 async command void Leds.led0Toggle() { call Led0.toggle(); } … } 혼란 방지를 위해 인터페이스 이름 변경
1. Task를 이용한 LED 제어 LED component를 사용하여 LED 제어
Blink.nc configuration Blink { } implementation { components MainC, BlinkM, LedsC, BusyWaitMicroC; BlinkM.Boot -> MainC; BlinkM.Leds -> LedsC; BlinkM.BusyWait ->BusyWaitMicroC; } Blink.nc MainC (configuration) BusyWaitMicroC (module) Boot BusyWait implementation BusyWait(); BlinkM (module) LedsC (configuration) Boot Leds implementation Boot.booted(); led_task(); implementation Leds.init(); Leds.redOn(); … Leds BusyWait
configuration MainC { provides interface Boot; uses interface Init as SoftwareInit; } implementation { components PlatformC, RealMainP, TinySchedulerC; RealMainP.Scheduler -> TinySchedulerC; RealMainP.PlatformInit -> PlatformC; SoftwareInit = RealMainP.SoftwareInit; Boot = RealMainP; } MainC.nc MainC.nc MainC (configuration) TinySchedulerC (configuration) Boot Scheduler implementation Scheduler.init(); Scheduler.runNextTask(); Scheduler.taskLoop(); SoftwareInit RealMainP (module) Boot implementation main(); boot.booted(); PlatformC (configuration) SoftwareInit Scheduler PlatformInit implementation PlatformInit.init() PlatformInit
RealMainP.nc module RealMainP { provides interface Boot; uses interface Scheduler; uses interface Init as PlatformInit; uses interface Init as SoftwareInit; } implementation { int main() __attribute__ ((C, spontaneous)) { atomic { call Scheduler.init(); call PlatformInit.init(); //각종 hardware 초기화 while (call Scheduler.runNextTask()); call SoftwareInit.init(); //각 모듈에서 사용하는 변수 초기화 while (call Scheduler.runNextTask()); } __nesc_enable_interrupt(); //글로벌 인터렙트 가능하도록 설정 signal Boot.booted(); //최상위 모듈에서 booted() 이벤트 발생하도록 함 call Scheduler.taskLoop(); //task를 수행 (task 없으면 sleep) return -1; } default command error_t PlatformInit.init() { return SUCCESS; } default command error_t SoftwareInit.init() { return SUCCESS; } default event void Boot.booted() { } }
async and atomic • Commands and Events that are executed as part of a Hardware Event handler must be declared with the async keyward • Indicates that this code may execute asynchronously to Tasks and other processes. • Races are avoided by • accessing shared data exclusively within Tasks • Because Tasks can’t interrupt each other • Use atomic statement to access shared variables
기본 지식 • LedsC component • 경로: \opt\tinyos-2.x\tos\system\LedsC.nc • Leds interface 사용
Blink 예제의 구성 configuration Blink { } implementation { components MainC, BlinkM, LedsC, BusyWaitMicroC; BlinkM.Boot -> MainC; BlinkM.Leds ->LedsC; BlinkM.BusyWait ->BusyWaitMicroC; } us(10-6) 단위의 지연시간을 줌 //booted 이벤트가 발생하면 프로그램 시작 //interface Leds와 하부 component의 Leds를 연결
module BlinkM { uses { interface Boot; interface Leds; interface BusyWait<TMicro, uint16_t>; } } implementation { task void led_task(); event void Boot.booted() { post led_task(); } task void led_task() { int i; for(i = 0; i < 10; i++) { call Leds.led2On(); call BusyWait.wait(30000); call Leds.led1Toggle(); call Leds.led2Off(); } } } //시간단위를 us (TMicro), 시간 변수 형식은 uint16_t로 함 //task로 실행하고 싶은 함수는 task 키워드를 붙이고파라미터가 없는 형식의 함수를 정의해야 함 //MainC component에 의해 호출됨 // task 함수를 호출하기 위해 post 키워드 사용 //30ms 지연시간 가짐
Blink 예제 실습(1) $ cd /opt/tinyos-2.x/contrib/zigbex/Blink $ make zigbex
Blink 예제 실습(2) • USB-ISP와 ZigbeX노드를 결합 • USB-ISP mode는 ISP로 설정 • AVR Studio에서 Tools → Program AVR → Auto Connect 메뉴를 선택 • … 버튼을 눌러 Blink\build\zigbex\main.hex선택 후 Program 버튼을 눌러 프로그램함 • 프로그램 직후 led가 잠깐동안 깜박거리는 것을볼 수 있음
Blink 예제 실습(document 생성) $ cd /opt/tinyos-2.x/contrib/zigbex/Blink $ make docs zigbex
(참고) java 오류 • make zigbex 수행이 잘 되지 않을경우 • http://java.sun.com에서 jdk를 다운받아 window에 설치 • 자바 설치경로(예를 들면 C:\Program Files\Java\jdk1.6.0_10\bin)를 windows 환경변수에 추가 • 내컴퓨터->속성->고급탭-> 환경변수 -> Path에서변수 값의 맨 뒤에 ; 입력 후추가 함

![Microsoft and Cloud Computing [10 minutes] Introduction to Windows Azure [35 minutes] Research Applic](https://cdn0.slideserve.com/183416/slide1-dt.jpg)