Download
1 / 31
320 likes | 553 Views
Intro to Stage Lighting. AIMS IN LIGHTING A SHOW Source: http://www.seleconlight.com.

E N D
Intro to Stage Lighting AIMS IN LIGHTING A SHOWSource: http://www.seleconlight.com
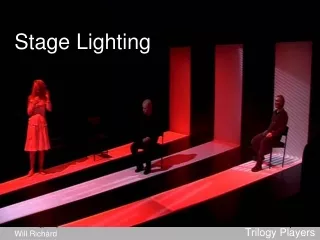
The primary function of lighting in the theatre is to make the stage picture visible, but the way in which the stage is lit will have a major impact on the way the audience perceives the stage picture and therefore the show. After the basic aim of visibility is achieved the lighting designer's aim is to reinforce the overall dramatic impact of the production.
The four general functions of stage lighting are: • Visibility • Motivation • Composition • Mood.
Visibility: • The function of providing visibility needs little further discussion except to point out that it also implies keeping light off parts of the stage that should not be seen.
Motivation: • Part of the Lighting Designer's job is to make the light look natural for the setting i.e. in a realistic night interior scene the light should appear to come from chandeliers or lamps or practicals in the set. This Motivation must be maintained even if the setting is non-realistic. In such productions the light must be appropriate to the play's context.
Composition: • This function of lighting is also a part of Scenic Design. Composition is the Lighting Designer's attempt to enhance the possibilities the Scenic Designer has provided and that the Director has provided in blocking. In other words lighting the actors and set in proportion and where and when necessary.
Mood: • Though a separate function the enhancement of mood is also a part of the other three. Composition, motivation and the amount of light and kind of visibility all affect the mood of a production.
In performing the four functions of stage lighting the Designer works with four basic controllable properties of light: • Intensity • Distribution • Color • Movement
Intensity:Simply refers to the brightness of light. Distribution:This includes not only the way the light is distributed around the stage but also the direction from which the light reaches the stage.
Color: • Color is easy to change by simply putting a piece of colored plastic in the beam light, but effective use of color is one of the most challenging aspects of stage lighting.
Movement: • This means either a physical movement of a beam of light or a change in any of the other three. • There is any number of methods of lighting the stage but all are based on the general principles of illumination -
There must be enough light to perceive color, texture and some amount of detail • The light must be as directional as is necessary to perceive form (shape) • Objects of prime interest must be clearly distinct from, and somewhat brighter than the background against which they are seen
Lighting Designers usually treat the lighting for Actors separately from the lighting for the Set. The Actor is the center of interest. Even in tragic or highly dramatic scenes the actor should be distinct from the background, and all aspects of his form should be clearly visible.
To ensure good lighting for the actor, most lighting is designed as a group of acting areas. The luminaires lighting the acting area are distributed to achieve the desired visibility, to adequately reveal the actor's form and to make sure the actor appears separate and distinct from the scenic background.
Each area can be lit from a combination of: Overheads:Called Toplight or Keylight. From above and in front, angled to about 45°. Fill:From the front, eyes and teeth lights. Makes objects look flat.
Sidelight:Used to sculpt the body. Major use in dance or musicals. High sidelight from the use of lighting bars or ladders or booms. Low sidelight often on the floor and called "Shinbusters". Backlight:From above and behind. Gives dimension to objects. Can be angled in from the side to provide Motivation or for colored shadow effects on the stage floor.
Lighting the Actor • Normally aim for two or more luminaires for each area, from the front. Visibility is the primary aim.
Lighting the Show (a simple approach) • Decide where the acting areas are and cover these. Choose angles carefully making sure adjacent areas will blend together properly with no dead spots. • Decide on the "Motivating Light" i.e. light from a source - sun, moon, room lights, candle etc. Add extra lights to produce the appropriate effect.
Think about any other needed Effects or Specials e.g. strong backlight, sidelight, specially lit areas spots, light through trees etc.
The Design Process • Read the script, noting relevant stage directions and your thoughts (if a musical, listen to the score). After getting copies of the Set Design (plan and elevation) meet with the Director and discuss the requirements and your ideas.
Watch rehearsals noting acting areas and specials needed • Check Set and Costume colors and decide on your color palette. Rough out the plan. Check costings for Hire Equipment and Consumables (gel, tape, gobos etc). • Draw up the plan and associated paperwork: Instrument schedule (bar plots) • Instrument lists • Color cut lists • Dimmer hook-up schedule • Channel assignments (soft patch sheets) • Focus notes • Cheat sheet
If you are also the Head Electrician, then before Load In: • Calculate dimmer loadings and main power feed requirements • Calculate cable runs and cable requirements • Check hanging positions, pipes, clamps etc with Head Mechanist • Order Hire Equipment, gel etc. • Pre-cut and frame up gel • Check iris', gobo holders etc.
Load In • Allow 15 minutes per luminaire for rigging, colouring, patching and focusing. • e.g. 100 x luminaires x 15min each = 25 man-hours. • So, a 100 luminaire rig would take 4 people 8 hours to set up (excluding rigging hanging positions and flying the rig). It is usual to start rigging Onstage so as to clear the stage as quickly as possible to allow the Mechanists to start on the Set.
A suggested order for rigging • Place luminaires on the bar, all hookclamps on one side of the bar • Check spacing with the plan, use a tape measure and scale rule if necessary • Point the luminaire in its intended direction. This will show up any potential spacing problems • Spot the luminaire down. This helps when flashing through the rig and when focusing • Tighten the hookclamp, secure safety chain • Make sure luminaire has its accessories: gel, iris, barndoor, gobo etc and that the shutters are out and the barndoors are open
Cable the bar ensuring there is enough cable on each fitting for focusing • Tape the cables on to the bar. Do not coil the cable on the bar • Plug each cable into a live socket to check the lamps and cables are OK and that any pairing of the bar is correct • Ensure the Instrument Schedules are written up • Fly the bar, after attaching a tape measure (if necessary) to set the Trim (dead) • Fly out the Electric • Patch up the Electric to the House Waylines or straight into the dimmers, noting numbers on the Instrument Schedule
From the Instrument Schedule the Head Electrician or Board Operator will produce the dimmer joseph0195.jpeghook-up schedule and the Channel Assignment sheets so the Softpatch can be put into the desk.
Flash through the rig on the desk to confirm the Softpatch is right and that each channel has the correct lights and gel etc on it.
Focusing is best done when the Set is complete and painted and is easiest with three or four people - a board operator, a focuser, the designer on stage to give instructions and a 'gopher' to carry the ladder and fetch things.
Bring the next luminaire up before fading the previous one • Total blackout is dangerous. Focus luminaires at 70 / 80% power, moving a luminaire at full power can blow the lamp • The focuser needs a spanner for luminaires that are stuck • Turn the luminaire off and allow it to cool before attempting anything violent • A luminaire should be spotted down so you can see the centre of the beam clearly
Make sure that the luminaire covers the desired area - remember that actors come in various heights, and have a nasty tendency to move around • Facing away from the light, give clear instructions to the focuser. Once the luminaire is in place, it should be firmly locked off • It may be useful to compare the luminaire with others, to check the coverage is smooth
Plotting can take a very long time. From your notes you will have some idea of the number of Cues in the show. On average you will be able to plot between 6 and 8 cues per hour.