Download

1 / 23
230 likes | 348 Views
Online Tour Permits. The how to portion. How to establish access to the online tour permits. Go to www.scouting.org Click on LOG IN. Creating a New Account.

E N D
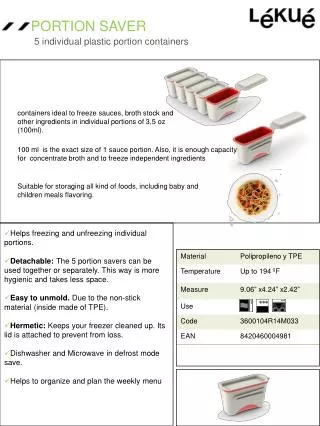
Online Tour Permits The how to portion
How to establish access to the online tour permits Go to www.scouting.org Click on LOG IN
If you are a first time user of www.scouting.org then you will need to create a new account by choosing this option and creating a unique username & password.
Once you have chosen your username and password you will be asked to enter your full name email address You will also need to enter the Council name: GOLDEN EMPIRE COUNCIL SACRAMENTO CA #047 And your BSA ID# without this number you WILL NOT have access to The online tour permits. It is located at the bottom of Your membership card & should look like this: (047 x xxxxxxxxx)
Signing in..IF YOU ALREADY HAVE A USERNAMD AND PASSWORD YOU CAN JUST SIGN IN BELOW..
If you have done everything correctly once you are at this screen, look on the left under “UNIT TOOLS” you should see “TOUR PERMITS”
Online tour permit access has been given to ALL registered members of each unit with the exception of: ◊ Institutional Head (IH) ◊ Scout Parent (PS) ◊ Tiger Cub Adult Partner (AP)
In order to “CREATE” a permit you need to select the unit that you are registered with (if you are registered in multiple units) and click on “CREATE”
Enter the name of the tour then “CREATE PERMIT” There will be a pop up box that says “ tour permit local” and tour name. All you do is click “OK” then you will be asked if you want to create this permit.
Entering Vehicle Information
When entering the vehicle information it is not necessary to enter the vehicle information of a parent that will be Transporting their own scout. Once the information is entered you will not have to enter it every time you create a permit so it is advisable to enter ALL vehicle information for the registered members of the unit. One thing to ALWAYS remember is each time you enter data and you save it click “UPDATE MY PERMIT”
DON’T FORGET UPDATE PERMIT It is my recommendation that you enter all of the trained registered adults that are on your roster into the BSA training area of the permit. By doing this you will not have to try and locate someone that may have the specific training that you need to go on your outings. This also applies to the NON-BSA training. FYI:YOUTH PROTECTION, CLIMB ON SAFELY, SAFE SWIM DEFENSE, & SAFETY AFLOAT EXPIRES EVERY 2 YEARS.
Step 1This is 1 of the MOST IMPORTANT steps in the Tour Permit process. In order to enter the necessary Information regarding your Outing you MUST 1st click on “EDIT TOUR INFORMATION”
Step 1(cont) This is the step where you enter All of the information pertaining to Your outing. The most common Mistake that most people make is Forgetting to check the “PARENTS APPROVAL BOX” The only units that have outside Insurance are the LDS units, as for the traditional units the council provides for you guys so make sure that you check this box. The earliest departure date should be 2wks away from the date that the permit is filed but things happen and that is not always the case. So you can still file the permit if it is 2-3 days away.
Step 1(cont) Once you have entered all of the necessary information for the outing click “SAVE” REQUIRED LEADERSHIP Every outing NEEDS a TOUR LEADER (21+) & an ASSISTANT TOUR LEADER. (18+) with 2 different email Addresses. Click edit leadership Information to Begin entering their Information.
Step 2TRIP POLICY CERTIFICATION Trip Policy Certifications: We agree to comply with the following trip policies. Please check each box to show agreement with the policy and read the statements on Our Pledge of Performance and Transportation Guidelines. You may also click the links to view and print the documents. Once the boxes are checked to show your agreement, click the Save button at the bottom of the page. DON’T FORGET UPDATE PERMIT
Step 3TRAVEL ITINERARY/VEHICLE SELECTION Travel Itinerary: Make sure that you enter the primary mode of transportation If the scouts will be traveling with their parents then there is no need to include Their information on the permit. Vehicle ownership information: This is where all the vehicle information that you entered should appear. This is also where you select the drivers that will be transporting scouts in addition to their own. If there are several pages you will need to choose the page number in order to choose the additional drivers. After making your vehicle selections make sure That you “SAVE TRANSPORTATION” Information DON’T FORGET TO UPDATE PERMIT
Step 4SELECTING BSA & NON BSA TRAINING Select BSA & NON-BSA Training: This is where you select the members of your unit that have the required training for your specific activity. Once you have made your Selection click “SAVE BSA TRAINING” & UPDATE MY PERMIT FYI: Youth Protection & Hazardous Weather training are REQUIRED on ALL activities.
Once you have entered ALL the information on your permit then go to the top of the screen and click “SUBMIT” if you have entered everything correctly this is the only warning that you should have. If there are other warnings then you might want to go back and fix those before you submit the permit. Once those errors are fixed you can click on “OK” After clicking “OK another box will appear asking “if you are ready to submit this permit” If you are then click “OK” and if there are some corrections that need to be made then click “CANCEL” and go back and make those corrections and repeat this last step.
CONGRATULATIONS YOU HAVE SUBMITTED YOUR TOUR PEMIT!!!! IF YOU HAVE FURTHER QUESTIONS GIVE ME CALL AT THE COUNCIL OFFICE M-F 9AM – 5PM LACRISHA (916) 929-1417 OR (800) 427-1417