Download
1 / 9
120 likes | 378 Views
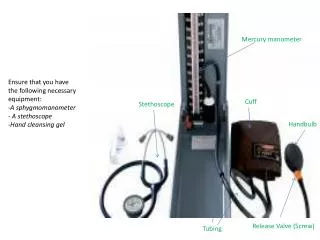
Mercury manometer. Ensure that you have the following necessary equipment: - A sphygmomanometer - A stethoscope -Hand cleansing gel. Cuff. Stethoscope. Handbulb. Release Valve (Screw). Tubing. Types of Sphygmomanometer. Aneroid Sphygmomanometer. Mercury Sphygmomanometer.

E N D
Mercury manometer Ensure that you have the following necessary equipment:-A sphygmomanometer- A stethoscope-Hand cleansing gel Cuff Stethoscope Handbulb Release Valve (Screw) Tubing
Types of Sphygmomanometer Aneroid Sphygmomanometer Mercury Sphygmomanometer Electronic Sphygmomanometer
Ensure you introduce yourself to the patient, explain the procedure answering any questions they may have, and ask for their consent. You should also explain to them that they may feel some discomfort as you inflate the cuff, but that this will be short-lived. Make sure they are sitting comfortably, with their arm rested.
As with all clinical procedures, it is vital that you first wash your hands with alcohol cleanser and allow to dry
Ensure that you have selected the correct cuff size for your patient. A different cuff size may be required for obese patients or children
Wrap the cuff around the patient’s upper arm ensuring the arrow is in line with the brachial artery. This should be determined by feeling the brachial pulse
Determine a rough value for the systolic blood pressure. This can be done by palpating the brachial or radial pulse and inflating the cuff until the pulse can no longer be felt. The reading at this point should be noted and the cuff deflated
Now that you have a rough value, the true value can be measured. Place the diaphragm of your stethoscope over the brachial artery and re-inflate the cuff to 20-30 mmHg higher than the estimated value taken before. Then deflate the cuff at 2-3 mmHg per second until you hear the firstKorotkoff sound– this is the systolic blood pressure. Continue to deflate the cuff until the sounds disappear, the 5th Korotokoff sound – this is the diastolic blood pressure
If the blood pressure is greater than 140/90, you should wait for 1 minute and re-check. Finally, you should inform the patient of their reading, and thank them