Download
1 / 6
60 likes | 221 Views
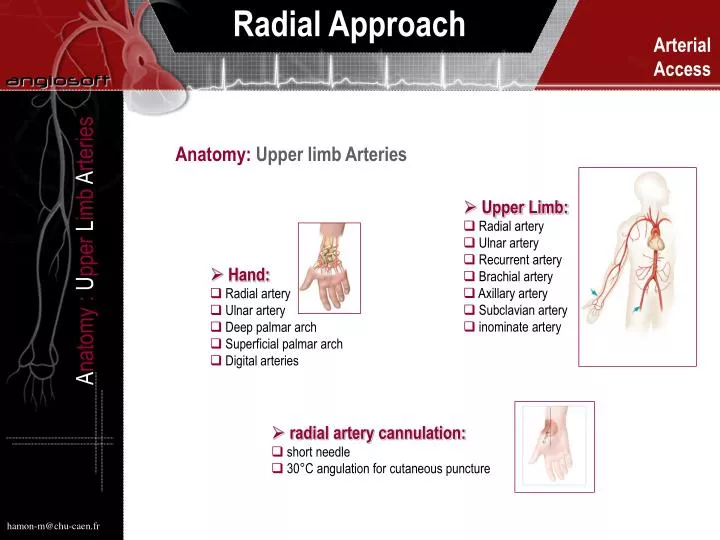
Anatomy: Upper limb Arteries. Upper Limb: Radial artery Ulnar artery Recurrent artery Brachial artery Axillary artery Subclavian artery inominate artery. A natomy : U pper L imb A rteries. Hand: Radial artery Ulnar artery Deep palmar arch Superficial palmar arch

E N D
Anatomy: Upper limb Arteries • Upper Limb: • Radial artery • Ulnar artery • Recurrent artery • Brachial artery • Axillary artery • Subclavian artery • inominate artery Anatomy : Upper Limb Arteries • Hand: • Radial artery • Ulnar artery • Deep palmar arch • Superficial palmar arch • Digital arteries • radial artery cannulation: • short needle • 30°C angulation for cutaneous puncture hamon-m@chu-caen.fr
Patient Selection: Allen Test Patient Selection : Allen Test • To assess contribution of radial and ulnar arteries in blood supplyof hand: make chenked fist and occlude both radial and ulnar arteries. When fist is open skin is pale, colour should return rapidly on release ofvulnar artery as shown in the above figures. An obvious delay after releasing ulnar artery indicates that the radial aretry is dominant and that procedures that Might damage the radial artery (eg cannulation) should be avoided. • Alternative to the Allen test:: Oxymeter Only radial artery compression No significative variation
Right Transradial Approach Right Transradial Approach • A table extension is required for the upper limb installation. Right trans-radial approach allows the operator to work in conditions very closed to the traditional femoral access site.Different steps of patient installation are depicted in the above figures. Note that for the arterial puncture the arm is in abduction and as soon as the sheath is placed in the artery the articulated extension of the table makes possible to put the arm along the body.
Materials and Medications 5F short radial sheath xylocaïne Isoptine 5mg Materials And Medications • Different materials are now available for the arterial puncture. Since the usage of verapamil for arterial spasm prevention short sheaths are most frequently used and easy to retrieve at the end of the procedure. • Spasmolytic coktail: because the radial aretry is very spastic as soon as the sheath is inserted in the artery 5mg of verapamil is directly injected in the artery as a bolus. • Anticoagulation: systematic anticoagulation even during a dignostic procedure is recommended to limit the occurrence of subsequent radial artery occlusion following the procedure. Heparin is injected intravenously (5 OOO UI IV as a bolus).
Sheath Installation, Arterial Cannulation Sheath Installation, Arterial Cannulation • After local anesthesia the short needle is used for radial artery puncture and the soft 0.018 wire inserted in the artery as soon as the blood flow is good. Never forced to put the wire within the artery. • Given the small caliber of the radial artery short needles are recommended (blood return) and gentle bevel preferred (wire manipulation) with straight floppy tip wires. Shorter steaths are easier to place and to remove (5F, 6 F).
Sheath Removal: Compression Sheath Removal: Compression • At the end of the procedure the sheath is immediately removed by the operator. A compressive bandage is then applied on the arterial access site for 4 hours.