Step by step instructions to Obtain a Green Card
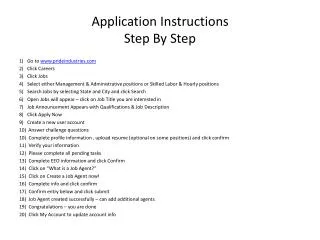
A green card gives migrants perpetual inhabitant status, regardless of whether they are not residents of the United States. Green cards give help to settlers living in the nation, as it is the initial move toward acquiring citizenship, and it shields them from expelling. There are various ways an individual can acquire a green card, in spite of the fact that the procedure isn't simple. A Chicago movement lawyer can enable the procedure to go as easily and as fast as could be allowed and give you the most obvious opportunity with regards to getting a green card. Peruse on to gain proficiency with the means you should take to acquire a green card. Your Eligibility Status Acquiring a green card through a relative is one of the most well-known techniques for increasing changeless occupant status. In the event that you are an immediate relative of a United States resident, they can record a request for you to live in the nation. You can likewise acquire a green card if your relative isn't a resident however is viewed as a perpetual occupant. This procedure takes somewhat more and is more entangled, however, it is conceivable. You can likewise acquire a green card through your boss. In the event that you are as of now for all time utilized, your boss can round out Form I-140 and acquire work affirmation. On the off chance that you are not a representative, however, a business visionary who anticipates making employments in the United States, you can likewise acquire a green card. You should likewise put $1,000,000 or $500,000 in a work region, and document Form I-526. Displaced people can enter the United States as evacuees, or if a close relative is an outcast. In the event that you do enter the nation as a displaced person, you should apply for a changeless inhabitant status inside one year of entering America. Petitions and Visas The subsequent stage in getting a green card is figuring out which appeal you should record. The appeal recorded will rely upon whether you are applying for a green card dependent on a family member or business. Regularly, your relative or manager will record the appeal for your benefit. Once in awhile do candidates document these petitions individually, in spite of the fact that it does some of the time occur. After the request is documented, you at that point need to decide whether there is a visa accessible for you. Certain visas have a constrained sum that is disseminated every year. There is no restriction for those applying for a green card through direct family members. After the request is documented, you will get a Visa Bulletin that will state if there are confinements on the kind of visa for which you are applying. The Bulletin will likewise remember guidelines for how to check your place in the line, or line, of visa candidates. On the off chance that a visa is accessible to you, you would then be able to document Form I-485. This structure enables you to alter your status or register as a lasting residency. Documenting this structure costs $1,070. On the off chance that you are attempting to get a green card through a relative, you can document this structure simultaneously your relative records the appeal. You may need to incorporate supporting documentation with the structure, so it is critical to peruse the directions cautiously. The Last Steps To get a green card, you should have your fingerprints and photo taken. The USCIS will likewise play out a historical verification. In specific cases, the USCIS will likewise call you in for a meeting. Now and again, the relative who recorded the request is additionally approached to go to the meeting. It is of pivotal significance that you go to this meeting on the date and time mentioned and that you bring travel reports, international IDs, and some other important data with you. After these means, the USCIS will settle on a choice on your application. On the off chance that they deny your application, you can document an intrigue. In the event that the USCIS favors your application, they will send further guidelines on the most proficient method to acquire your green card, and when you should recharge it. Call an Illinois Immigration Lawyer Today A green card holds numerous advantages for the individuals who wish to stay in the nation consistently. Be that as it may, the way toward getting a green card is long and regularly challenging. A Chicago movement legal counselor can help assist the procedure and make it simpler for you. In the event that you need to get a green card for yourself or record an appeal for one for another person's benefit, contact Kriezelman, Burton and Associates, LLC. We will walk you through each progression of the procedure and give you the most obvious opportunity with regard to progress. Call us today or get in touch with us on the web so we can start surveying your case.
90 views • 8 slides