Download

1 / 8
80 likes | 84 Views
Learn how to run simulations using the Genesis Free-Electron Laser code on the iDataPlex cluster. This session assumes some prior experience with Genesis but provides step-by-step instructions. Includes preliminary steps, loading the Genesis module, running in serial and parallel modes, and plotting the output.

E N D
Running Genesis Free-Electron Laser Code on iDataPlex Dave Dunning 15th January 2013
Genesis Free-Electron Laser Code • Free-electron lasers (FELs) are particle accelerator-based lasers which are powerful instruments for scientific investigation. They can operate across a range of different wavelengths, some examples are: • ALICE FEL at Daresbury operates in the infra-red, and has been used for imaging oesophageal cancer tissue. • CLARA FEL planned at Daresbury would operate in the ultra-violet, and would use the current Electron Beam Test Facility as a first stage. • Many FEL facilities around the world, including x-ray FELs in USA (LCLS) and Japan (SACLA) – opening new areas of scientific investigation. • Large-scale, expensive facilities require modelling to validate designs. • One of the main codes used for free-electron lasers is Genesis, written by Sven Reiche, though there are also others – e.g. talk by Lawrence Campbell tomorrow on a new FEL code called PUFFIN. • The primary aim of the session is to learn how to run simulations on the iDataPlex cluster, using Genesis as an example: • So some prior experience of running Genesis is assumed, but it should be possible to follow the steps given in the following slides without this. The Genesis manual is available and I’m available to assist.
Preliminary Steps Following Rob’s worksheet: • Log in to workstation (needs full user name including training code) + password. • Check that you can see training material on training machines: • Open terminal: right click on desktop, press “Open in Terminal” • Type “mount” in window: should be able to see something like: “172.31.202.240/twhome on /gpfs type nfs (rw,vers=3,bg,addr=172.31.202.240)” • Change directory to: “cd /gpfs/home/training/jpf03/rja87-jpf03/” and use “ls */” to view all the resources: • /Documents/genesis_manual.pdf – Genesis manual + presentation • /Applications/exelis/idl/bin – should contain file “idl” for running IDL Virtual Machine, which is used for plotting output from Genesis. • Try logging in to iDataPlex: • iDataplex icon on desktop – opens connection to iDataplex.
Load Genesis module on iDataPlex On iDataplex: • Make a folder to work in and go into it: e.g. “cd ~; mkdir Genesis; cd Genesis” • Use “module avail” to show the available modules. • Use “module load genesis/2.0” to load the genesis module. • It should say something like “Executable name is genesis_mpi”.
Running Genesis in Serial • As a test try running genesis in serial mode: type “genesis_mpi” • The program should prompt for an input file, type enter with no input to generate an example input file “template.in”. • Then run again: “genesis_mpi”, and enter “template.in” • This should run the program, generating “template.out”, try “ls” to see if it has, and e.g. “emacstemplate.out” to view it. • The default is a steady-state run. Try opening template.in and changing to time-dependent mode: e.g. “emacstemplate.in”, change itdp=0 to itdp=1, (ctrl-x, ctrl-s to save, ctrl-x,ctrl-c to exit). • Try running again. This is a time-dependent job, it should take a few minutes. Can stop with ctrl-c if you like. • One further step which will be used later can be introduced now. Open a file e.g. “emacs input.txt” and type template.in and return, (ctrl-x, ctrl-s to save, ctrl-x, ctrl-c to exit). Then try running genesis like this: “genesis_mpi < input.txt” – this should bypass the prompt for an input file name.
Running Genesis in Parallel Now for a Parallel job: • Make the submit script: “emacstestjob.bsub” and type script following Rob’s notes, (ctrl-x, ctrl-s to save, ctrl-x, ctrl-c to exit). • Note that you have to specify the folder where you are working on line starting “cd …” : it will be ~/Genesis if following instructions here. • There is an example submission script – try seeing how your script compares to the example using: “diff testjob.bsub /gpfs/home/training/jpf03/dxd46-jpf03/Genesis/testjob.bsub” • Submit the job by running the script using “bsub < testjob.bsub” • You can use “bjobs –u all –w” – to see what jobs are running. • And “bkill <jobid>” – kills a job if it gets stuck for any reason. • While the job is running it will make multiple output files – one per slice e.g. “template.out.slice000001”, which will all be combined into a single output file “template.out” at the end. Try “ls - l” to see what files are being made.
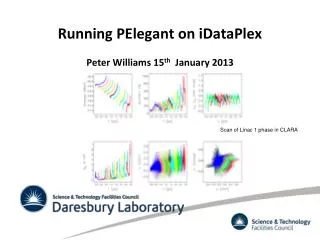
Plotting the output • Copy the output from iDataplex to the training machines: e.g. from training machine terminal type “cd ~”; “scp –r idpxlogin3:~/Genesis/template.out.” • Plotting the output: • On the training machines go to the following directory for running IDL Virtual Machine: • “cd /gpfs/home/training/jpf03/rja87-jpf03/ Applications/exelis/idl/bin” • Type “./idl -vm” to run and click to continue when prompted. • Load the .sav file “xgenesis.sav” from the current directory – this is a configuration file for plotting genesis output. This should open a gui interface with plot options. • Locate the genesis output file that you copied across and load it: File->Open->……/template.out – this should open another gui window with a list of plottable parameters. • Try using the interface to plot the output.
Example output • An example of the output for the given plotting options: • Try other plots, animating profile etc. Feel free to take it further: you could try editing the template.in file or try running your own input files. You could try testing the speed increase between serial/parallel, or versus your laptop, or with different number of processors…