Download

1 / 26
260 likes | 264 Views
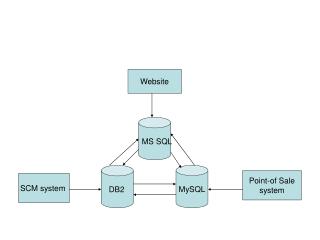
MySql In Action. Step by step method to create your own database. What is next?. Having convinced that MySql is a strong tool to develop databases, you are wondering if you can use it to develop your own business. This is the story.

E N D
MySql In Action Step by step method to create your own database
What is next? • Having convinced that MySql is a strong tool to develop databases, you are wondering if you can use it to develop your own business. • This is the story. • You want to open a small video rental in Seattle. You are thinking to create a small database to keep track what kind of films that you have, how long the films are checked out, and how much money that a customer has to pay for renting a film . • Since you already know that MySql is easy to use, you will use it for developing your own database. MySql In Action
Database Structure for Video Rental I • After spending some time, you come up with the following structure of the database that you need for your small video rental. • Customers • customerID ( int ) => Primary Key • firstName ( VarChar(20) ) • lastName ( VarChar(20) ) • address ( VarChar(20) ) • Rentals • movieID ( int ) => Primary Key • title ( VarChar(20) ) • copyNum ( int ) MySql In Action
Database Structure for Video Rental II • CheckOut • entryID ( int ) => Primary Key • customerID ( int ) • movieID ( int ) • checkOutDate ( date/time ) • duration ( int ) • cost ( double ) MySql In Action
Connecting To MySql • Until this point, you are ready to create tables to implement your database. • The first step that you have to do is to connect to MySql by using your favorite tool, such as Telnet or x-window. • I assume that you already contacted the database administrator to create a blank database which is called “video_rental”. • On the prompt, type in mysql -p video_rental • ‘-p’ option is used to tell MySql that you will use password to connect to your database. MySql In Action
Connecting To MySql (Cont….) • After you logon to MySql, you should get similar result as the following: • Note: • I use x-window to logon to MySql • On the prompt, it displays “ffaizal@cochise” • cochise is the name of the server that I use, and • ffaizal is my login name in that server. • You should get similar prompt when you logon to MySql. MySql In Action
Creating Customers table • The next step is to create tables on the video_rental database. • The First table that you will create is Customers table. • To create that table, you need to use create table command. • In this case, you should use create table Customers (customerID int unsigned auto_increment primary key, firstName varchar(20) not null default ‘N/A’, lastName varchar(20) not null default ‘N/A’, address varchar(30) not null default ‘N/A’); MySql In Action
Creating Customers table (Cont….) • If you want to know and check the table that you just created, you can use show command. • I used show columns from Customers; MySql In Action
Creating Customers table (Cont….) • Note: • customerID is a primary key. I declared it as an unsigned integer with auto increment so that I can always get the unique number. • For the rest of the table, I declared them as variable characters with a default value N/A. • In all columns, I will not allow them to have null as value. MySql In Action
Creating Rentals table • The second table that you should create is Rentals table. • Following the syntax from the previous table creation, you should come up with the following command: create table Rentals (movieID int unsigned auto_increment primary key, title varchar(20) not null default ‘N/A’, copyNum int unsigned not null); MySql In Action
Creating Rentals table (Cont….) • Note: • movieID is a primary key. I declared it as an auto-incremented unsigned integer. • Title is a variable character with default value ‘N/A’. • copyNum is an integer with 0 as its default value. MySql In Action
Creating CheckOut table • CheckOut table is the last table that you need to create. • Following the syntax from the previous slides, the command will be as the following: create table CheckOut(entryID int unsigned auto_increment primary key, customerID int unsigned not null, movieID int unsigned not null, checkOutDate datetime not null default 'N/A', duration int unsigned not null, cost double unsigned not null); • If you succeeded in creating the table, you will get the same result as the one shown on the next page. MySql In Action
Creating CheckOut table (Cont….) • Note: • entryID is used as a primary key, instead of customerID and movieID. MySql does not allow more than two primary keys on the same table. • The rest of the table should be clear from the above screenshot. MySql In Action
Checking Your Database • The quick way to check all tables that you have created is by using the show tables command. • Congratulation…. You have successfully created three tables in the video_rental database. MySql In Action
Inserting data into the tables • After you have created tables in video_rental database, it’s time for you to input the data. • Suppose that you have invested some money to buy five copies of “StarWars” and you want to store this information into your Rentals table. • How do you do that??? MySql In Action
Inserting data into the tables (Cont.) • Use insert command. • The command should look like the following: • insert into Rentals (title, copyNum) values ('StarWars', 5); • Since the movieID is auto-increment integer, I do not have to explicitly give a value. It is done automatically for you. • If the insertion is successful, you will have the similar result as the one on the next slide. MySql In Action
Inserting data into the tables (Cont.) • To see the entry in the table, you can use “select * from Rentals;”. • * means that you want to see all available columns in the table • Remember to use ‘ or “ at the beginning and at the end of the string values. MySql In Action
All entries are already inserted • Congratulation…. • To shorten your time, all the data insertions are already done for you. Customers table MySql In Action
All entries are already inserted (Cont.) Rentals table CheckOut table MySql In Action
Deleting data from a table • You can delete an entry from a table by using delete command. • Suppose that you inserted a wrong data in CheckOut table as shown at the last row of the following table. • There is no customer with ID# 4 and there is not movie with ID# 4 as well. MySql In Action
Deleting data from a table (Cont.) • I used the following query to delete the last row: • delete from CheckOut where entryID = 4; • You can use different condition on where clause, such as customerID = 4. MySql In Action
Deleting a table from a database • In addition to record deletion command, MySql also provides a command to delete a table from a database. • Use drop table command to delete a table. • Suppose that you want to delete a table whose name is service, you can use the following command: • drop table service; MySql In Action
Deleting more than one table • You can also use the drop table command to delete more than one table at the same time by cascading the table names. • Suppose that in addition to service, you also want to delete tables pay and time. You can delete them by using: • drop table service, pay, time; MySql In Action
Select-Form-Where query • Like almost all SQL query, MySql uses Select, From, and Where syntax to retrieve some information form the database. • The Form clause is usually used to indicate which relation(s) to which the query refers. • The Where clause is consist of the condition in which tuples must satisfy. • The Select clause is consist of attribute(s) of tuples that match the condition(s). MySql In Action
Select-Form-Where query (Cont.) • Suppose that you want to retrieve the information about your customer whose last name is Doe. • The proper query will be select * from Customers where lastName = ‘Doe’; Note: * means that you want to retrieve all information about the customer whose last name is Doe. MySql In Action
Select-Form-Where query (Cont.) • The result of the query is shown below. MySql In Action