Download

1 / 28
280 likes | 293 Views
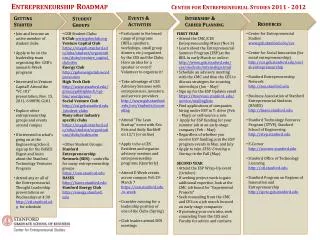
Learn how to set up PM Direct for effective facility management. Reduce emergency work orders by 25% and cut costs on corrective maintenance. Follow these step-by-step instructions to configure account settings, generate PM work orders, add users, activate locations and buildings, and define classifications and types.

E N D
PMDirect - Getting Started Allena Harrington Client Service Center SchoolDude.com
Dude Facts 25% reduction in number of emergency work orders when using PM (US) Corrective maintenance work orders cost 2-3X more than PM work orders
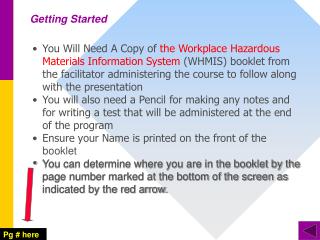
Setup Account Settings • Click on the Account Settings tab • Click on the Account Settings link Make the appropriate changes to your settings. Fields with a are required. • Click Submit to save your changes. 6
Setup Account Settings The top information on the Account Settings page will pull over from information within MaintenanceDirect such as your Time Zone and the Date/Time. • Purpose Code: Should be set to Preventative Maintenance • Budget Code: If you want to default a budget code for all planned maintenance • Current Period: This should pull from MaintenanceDirect • Requested By: This will be the default ‘requested by’ name on all PM work • Generate inventory issue transactions when creating PM work • Deferring work: number of days you want to wait before PM work will appear ‘deferred’ in your ‘How’s your track record’ chart on the home page
Generate PMs On 8 Click on the Account Settings tab Click on the Generate PMs On link Make the appropriate changes to your settings. Click Submit to save your changes.
Generate PMs On On the Generate PMs On, when work will be generated • Auto generation date: plug in tomorrow’s date (PM updates every night at midnight) • Generate PM Work Orders every ___ days (how often you want our system to look for schedules that need to be generated) • And ___ days ahead of their due date (how many lead days to give your technicians to complete the work • Check the ‘Yes’ box to create new PM WO even when there is a work order in-process, not completed/closed. • Decide who would like email notifications when PM WOs are created
Adding Users • Click the +Add User link Click on the Account Settings tab Click on the PM Users link
Adding Users • First, look for the user’s name in the Registered Users dropdown menu. If they are a user in another SchoolDude product, their profile has already been created and you won’t have to re-enter things like their name, email, etc. • Click either the Add This User (if they appear in the Registered Users List) or New User button to add in a new user. Make sure that PM Administrator is selected as the role.
Activate Locations and/or Buildings • Click on the Thumbs Down to make it a yellow thumbs up for any location you would like to activate in PMDirect. • Do the same for Buildings if you are using Buildings. Click on the Account Settings tab Click on the Locations link
Adding Classifications & Types The name or Description of the Classification is the only required information. Examples: HVAC, Electrical, Life Safety, Fire Safety, Plumbing, etc. You can choose to use Groups as well, as this adds another level of organization. However, it’s not required in the system. You can add Groups the same way you add in Classifications, just make sure to select the Groups link first (prior to trying to add in Classifications). Then click the Submit button to save to your list Click on the Account Settings tab Click on the Classification link Click on the + Add new Classification link
Adding Classifications & Types • Once you have a Classification saved, you can begin adding in Types to that classification for further organization. Types are required in the system to begin entering schedules. Examples of Types within the Classification of HVAC would be things like AHU, Boilers, Chillers, Exhaust Fans, etc. • To enter in a type you can either click on the Types link that appears in the Quick Links section on your Classification List page or by going to your Account Settings tab and clicking on the Types link from your Manage Codes section. • You will notice that not only are you required to enter the name of your Type but you also have to associate it with a Classification. Then click Submit to save.
Classifications & Types by Schema You may also choose to use one of the predefined schemas located in your Copy Schema link which appears in the Shortcuts section of your Account Settings tab. This will add classification and types from a predefined list. • You can view all the schemas first by clicking on the ‘view code list’ link out to the right of the list title. • Once you have decided on the list of your choice to copy into your account, select the radio button and click submit. *Keep in mind that once you select a schema you will no longer have access to the other lists and will not be able to change your choice.
New Schedule Creation To create a schedule in PMDirect, in order to set up auto-generated planned work orders, click on the New Schedule tab at the top of the page.
New Schedule The Dude Says: Although there are 17 steps on the schedule creation form, you only need to fill out a few to start creating beneficial schedules in your account. In this guide, we’ll cover the basic required and recommended steps for entering your PM schedules quickly. You can always come back to add more information to your schedules as needed. Please call the Client Service Center if you have any questions.
Steps 1, 4, 7, 10, 15,16, and 17 Select Classification: You will need to select a classification based upon the type of schedule Select Location: Select the Location you need to perform the planned maintenance Step 1 Step 4 Select Building: Choose the specific building if needed or applicable Select PM Template – Your account has been loaded with SchoolDude Starter Templates that can help you quickly create your schedules. Click on the red book to see if there is a template that you can use for your schedule. Keep clicking on the books in the tree to get down to the task list of the template. If you see a template you would like to use for your schedule, click the Copy Selected Template button. You will notice that information, such as the list of tasks, will automatically fill in the appropriate schedule steps. You can go into those steps (marked with a red checkmark) and make additions or modifications to the information added from the template. If you do not want to use any of the templates, click the Create My Own Schedule button. Step 5 Step 7 Steps 1, 4, 7, 10, 15, 16, and 17 are steps to help get PM schedules started in PMDirect.
Steps 1, 4, 7, 10, 15,16, and 17 cont’d Step 10 Step 15 Define Tasks & Procedures – If you copied a template, verify that the tasks are listed and make any necessary changes. If you did not copy a template, enter your own tasks. Click Next Step to save.
Steps 1, 4, 7, 10, 15,16, and 17 cont’d Define Frequency (Required) – You must select how often you would like this schedule to generate a PM work order. You can select Daily, Weekly, Monthly, or Yearly options: Daily – Select either Every (_) day(s) or Every Weekday. Weekly Recur every (_) week(s) on (day of week). Example: For work that needs to take place every other Monday, enter Weekly Recur every (2) weeks with a check mark in the box next to Monday. Monthly Day (_) of every (_) months. Example: For work that needs to take place on the 15th day of every month, enter Day (15) of every (1) month. The (first) (Monday) of every (_) month(s). For work that needs to be done quarterly, enter every (3) months. Yearly Every (January) (_) of every (_) year(s). In the first field, select your month, in the second field enter in a number to represent the day of that month, and then again enter in a number to represent how often you want the schedule to generate on a yearly basis (i.e. 1, 2, 5, 10, etc.). The (first) (day) of (January) of every (_) years. This option allows you to select the day of the week instead of just the date. Step 15
Steps 1, 4, 7, 10, 15,16, and 17 cont’d In the Range of Recurrence field, enter the date you want the schedule to start generating PM work orders. If this is a temporary schedule, you can set an End Date to the right of the Range of Recurrence. Click Next Step to save.
Steps 1, 4, 7, 10, 15,16, and 17 cont’d Define Template – If you created an original schedule where you entered your own tasks and will need to use this schedule again for a different location, you will want to save it as a template. This template will then show under Step 7 for you to use in creating new schedules. Note: If you copied a template in Step 7 and made no changes to the task list, then there is no need to save it as new template. You can click on Step 17 to skip the template step. To create a template: Select a Template Book where this template will live. You can select the default My Standard book or you can create your own Template Book. If you create your own, enter a generic and easy to understand title to help you find the template you need later on. Under the Template Title, enter a generic template title (such as AHU Quarterly or Exterior Lighting Inspection). Click Create Template Now. The next screen will confirm that your template has been created. Click Next Step to move to Step 17. Step 16
Steps 1, 4, 7, 10, 15,16, and 17 cont’d Step 17: Setup Schedule Now (Required) – This is the final step to creating your schedule. Enter a title for this schedule. You want to be as specific as possible when naming your schedules. For example: Enter the initials of the location, the classification or type, and the frequency (KHS-AHU-Quarterly). Step 17 This step also shows the selections you made on the schedule. Make sure these selections are correct, and then click Setup Schedule Now. This schedule is now an active running schedule that will create PM work orders in your MaintenanceDirect account.
PM work order PM work orders are produced in MaintenanceDirect and processed the same way your corrective work orders are processed and assigned. The only differences on the work order will be the background color, yellow, and a PM Schedule section under the Action Taken field.
Good, Better, Best • Looking for ways to become more efficient or use PMDirect better? Here are some way to improve as you use PM over time:
Let us help … COME SEE US IN THE LAB! • Check out scalable offers from our SchoolDude PM partners, to help implement PMDirect Purchase Templates Visit our Resource page: http://www.schooldude.com/resources/pm/ • Check out other Dude U classes: • PMDirect Tips & Tricks • Best Practice Discussion - MaintenanceDirect • Delivering Insight - Facility Management Reports • SchoolDude's Facility Management Suite • SchoolDude's Building Automation Award winning Support: • Call us, 877.883.8337 (for questions or unlimited trainings) • Send us an email or chat (link your HELP link)
Don’t forget to fill out our survey! We’d love your feedback so we can make every University better than the last…