Download

1 / 18
330 likes | 570 Views
Histological Techniques. By Zahoor Ahmed B.S MLT 06. Introduction. Histological technique deals with the preparation of tissue for microscopic examination. The aim of good histological technique to preserve microscopic anatomy of tissue.

E N D
Histological Techniques By Zahoor Ahmed B.S MLT 06
Introduction • Histological technique deals with the preparation of tissue for microscopic examination. • The aim of good histological technique to preserve microscopic anatomy of tissue. • Make them hard so that very thin section (4 to 5 micron) can be made. Good staining should be possible. • After staining, the section should represent the anatomy of the tissue as close to as possible to their structure in life. • This is achieved by passing the total as selected part of the tissue through a series of process.
Specimens in histology • Biopsy:piece of tissue or organ taken from living human being. • Autopsy: piece of tissue or organ taken from dead body. Ex: blood, CSF, ascites fluid, pleural effusion fluid. * How to study the specimen: • 1. Gross: colour, size, surface, texture, consistency. • 2. Microscopical examination: examine under microscope.
Techniques • These techniques are: 1. Fixation 2. Dehydration 3. Cleaning 4. Embedding 5. Cutting 6. Staining
Fixation • This is the process by which cells and tissue are fixed in a physical and chemical state so that they will withstand subsequent treatment with various reagents with minimum loss of architecture . • This should be approximately 10-20 times the volume of the specimen. Fixative should surround the specimen on all sides.
Basic steps for preparation of stained section from tissue 1. Fixation: the aim of this step are: • To prevent autolysis • To preserve tissue as nearly as possible to living state. • To prevent damage during subsequent procedures • To give a suitable texture. • To prevent growth of bacteria. • To render tissue receptive to subsequent staining.
Fixation is done by using fixative materials like: 1. Formaline 10%. 2. Alcohol 75%. 3. Zenker’s fluid. 4. Bouins fluid: it provide balance between those ingredients that cause shrinkage of the cell and thiose cause sweelling of the cell. 5. Carnoy’s fluid.
It requires 24hours and done in many stages. • It can be subdivided into a) dehydration b) clearing c) impregnating d) embedding. Note: It is important that all specimens are properly labeled before processing is started.
Sequence of tissue processing • Dehydration:Tissues are dehydrated Clearing:Duringdehydration water in tissue has been • replaced by alcohol. The next step alcohol should be replaced by paraffin wax. • Clearing of tissue is achieved by any of the following reagents:Xylene, Chloroform,Benzene • Note:Xyleneis commonly used. • Xylol: cheap, rapid and tends to harden tissue on prolong application. • b. Choloroform: makes tissue less brittle than xylol it cause shrinkage on prolong use. • .
2. Dehydration: this process is done to pull the water from sample, and carried out by using alcohol in various dilutions(by using increasing strength of alcohol; e.g. 50%, 70%, 90% and 100%.). Acetone is another agent can be used. 3. Clearing: done by: • Xylol: cheap, rapid and tends to harden tissue on prolong application. b. Choloroform: makes tissue less brittle than xylol it cause shrinkage on prolong use.
Embedding • Impregnated tissues are placed in a mould with their labels and then fresh melted wax is poured in it and allowed to settle and solidify. • Once the block has cooled sufficiently to form a surface skin it should be immersed in cold water to cool it rapidly. • .Microtomy • For light microscopy, a glass knife mounted in a microtome is used to cut 4-6um-thick tissue sections which are mounted on a glass microscope slide.
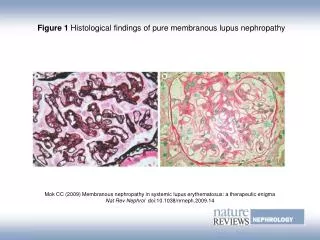
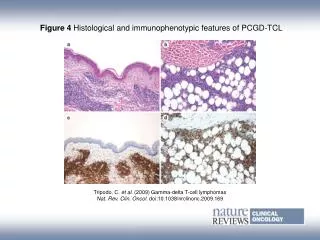
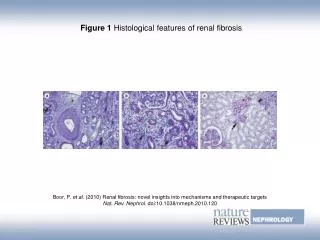
Staining • Staining is a process by which we give color to a section. There are hundreds of stains available. The stains can be hematoxylin/eosin stain or special stains The hematoxylin/eosin stain is usually abbreviated as h&e stain. The H&E stain is routinely used. It gives the nucleus a blue color & the cytoplasm & the extracellular matrix a pinkish color.
4. Impregnation: This is allowed to occur at melting point temperature of paraffin wax, which is 54-60oC. Volume of wax should be about 25-30 times the volume of tissues. • tissue impregnated with wax for two reasons: • To surround tissue with substance to support it to put on slide without injury. • To enable natural cavities of tissue to be filled with wax thus preserving their relationship to each other.
. 5. Adhesion to section slide: this is usually done by smearing with egg albumin. 6. Drying: put the slide for (10-15) min in oven at 65C.
Steps of staining with hematoxylin-eosin (HE) • Xylene wait for 1 min to remove the substance that are not embedded in slide. • Alcohol 70% wait for 1 min. • 3. Alcohol 90% wait for 1 min. • Alcohol absolute wait for 1 min. • Hematoxylin wait for 5-10 min. • Wash with tab water. • Eosin wait for 1-2 min. • Wash with tab water. • Dry by using oven. • Clear by xylene and then using Canada balsam.
Frozen section biopsy This is used for the spot diagnosis, usually fresh unfixed tissue is utilized. Afreezing microtome or cryostat machine at a tempreture of -20 to -30 is used, the section is cut at thickness of 5-10 microns then staining can be used for these sections.
Decalcification of bone and other tissue Sometimes its necessary to remove deposits of calcium from tissues e.g.. Calcified arteries, bones, teeth…etc. this should be done immediately after fixation, fixatives containing mercuric chloride cause swelling of soft tissue during decalcification. If large piece is submitted: cut into small pieces and then suspend the tissue in decalcification fluid from these fluids: - Normal saline • Nitric acid materials.