Download
1 / 4
40 likes | 286 Views
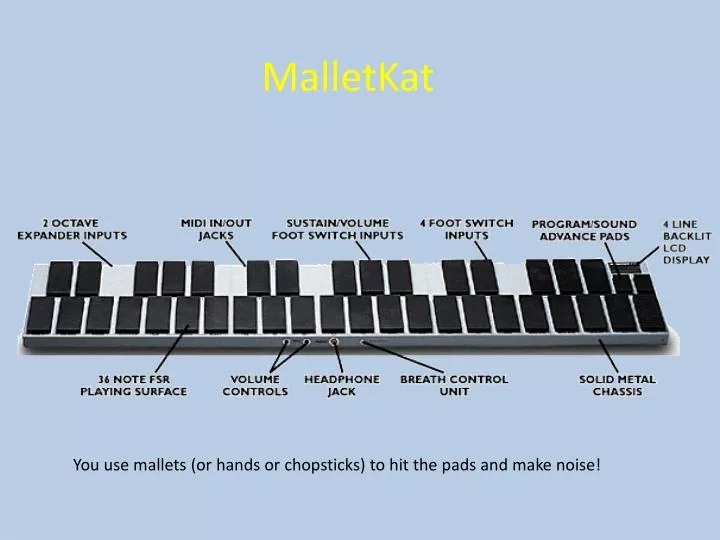
MalletKat. You use mallets (or hands or chopsticks) to hit the pads and make noise!. THE DISPLAY on the machine! Four lines of text that change as different features are brought up. 1 st line: Will have F (factory kits), C (chain mode) or U (user kits). After this there will be Layer Modes.

E N D
MalletKat You use mallets (or hands or chopsticks) to hit the pads and make noise!
THE DISPLAY on the machine! Four lines of text that change as different features are brought up. 1st line: Will have F (factory kits), C (chain mode) or U (user kits). After this there will be Layer Modes. 2nd line: Displays the Controller you are working on. 3rd line: Displays the General MIDI name. 4th line: Shows bank, volume, and program info. HOW TO EDIT YOU’RE malletKat 1. Step on the Edit footswitch. 2. Hit controller you want to edit. (number 1 or 2) 3. Select what you want to edit. 4. Hit the value pads, known as the black keys, or the number pads. 5. Stop stepping on the footswitch! Foot switch Pad with thing you want to edit Controller # F? C? U?Modes in the MalletKat. To jump between these modes , hold down the Edit Footswitch button and hit pad F (Bank Select). Use Decrement/Increment pads (C#-D#) on high octave to change modes. F: factory kits are preprogrammed, changes are gone as soon as you change kit #s C:arrange kits in own way, you can save 16 that include 16 kits U:name own kits, change and save into memory 128 U or F kits.
Layer Modes These tell the instrument how to control the layers of sound. These go with Controller One & Controller Two. Hang: hang mode: you will hear sound from Controller 1; hit on Sustain 2 to switch the sound to Controller 2, and the sound hangs until you press sustain2 again; this allows you to play hanging sounds under what you play on Controller 1. Splt: split mode: allows you to play two sounds without hitting sustain2. two sounds can then overlap. Keyboard is split into right (control 1) and left (control2). Doub: double mode: both controllers are accessed by the instrument. Sounds are layered. Mel1, 2, 3: Melody Chord Mode: These tell the malletKat what to play depending on the notes and which ones are being played at which time. VelS: Velocity Shift Mode: this switched from controller 1 to 2 depending on how hard you play Alt: Alternative Mode: every time you hit the pads it switches from controller 1 to 2
MOTIF RACK Patches: There are about a billion different patches, ranging from organs to bass instruments to bells that sound like wind chimes. These can all be located with the motif rack! You can scroll through all the presets with the big scroll knob. Make sure the voice button is pressed and lit up. Headphones: There is a plug in the motif rack that says phones. You put you’re headphones there! This can also be used like the scroll knob. This shows you what patch you are on, among other things Volume!