Download
1 / 47
520 likes | 887 Views
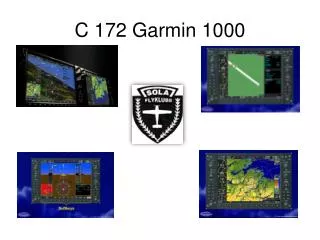
Introduction to Aspen EFD 1000 and Garmin GMX 200. Objectives / Content. Provide introduction to basic functions of: Aspen EFD 1000 primary flight display Garmin GMX 200 multi-function display Garmin GNS 430 Navigator. Syllabus – Aspen EFD 1000. Aspen EFD 1000 PFD

E N D
Introduction to Aspen EFD 1000 and Garmin GMX 200
Objectives / Content • Provide introduction to basic functions of: • Aspen EFD 1000 primary flight display • Garmin GMX 200 multi-function display • Garmin GNS 430 Navigator
Syllabus – Aspen EFD 1000 • Aspen EFD 1000 PFD • Read and interpret AI and tapes for ASI, ALT, and VSI • Set HDG, ALT, BARO • Set Nav Source • Set CRS. IAS and BARO • Read and interpret e-HSI display, including color scheme • Use soft keys, including range
Syllabus – Garmin GMX 200 • Garmin GMX 200 MFD • Use FN key to select map • Use MENU/ENT and soft keys to configure maps as needed • Use in/out soft keys to set map scale and range
Syllabus – Garmin GNS 430 • Garmin GNS 430 Navigator • Set and select frequencies for communication & navigation • Enter a flight plan • Edit a flight plan (add, modify, delete waypoints) • Navigate through chapters and pages • IFR operations • Select IAPs • Load and activate IAPs
Important!! • There are significant differences between the Aspen EFD1000 PFD / Garmin GMX 200 suite and the G1000 or GNS430/530 avionics that CAP pilots are accustomed to using. • Do not assume that anything you know about the G1000 or GNS 430/530 will translate to the Aspen EFD1000 and Garmin GMX 200.
N4813C Panel • Equipment includes: • Aspen EFD 1000 primary flight display (PFD) with separate power switch • PS audio panel with Comm Swap switch • Garmin GMX 200 multi-function display (MFD) • Garmin GNS 430 moving map nav/com • Garmin SL30 nav/com radio • DOES NOT HAVE: • Becker • SAR software
Aspen EFD 1000 Attitude Display Navigation Display
Aspen EFD 1000 Vertical deviation indicator (for GS) Altitude Airspeed TAS Altimeter setting Lateral deviation indicator (for LOC)
Selected airspeed Aspen EFD 1000 Selected altitude OAT Wind direction arrow Groundspeed Wind direction and speed
Aspen EFD 1000 Attitude Display Navigation Display
Aspen EFD 1000 Selected HDG Magnetic HDG VS value Selected CRS VSI CDI source info Hot key legend
Aspen EFD 1000 CDI source indicator Double-line bearing pointer source Single-line bearing pointer source Double-line bearing pointer source indicator Single-line bearing pointer source indicator Double-line bearing pointer source select Single-line bearing pointer source select CDI source select Micro SD card slot
Aspen EFD 1000 Controls Controls
Reversion & power Range adjustment Menu Hot key menu Minimums on/off HSI view – 360 or Arc Map declutter GPSS on/off Aspen EFD 1000
Aspen EFD 1000 • Right knob home state is HDG. • Also used to set : • ALT • BARO • IAP minimums (MIN). • Press to cycle HDG-ALT-BARO-MIN • From inactive home state (HDG in cyan): • Press 1x to set HDG • Press 2x to set ALT • Press 3x to set BARO • Press 4x to MIN
Aspen EFD 1000 • Left knob home state is CRS. • Also used to set : • IAS • Press to cycle CRS - IAS • From inactive home state (CRS in cyan): • Press 1x to set CRS • Press 2x to set IAS
Aspen EFD 1000 Right knob state Left knob state
Garmin GMX 200 • FN (Function) Key: • “Home” state shows: • MSG • MAP • IFR • VFR • Choose MAP • Custom Map option provides the greatest flexibility to configure as needed.
Garmin GMX 200 • Basic setup sequence: • FN should show home state – select MAP. • Select Custom Map. • Adjust the zoom/pan using the in/out soft keys at the bottom of the display. • Press MENU key to activate soft-key map configuration options.
Garmin GMX 200 Menu/ENT Key activates on-screen display of the options available via each of the six “soft keys” on the right side of the GMX 200 bezel. Options displayed are context-sensitive – i.e., dependent upon the selected map.
Garmin GMX 200 • Options displayed through soft keys have three possible states: • Blue - selected • Gray – partially selected • Black – not selected
Issues, Cautions, Recommendations • Aspen EFD 1000 PFD can be extremely hard to read due to type size and sheer volume of information presented. • Use range key to set flight plan display on navigation (lower) half of PFD to a readable scale.
Issues, Cautions, Recommendations • Garmin GMX 200 is not a “native” Garmin box; do not expect it to look or function the same way as the G1000 MFD or GNS 430/530. • Recommended selection is “custom map,” since pilot’s ability to configure “VFR” and “IFR” maps is limited. • Use range to make the MFD map more readable. • Think of FN (function) key as the “home” or “escape” key. FN brings up the base menus; side hot keys are context sensitive. • Take note of map orientation setting – it will not automatically match that of the PFD. Suggest using “TRK UP” on MFD to eliminate confusion from different map orientations on PFD and MFD.
Garmin GNS 430 • Basic “Garminology” • Anatomy of the Display • Chapters and Pages • Flight Plan Entry • Flight Plan Editing
Organizational Scheme Mechanical Scheme • “Chapters” • “Pages” • Menus • Dual concentric knobs • Push to center, sync, toggle • Cursor first! Garmin GNS 430
Pushing center moves tuning box b/w com and nav Pushing center activates cursor Garmin GNS 430 Com radio flip-flop Com radio volume/squelch Range control Direct to Nav radio volume/ID Context-sensitive options “Yes” or “forward” Nav radio flip-flop “No” or “back”
Garmin GNS 430 • “Dual concentric knobs” • Large outer knob for MHz • Small inner knob for KHz Press and hold 2 seconds for default NAV page
Garmin GNS 430 Selects IAPs, DPs, STARs Selects nav source (GPS / VLOC) Suspends “leg” (auto-sequence) mode Message Flight Plan
Active com frequency Tuning box (standby) Active nav frequency Standby nav frequency Sensitivity mode Navigation source Garmin GNS 430
Chapter (page group) name Activates cursor Page marker (2 of 8) Garmin GNS 430 Changes chapters Changes pages
Garmin GNS 430 • Chapters: • NAV • WPT • AUX • NRST
Curse first! Garmin GNS 430 • “Curse” – press the right inner knob to activate the cursor. • Turn the large (outer) right knob to move the cursor. • Turn the small (inner) right knob to change the character. Entering a flight plan
Active leg Active leg Cursor active (for additional entries) Garmin GNS 430
Direct-to WPT Direct-to WPT Garmin GNS 430 Direct-to a WPT not in the flight plan Direct-to a WPT already in flight plan
Garmin GNS 430 • “Curse” – press the right inner knob to activate the cursor. • Turn the large (outer) right knob to position the cursor over the waypoint you wish to edit, or on the waypoint just below the place where you wish to add a waypoint. • Turn the large (outer) right knob to move the cursor. • Turn the small (inner) right knob to change the character. Editing a flight plan