Download

1 / 1
20 likes | 232 Views
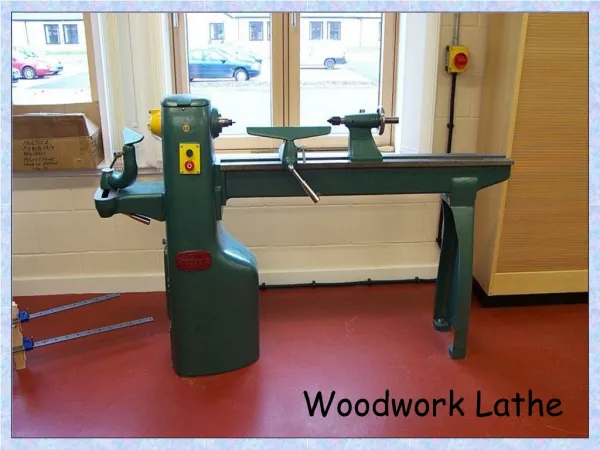
Lathe Tools. Tool Rest. Tail Stock. TOOL REST TOOLS: Speed Depends on Size of Stock Part FACING TOOL: (Figure 3,4 ) -Place at approximately ten degree angle from part. The tool has to be about center height or slightly higher of stock.

E N D
Lathe Tools Tool Rest Tail Stock • TOOL REST TOOLS: Speed Depends on Size of Stock Part • FACING TOOL: (Figure 3,4) -Place at approximately ten degree angle from part. The tool has to be about center height or slightly higher of stock. -Feed across at constant speed for a better finish. • TURNING TOOL: (Figure 3,5) -Used to change size of outer diameter of stock. -Same tool at Facing Tool. -Set depth in x direction, then cut in the z direction. -Turn down in max .03 inch steps. • KNURLING TOOL: (Figure 6) • -Used to give part a grip-able surface. • -Position tool so that both wheels turn together. • -Knurl at on low gear at lowest speed possible. • PARTING TOOL: (Figure 7) • -Used to cut a piece of stock to a smaller size, or cut notches into a part. • -Remember to account for diameter of parting tool. • -The tool has to be about center height or slightly higher of stock. • -Cut with tool parallel to stock material. • BORING TOOL: (Figure 9) • -Used to widen inside diameter of part. • -Start by drilling a hole large enough to fit boring tool into. (See Figure 8) • -Start with small boring tool and step to larger ones. • TAILSTOCK TOOLS:Speed Depends on Bit mounted in Tailstock • CENTER DRILL: • -Used to start any drilling operation. • -Marks exact center of round stock for drill bit to follow. • DRILLING TOOLS: (Figure 8) -Used for cutting holes to depth or through holes for screws or bolts. -Always peck drill on the Lathe. • REAMING TOOL: -Used to widen a hole to a precise diameter -Ream at half the speed indicated on speed chart. -Ream with one motion at constant speed. (NO PECKING) • TAPPING TOOL: (Figure 10) • -Used to thread holes for screws or bolts. -Manually tapping is the safest and easiest method. -Use guide block to start all tapping procedures to keep threads straight. -If power tapping, see power tapping poster. • LIVE CENTER: (Figure 2) -Used to keep longer stock pieces from flexing when machining with tool rest tools. -First drill a center hole for live center to rest in. Figure 1. • MEASUREMENT AND • ADJUSTMENT TOOLS: • DEFLECTION GAUGE: While in Neutral position, manually turn lathe and use gauge to measure how far off from center, the part is mounted. (under .005 is acceptable) • PARALLELS: Place between lathe and a faced edge of stock material to quickly center part. • TRAVEL DIAL INDICATOR: See Dial Indicator Poster • CALIPERS:Remember to place stock material so that measurements can be made without removing material from lathe to speed up machining process. Figure 2. Figure 3. Figure 4. Figure 10. Figure 9. Figure 8. Figure 7. Figure 6. Figure 5. Designed By – AchalaAkuretiya&Holly Carlier