Download
1 / 41
410 likes | 598 Views
Lesson Plan Template Training. Negotiating the New Template Platform. Welcome. Welcome to the lesson plan template online training module. During this module we will: Go over the components of the lesson plan template a section at a time in detail

E N D
Lesson Plan Template Training Negotiating the New Template Platform
Welcome • Welcome to the lesson plan template online training module. • During this module we will: • Go over the components of the lesson plan template a section at a time in detail • Examine each subpart of the template specifically • View a short demo on negotiating the template
Enabling Content • One of the first things that you must do when opening the template is to “enable content.” • To do you this you simply click on the enable content button that is automatically parked at the top of the template. • Why do this? This allows the macros and other features to work throughout the document.
Click here on the “Options Tab” and this allows you to enable content. Show me!
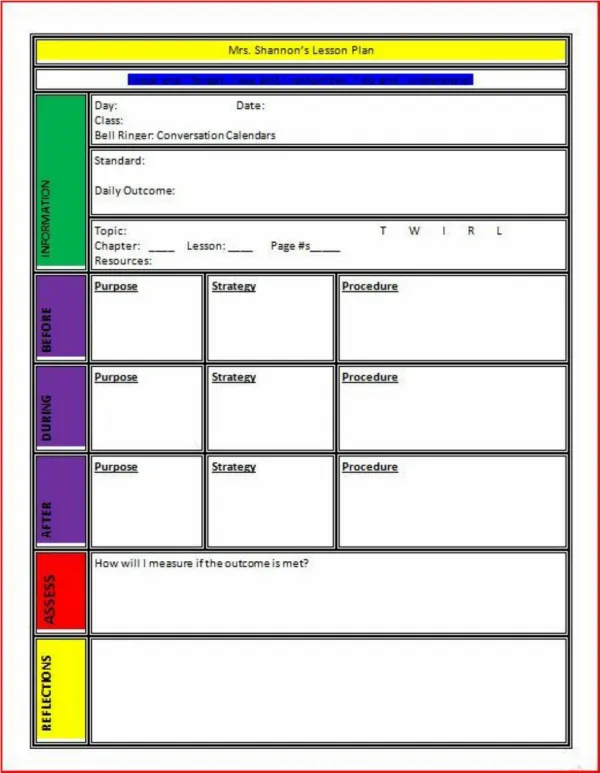
Section #1 • Name • Class • For the week of • Concept • Timeline
Show Me! For the week of Class Name Example: Math Teacher Name How long will the lesson last? 1 week 2 weeks 3 Days, etc. What is the concept of this lesson?
Section #2 • Essential Question • What is the essential question? The essential question is the focus of the lesson. • In order to design an effective learning experience for all students, teachers should address the following questions: • What do I want students to know and be able to do at the end of this lesson? • What part of the core content/program of studies will students be addressing through this lesson? • What connection to real life will this learning have? • What will I do to cause this learning to occur? • What will the student do to facilitate their own learning? • How will I assess to find out if this learning occurred?
Sample Essential Questions • Listed are some sample essential questions to consider: • What can we learn from the past? • What are the roles and responsibilities of government? • Why do we have money? • What story do maps and globes tell? • Are modern civilizations more ‘civilized’ than ancient ones? • What is the balance between rights and responsibilities? • What is legitimate authority? • Is new technology always better than that which it will replace?
Show me! Type in the essential question or essential questions that are part of the concept being presented.
Section #3 • CSO/Extended Standards Selection • Use the pull down menu to select the appropriate CSO/Extended Standards that you are using • There are a total of 10 spaces for CSOs and Extended Standards – if you need more than 10 simple click on the macro bar and add as many as you like • Can I cut and paste? YES you can! • Can I add space to make my items print? YES you can!
Show me! Use the pull down arrow to select the CSO you need for the lesson Do the same for any extended standards that apply • Please note! You will only find the extended CSOs on the Math and the RLA lesson plan templates. • Science and Social Studies have the standard CSOs
Please Note! • You do not have to fill up each CSO box or Extended Standards box. They are simply there if you need one or both. • If you need more than 10 CSO/Extended Standards boxes, use the “Click here” button to add as many as you like.
Show me! • Click on the “Click here to add a CSO Box button to add lines that you need. • It also adds lines to the Extended Standards column as well. • The button will not work if you have not “Enabled Content” (make sure to do that).
Section #4 • Activating Strategies • The activating strategy is what "hooks" student interest and "links" to prior knowledge. This part of the lesson focuses on activating the student's initial thinking on the topic. • Activating strategies are active and group-focused and may be connected to music, art, current events or other areas of student interest. • Examples • Graphic Activities • Writing Activities • Fact and Opinion • Diagrams/Draw Pictures • Brainstorming • Think-Pair-Share • Predicting-Analysis of Results
Activating Strategies
Resources you will need for Activating Strategies: • Please take a moment to open and print out the following reference information that goes along with this module. Locate these resources inside the OIEP online File Cabinet OIEP File Cabinet web address: https://sites.google.com/a/wvde.k12.wv.us/oiep-principal-e-book/oiep-professional-development-file-cabinet
Activating Strategies • The activating strategy is what "hooks" student interest and "links" to prior knowledge. This part of the lesson focuses on activating the student's initial thinking on the topic. • Activating strategies are active and group-focused and may be connected to music, art, current events or other areas of student interest. • Examples on the lesson plan template: • Graphic Activities • Writing Activities • Fact and Opinion • Diagrams/Draw Pictures • Brainstorming • Think-Pair-Share • Predicting-Analysis of Results
Exemplars • 5 Words, 3 Words – Individually, students brainstorm five words on a particular topic. In pairs or small groups students share and discuss the words. Each small group selects three words to share with the entire group. • Acrostic – Students are given a word, which is listed vertically on paper, and are asked to create sentences or phrases for each letter. • Anticipation Guide – Students are given sentences related to the topic to be learned and are asked to write, “agree” or “disagree” for each sentence. After the lesson the students may review their predications in the anticipation guide and revise their initial answers, if necessary. • Brainstorm – Students are introduced to a topic and are asked to think of as many words about the topic as possible. • Brainstorm and Categorize – Same as Brainstorm but students are then asked to put the words into separate categories. • Draw a Picture – Students are asked to use their prior knowledge of the subject to create a picture or a diagram. • Carousel Brainstorm – A question or subtopic is written on various charts around the room. Students are divided into small groups, each with a different colored marker. Students will have a specified amount of time at each chart, recording the information on the chart that they have brainstormed about the question or subtopic. Each groups ends at the chart where they began and can group the ideas into categories. • Dear Teacher – Students write a brief letter to the teacher describing what they already know about a topic. • KWL – Students list what they know, what they want to know and what they learned about a subject. The “K” and “W” portion can be completed as the activating strategy while the “L” can be completed as a summarizing strategy. • KWL Plus - This is the same as KWL with the addition of a final categorization piece.
Exemplars • Medium Size Circle – This is a forum to share ideas, opinions, concerns, etc. about a topic. A group of 5 – 10 students sit in a circle and listen, non-judgmentally, to one person who is speaking. Each person may or may not take his/her turn to share but after 5 or so responses there is a time to reflect on what has already been stated. This continues for the time that has been allotted for this activity. • Sort Cards – The teacher creates a set of cards, one set of cards for each 4 – 5 students, that contain concepts, terms, pictures or examples associated with the topic. Students sort the cards into categories and label each category. Afterward, students explain why each card belongs to that category. • Think, Pair, Share - During this activity, students will have individual time to think about a question related to the topic of study. They will then pair up with a partner to share their thoughts. Finally, the pairs will select one major idea to share with the entire class. • Treasure Hunt – Students are given a grid filled with statements about a topic. Students search for other students in the class that have had certain experiences or knowledge about the topic. When someone is found that fits the description written in the rectangle the student writes in that student’s name. • Video – Students are shown a short video on the content to be learned. Please see the website www.unitedstreaming.com for access to short video clips. • What’s Already in my Head? - Students fill in a thought bubble (dialogue callout) with words and/or pictures that come to mind when they think about the topic to be studied. • Wordsplash – Selected words related to the topic are presented to students all at once in a random order. Students are asked to write a sentence or two, using all of the words, to connect the vocabulary that has been presented. As the students learn about the topic they are asked to go back and check their statements.
Activating Strategies Website Resources • http://its.gcsnc.com/act/strategies/Activating.htm • http://www.montgomeryschoolsmd.org/departments/development/resources/activators/index.shtm
Section #5 • Teaching Strategies • A variety of teaching strategies are employed to help students understand the concept in depth. The best strategies require active student involvement, making the switch from a teacher-centered to a student-centered classroom. Ideally, the lesson will provide multiple opportunities for practice and collaboration. Graphic organizers are used to help students store and process information as it is learned. • Examples • Discovery Based Learning • Guided Practice • Project based learning • Modeling • Hands-on Lab • Work stations • Blending • Cooperative Learning • Whole Group Instruction • Individual Instruction
Teaching Strategies
Resources you will need for Teaching Strategies: • Please take a moment to open and print out the following reference information that goes along with this module: Locate these resources inside the OIEP online File Cabinet OIEP File Cabinet web address: https://sites.google.com/a/wvde.k12.wv.us/oiep-principal-e-book/oiep-professional-development-file-cabinet
Teaching Strategies • A variety of teaching strategies are employed to help students understand the concept in depth. The best strategies require active student involvement, making the switch from a teacher-centered to a student-centered classroom. Ideally, the lesson will provide multiple opportunities for practice and collaboration. Graphic organizers are used to help students store and process information as it is learned. • Examples • Discovery Based Learning • Guided Practice • Project based learning • Modeling • Hands-on Lab • Work stations • Blending • Cooperative Learning • Whole Group Instruction • Individual Instruction
Exemplars • Cooperative learning: a range of team based learning approaches where students work together to complete a task. • Hands-on, active participation: Designing activities so that students are actively involved in the project or experiment. Hands-on participation is as important as verbal participation in the activity. • Model-lead-test strategy instruction (MLT): 3 stage process for teaching students to independently use learning strategies: 1) teacher models correct use of strategy; 2) teacher leads students to practice correct use; 3) teacher tests’ students’ independent use of it. Once students attain a score of 80% correct on two consecutive tests, instruction on the strategy stops. • Peer tutoring: Having students working pairs with one student tutoring the other student on a particular concept. • K-W-L: know, want to know, learned, routine. A form of self-monitoring where students are taught to list what they know already about a subject, what they want to know, and later what they learned. • Graphic organizers: visual displays to organize information into things like trees, flowcharts, webs, etc. They help students to consolidate information into meaningful whole and they are used to improve comprehension of stories, organization of writing, and understanding of difficult concepts in word problems.
Teaching Strategies Website Resources • http://glossary.plasmalink.com/glossary.html • http://honolulu.hawaii.edu/intranet/committees/FacDevCom/guidebk/teachtip/teachtip.htm • http://serc.carleton.edu/NAGTWorkshops/coursedesign/tutorial/strategies.html
Section #6 • Resources • Textbook • Periodicals • Key Vocabulary • OIEP Best Practices • Workbook • Technology • Handouts • Assessment Tools • Audio/Visual • Manipulatives
Activating Strategies Show me! Teaching Strategies Resources • Also notice the “Notes” section that runs down the right side of the page. • You can use this area for notes per section • Simply put a check mark in the appropriate box or boxes.
Section #7 • Methodical Narrative • Details of your lesson • Who, what, where, how, when Type in here!
Section #8 • Lesson Planning Section • Monday • Tuesday • Wednesday • Thursday • Friday
Show me! This section allows you to plan for each day of the week Type extra notes in here!
Section #9 • Assessment • After a new concept is taught, students apply that new knowledge in authentic and meaningful ways during extending and refining activities. • These activities force students to use, transfer and apply what they have learned in a new way.
Types of Assessment • Traditional Assessment helps determine how well students retain basic facts or concepts. Traditional Assessment has a right or wrong answer. This type of assessment usually comes in the form of standardized tests such as true or false, fill in the blank, or multiple choice. • Alternative/Performance Assessment is a performance based type of evaluating students. The student is evaluated by how they learn and solve problems. The students work out problems rather than memorize facts. It is active learning, where the students exercise higher level thinking skills. • Formative Assessment is when a teacher evaluates the students in a continuous manner, enabling the student to learn in a more efficient manner. It is an ongoing measurement designed to evaluate an individual's knowledge and skills. It evaluates critical thinking, decision making, and problem solving skills. Formative Assessment often provides the student with written or oral feedback from the teacher rather than a letter or number grade. • Summative Assessment is an attempt to summarize the student's learning all at one time. Summative Assessment is what most standardized tests are used for. • Authentic Assessment is "A form of assessment in which students are asked to perform real-world tasks that demonstrate meaningful application of essential knowledge and skills" -- Jon Mueller
Samples of Assessments • Product Assessments • Bulletin Board Display • Conducting a Survey and Constructing a Data Table • Display • Newspaper Article • Nonfiction Booklet or Pamphlet • Oral Interview • Oral Presentation • Poster • Song • Web Page
Samples of Assessments • Process Assessments • Concept Maps • Graphic Organizers • Group Work • Student Self-Assessment • Teacher Assessment
Samples of Assessments • Reading/Writing Assessments • Language in Use • Responding to Literature-Analyzing Information • Responding to Literature-Locating Information • Writing to Inform, to Persuade, and for Personal Expression • Content Quizzes and Tests/Teacher Created • Rubrics, etc.
Section #10 • General Guidelines/Strategies for Success • Notes section for YOU, the teacher • What other procedures do you need to list? • What worked, what did not work – for future reference • General notes on the lesson/new ideas
Show me! Include the type of assessment you will use for the lesson Type in more notes here Type in more notes here What worked? What needs changed? Step-by-step, notes on lesson.
Saving and Closing the Lesson Plan • File “Save-As” • Save the file with a good naming convention-make it easy to retrieve • Keep lesson plans in a specific file for easy reference • Make “files-within-a-file” for good organization
Show me! File Save As Give it a file name for easy reference Save your file in a folder for easy retrieval 1. 2. 4. 3. Please note! The document will always save as a macro enabled workbook. Don’t change this default setting – this way the macros will always work.
Completion • If you have any questions, please do not hesitate to contact me • Tracy L. Chenoweth tchenowe@access.k12.wv.us • 304-558-8833 my extension is 53252 Thank you for participating in the learning module.