Download
1 / 30

E N D
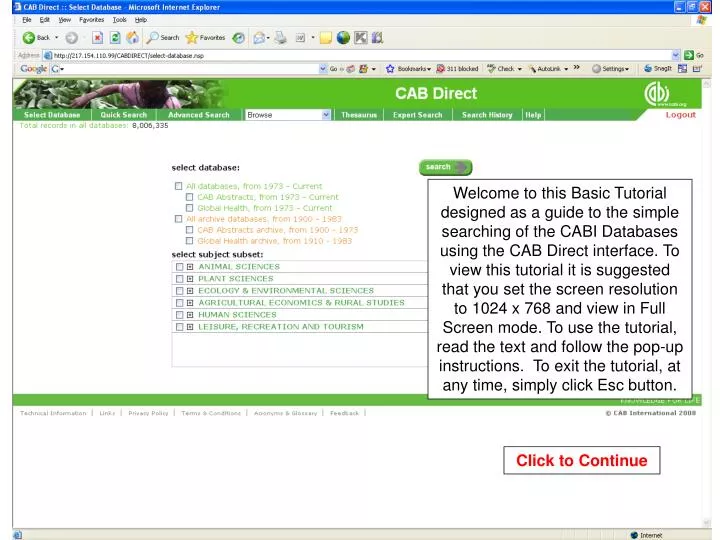
Welcome to this Basic Tutorial designed as a guide to the simple searching of the CABI Databases using the CAB Direct interface. To view this tutorial it is suggested that you set the screen resolution to 1024 x 768 and view in Full Screen mode. To use the tutorial, read the text and follow the pop-up instructions. To exit the tutorial, at any time, simply click Esc button. Click to Continue
This is the Database selection Screen. It shows all the CABI Databases and Database Sub-sets. The databases, available as part of your subscription, are shown in bold, while the databases to which you do not have access are “greyed out.” Click to Continue
CABI Produces two databases; CAB ABSTRACTS and GLOBAL HEALTH. They are each divided into a “Current” file and an “Archive File. They are then further subdivided into smaller and smaller subject subsets which are very useful when searching on narrow subject areas. Click to continue Click to continue Click to continue
The subsets can be expanded, to reveal a more detailed subject breakdown, by simply “clicking” on the + box Click to continue
In this example we have chosen two subject specific subsets; the Agricultural Entomology current file and its archive file. Click to continue
Click the search button now to go to the Quick Search screen If no boxes are checked, the default is to search all the Databases and/or subsets to which you have a current subscription. This is the option that we will use for the rest of this tutorial.
This is the Quick Search Screen, designed for simple searching using one or more “Keywords” or Author names. At the top of each screen is the Menu bar that allows the selection of a variety of functions while, at the centre of the screen, you see the area where the searches are performed. Click to continue Click to continue
Let’s try a simple search for the keyword “Cattle” Simply type the word cattle in the search box, as shown, and click the search button to execute the search. Cattle Click the search button to continue Click to continue
This is the results display screen. It displays the records that have been retrieved. Records are displayed in reverse chronological order so that the newest records are displayed first. The records are shown in “short” format; bibliographic details only. Click to continue
The default option is to display 25 records per page. However, the number of displayed records can be changed using the drop down menu which offers a choice of 25, 50 or 100. Once the number has been set, it remains set until it is changed or until the session is terminated. Click to continue
The bottom section of this screen offers a range of options for outputting the records. They may be e-mailed, printed or saved. They can also be exported to any one of four database management programmes including Refworks, Procite, Endnote or Reference Manager. These may be chosen from a drop down menu. Click to continue
The default option is to output all the currently displayed records. However, if only certain records are required, they can be selected by checking the white check box to the left of each record as shown here. Once one or more records have been checked, the output option changes to output only the selected records. The records can be output straight away or they can be added to a Marked list for outputting later. Records are added to the Marked list by first “checking” them and then clicking on the add button at the bottom left of the screen. Click to continue Click to continue
Up to 500 records can be added to the Marked list during a single search session. This has the advantage of allowing the user to output all the records in a single output operation. Note that the records that have been marked are highlighted as shown. Records can only be added once to the Marked list. There is no duplication. Click to continue
To view the Marked List, at any time, simply click on the view button at the bottom left of the screen. Click to continue
This is the Marked List screen, showing all the records that have been marked during the current search session. Records may be deleted by clicking on the appropriate red cross. Specific records can be selected for output by checking the white check box next to the relevant record(s), as described earlier. Click to return to the Results page
Another useful feature on the results screen is the refine search option which allows the user to narrow down or “refine” the search. To refine the search, simply enter the required term or terms in to the search box provided. The new term or search string will be combined with the last search using the AND operator. This will narrow the search to more specific records by performing a search within a search. Click to continue Click to continue
In this example we are refining the search to housing and Europe. Click to continue housing and europe
Click the search button now to continue Once the term or terms have been entered, click the search button to perform the search. housing and europe
The result of this refine search operation is 3155 records about the housing of cattle in Europe. Click to continue
From this results screen it is a simple operation to see a full record. Simply click on the title of the record of interest. Click to continue
This is a typical full record showing the title of the paper, the bibliographic information and the Abstract. Further down the screen are the other fields including the Indexing and the CABICODES. Click to scroll down the screen
At the bottom of each record we see the publisher information and the indexing. All the terms are “clickable” hyperlinks. Clicking on any of the terms will automatically perform a search for records that contain that term in that particular field. For example, clicking on the term Farm workers in the Descriptor field will search of all the records within the database that contain the index term “Farm workers” in the Descriptor field. Click to Continue Click to Continue
Terms can be combined using the “related records” function. Simply check the boxes next to the terms of interest and then click the related records button. In this example we have checked the phrase “Dairy farming”, from the Descriptor field, and the index term Germany from the GeographicDescriptor field. Once the terms are selected, click the related records button to perform the search. Click to Continue Click to Continue
Here’s the result of our “related records” search. Click to Continue
Author’s names can be searched from the Quick Search screen. Type the author’s name in the format shown, check the Author search “radio” button and then click search. Click to Continue Click to Continue
Click click the search button to Continue In this example we are searching for the author A J Smith. Note the format is to type the family name first, followed by a space and then the initials. If one or more of the initials are unknown, the “truncation” symbol (*) can be used to search for any letter. E.g. Smith A* or Smith *. The asterisk searches for one or more letters. Smith AJ Click to Continue
This is the results screen, showing the records for which AJ Smith was either one of the authors or one of the editors. Editors names and searched along with author names. Click to Continue
Let’s finish this basic tutorial by looking at the Search History screen. Click to Continue
The search History screen lists the searches that have been performed during the current search session. From within this screen, searches can be combined or saved to disk. Saved searches can also be loaded a rerun. To combine one or more searches together, check the boxes next to the searches to be combined, select the appropriate search operator from the drop down box next to the search term and then click the search button to perform the search. Click to Continue Click to Continue
That is the end of this basic tutorial. Click once to exit or hit the Esc key. To save a search that you want to rerun in the future, click the save button next to the search that you want to save and follow the on screen instructions. To rerun a saved search use the load from file button to locate the file and then follow the on screen instructions. Click to Continue


![[click to continue]](https://cdn3.slideserve.com/6656740/slide1-dt.jpg)