Download
1 / 9

E N D
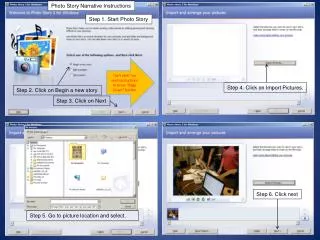
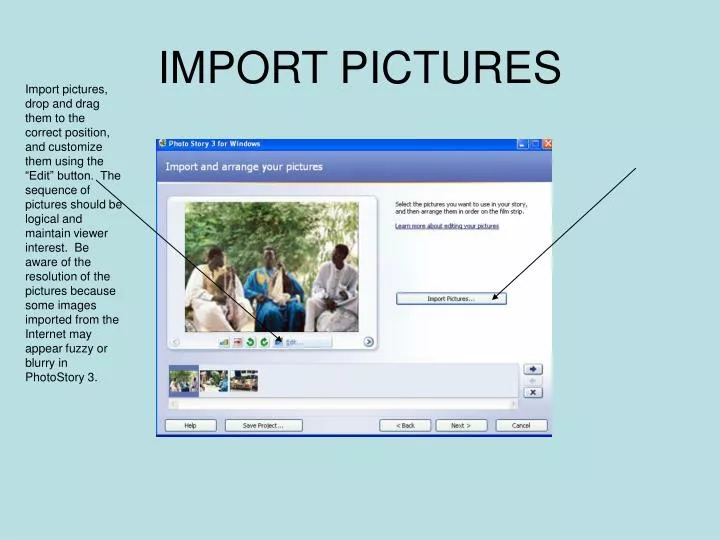
IMPORT PICTURES Import pictures, drop and drag them to the correct position, and customize them using the “Edit” button. The sequence of pictures should be logical and maintain viewer interest. Be aware of the resolution of the pictures because some images imported from the Internet may appear fuzzy or blurry in PhotoStory 3.
CREATE TITLE To create a title slide on the first picture, hit “Next” and type the name of the topic, presenter(s), and date in the text box. Make sure that the font size, color, and position of the title facilitate reading. (You may want to backwash the picture so that the title is more legible.) If titles are used on subsequent pages, avoid using too much text (i.e. writing whole sentences) on screen, but feel free to label pertinent aspects of the photographs.
CUT-AND-PASTE NARRATION Hit “Next” again to type or copy-and-paste narration into the textbox. The commentary should be interesting, clear, and related to the photograph(s) being described.
CREATE TRANSITIONS If desired, hit “Customize Motion” to add transitions, panning, and zooming effects. Limit the use of distracting transitions and try to maintain consistency.
SAVE Save the project often using the “Save Project” button. The computer will automatically want to save to the “My Videos” folder, but save to another folder instead (ex. in the K:, P:, or T: drive or on a flash drive). Save as a .wp3 file (a format that can only be read in PhotoStory) so that the project can be reopened in Photo Story 3 and future edits can be made.
RECORD NARRATION Record the narration using the laptops and microphones available in the conference rooms in the main library. Make sure that intonation is appropriate and that speech is clear. Don’t cut off the last words at the end of sentences. Additionally, since information is being presented to an audience, speak more formally than in normal conversation. Preview and re-record the narration as needed.
EDIT TIMING If desired, hit “Customize Motion” and set the number of seconds needed to display each photograph in order to match the narration. This is especially useful if one segment of recorded narration is being used to describe multiple pictures.
FINAL SAVE Once the presentation is complete, save it for playback on the computer by hitting “Next” until the option “Save your story for playback on your computer” is available. The presentation will become a .wmv file that can be viewed on any computer with Windows Media Player. Hit “Browse” to save the presentation in the desired location (ex. the K:, P:, or T: drive). Teachers will normally specify where and by what date final projects are to be saved.
TIPS • Think of the viewers – would they be informed and entertained while watching the presentation? • Think of the story – does this presentation have a clear introduction, body, and conclusion? Do the ideas flow naturally? 3) Think of the technical aspects – are the titles legible, transitions smooth, and pictures in sync with the narration? What is the quality of the audio?