Download
1 / 64
660 likes | 841 Views
#13: Shadows & Ray Tracing. CSE167: Computer Graphics Instructor: Ronen Barzel UCSD, Winter 2006. Outline for today. Fancy Texture Effects Shadow Mapping Ray Tracing. Where are we now. Texture mapping Assign texture coordinates to vertices based on surface parameters

E N D
#13: Shadows & Ray Tracing CSE167: Computer Graphics Instructor: Ronen Barzel UCSD, Winter 2006
Outline for today • Fancy Texture Effects • Shadow Mapping • Ray Tracing
Where are we now • Texture mapping • Assign texture coordinates to vertices • based on surface parameters • based on projection in object or world space • Interpolate texture coordinates to pixels • look up color in texture file • to avoid magnification problems, use bilinear or bicubic filtering • to avoid minification problems, use mipmaps • precomputed hierarchy of scaled-down versions of the texture image • based on amount of minification, choose two nearest mipmaps • look up color in each, interpolate between them (trilinear interpolation) • Procedural textures • compute patterns in procedural shader routines • choose details based on screen-space size of surface area • used especially for wood, marble, cloth, …
Fancy Texture Effects • We can look up data at each pixel… What can we do with it? • Given procedural shaders, can do most anything we want! • Here are some common techniques • Often supported by renderer without procedural shading • Some supported directly by hardware
Bump Mapping • An easy way to make a smooth surface bumpy • Use a texture to represent the variation in surface height • With Phong interpolation we have a normal for each pixel • Use the texture value to perturb the normal • Then use the perturbed normal for the per-pixel lighting • Texture can be stored or procedural • Used for rough surfaces • Used for “embossing” • Modern hardware supports bump mapping • Limitation: bumps are fake • silhouette edges betray smoothness
Displacement Mapping • Like bump mapping • but instead of faking by perturbing normals… • …actually move the surface point • Gives proper silhouettes, • Gives self-occlusion • Gives self-shadowing (once we have shadows…) • Expensive and hard to do well • Supported by some software renderers • Supported by some recent hardware
Environment Mapping • A simple but technique to fake mirror-like reflections of an environment • Precompute, photograph, or paint an environment map: • A view of the distant environment (ground, sky, horizon, etc.) from the center of the scene • Can be stored in a single spherically-projected texture • Can be stored in 6 faces of a cube • Imagine that the scene is enclosed in a huge sphere or cube, textured with that map • For each vertex or point to be shaded: • compute the vector e from the point to the eye • compute the reflection vector R • find out where R intersects the environment cube/sphere, and use that texture coordinate • (because the environment is huge, we don’t need to take into acount the position of the point) • add the texture color to the point’s color, with some constant ke
Environment Mapping n r e
Environment Mapping (www.sparse.org)
Reflection Mapping • Environment mapping often called Reflection Mapping • Generally, environment maps: • only reflect distant environment, not nearby objects • are static: don’t incorporate things that animate • But you can get animated local reflections… • If you’re willing to take two steps
Reflection Mapping • For Woody reflected in Buzz’s helmet…
Reflection Mapping • First, render just Woody, using camera at Buzz’s head
Reflection Mapping • In main render, Buzz’s helmet procedural shader computes reflection • If reflection hitsWoody texture mapuse its color, otherwiseuse the regular environment map • Two renders to generate each frame! • In practice, many renders to render each frame
Other Texture Effects • Textures can be used to map most any property onto a surface • Not just color • Bump or displacement • Diffuse coefficient? Specular Coefficient? • “combing” directions for anisotropic reflectivity • Parameters to procedural patterns • Many texture maps can be used at once • Different layers of effect • e.g. Base color, then smudges, scratches, dents, rust, etc. • each might affect color, bumps, displacment, lighting, reflectivity, … • Hardware systems have limited amounts of texture memory • In production, it’s not uncommon to have a dozen or more textures on each surface • Texture maps can themselves be computed or animated • E.g. To show a TV picture in an animation: • each frame, use a different texture map on the TV • E.g. For raindrops dripping down a window • E.g. To simulate effects such as patina and aging
Multipass rendering • Render diffuse, specular, reflection, etc. separately • Combine them using an image manipulation program • Lets you effectively tweak kd, ks, etc. without re-rendering +
Outline for today • Fancy Texture Effects • Shadow Mapping • Ray Tracing Intro
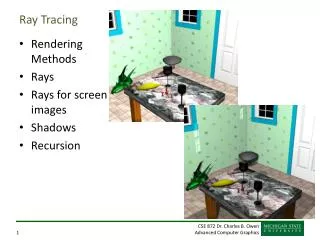
Shadows • So far we included contribution of all lights in illumination • But sometimes a surface is in shadow: • Another object is between the surface and a light source • That light source shouldn’t contribute to the surface’s illumination
Shadows • How can we test for this when rasterizing/shading? • Processing triangles one at a time • No information about other objects • Trick: introduce shadow maps (or shadowmaps) • Precompute where shadows are for a given light • Before adding contribution of a light, check against shadow map • Here’s how it works…
Shadow Map • Render an image from the light’s point of view • Camera look-from point is the light position • Aim camera to look at objects in scene • Render only the z-buffer depth values • Don’t need colors • Don’t need to compute lighting or shading • (unless a procedural shader would make an object transparent) • Store result in a Shadowmap AKA depth map • Store the depth values • Also store the (inverse) camera & projection transform • Remember, z-buffer pixel holds depth of closest object to the camera • A shadowmap pixel contains the distance of the closest object to the light
Shadow Map • Point light source
Shadow Map • Directional light source • use orthographic shadow camera
Shadow Mapping • When lighting a point on a surface • For each light that has a shadowmap… • Transform the point to the shadowmap’s image space • Get X,Y,Z values • Compare Z to the depth value at X,Y in the shadowmap • If the shadowmap depth is less than Z • some other object is closer to the light than this point • this light is blocked, don’t include it in the illumination • If the shadowmap is the same as Z • this point is the one that’s closest to the light • illuminate with this light • (because of numerical inaccuracies, test for almost-the-same-as Z)
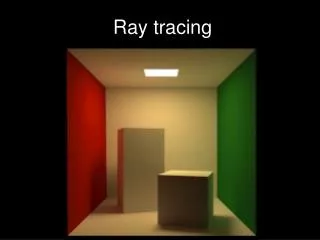
Shadow Mapping • A scene with shadows point light source
Shadow Mapping • Without and with shadows
Shadow Mapping • The scene from the shadow camera • (just FYI -- no need to save this)
Shadow Mapping • The shadowmap depth buffer • Darker is closer to the camera
Shadow Mapping • Visualization… • Green: surface light Z is (approximately) equal to depth map Z • Non-green: surface is in shadow
Shadow Mapping Notes • Very commonly used • Problems: • Blocky shadows, depending on resolution of shadowmap • Shadowmap pixels & image samples don’t necessarily line up • Hard to tell if object is really the closest object • Typically add a small bias to keep from self-interfering • But the bias causes shadows to separate from their objects • No great ways to get soft shadows (Penumbras)
Outline for today • Fancy Texture Effects • Shadow Mapping • Ray Tracing Intro
Ray Tracing • Goals: • better shadows • reflections, refractions • Leads to advanced capabilities • motion blur, depth of field, etc… • global illumination • Slower than Z-buffer techniques • But more parallelizable
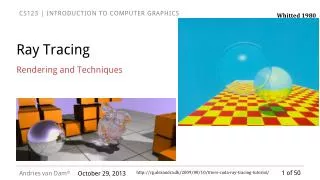
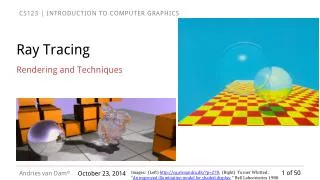
Classic Ray Tracing • Introduced in 1980 by Turner Whitted • commonly demonstrated with checkerboards and reflective spheres
Ray Tracing • Traditonal Z-buffer rendering pipeline: • Look at each object in turn • Determine which pixels it covers • Use color from closest object at each pixel • Ray Tracing: • Look at each pixel in turn • Determine which objects cover it • Use color from closest object at the pixel
What’s a Ray? • A ray is a geometric entity with an origin and a direction • Starts at a point and goes out to infinity • Represent as origin p and (unit-length) direction class Ray { Point3 p; Vector3 d; // Normalized }; • Any point q on the ray can be represented as q t p
First step: Ray Casting • Imagine the image floating in front of the eye • Trace a ray from the eye through each pixel • Can do this in any order: each pixel is independent • Ray origin is the eye • Ray direction is vector from eye to pixel • Ray is known as the camera ray, eye ray, or primary ray Camera ray Virtual image Camera position
Intersection Testing • Test which object(s) the ray intersects • Must check all objects! • Keep track of distance along ray • Save closest intersection • Once closest object is found • Perform lighting calculation on closest object • (If no objects intersect, assign background color to pixel)
Ray Intersections • For each ray, need to test if it intersects potentially millions of primitives • Need to do this for potentially million rays (1024x1024 pixels) • actually, it gets worse… more rays than this… • Algorithms exist to make this feasible, and remarkably efficient • But still much slower than Z-buffer with special-purpose GPU hardware • Some research-level hardware that performs ray tracing • Possible to write ray tracer to run on current programmable GPU • (Currently not faster than software ray tracer) • Notice: each pixel is rendered independently; allows parallel processing
Ray Intersection • For each intersection, need data for lighting: • Surface Position & Normal • Texture coordinates and texture map info • Color, material properties, procedural shader info class Intersection { Vector3 Position; Vector3 Normal; Vector2 TexCoord; Material *Mtl; float Distance; // Distance from ray origin to intersection }; • As usual, typically support primitive types: • Triangle • Sphere • Patch • For each primitive type, need to know how to • test if ray intersects primitive • compute or interpolate position, normal, texture coordinates, etc. • e.g. for triangle: have vertex data, do bilinear interpolation • will get back to this later…
Lighting • Given the intersection information, apply any lighting model we want • Eye vector is negative of ray direction vector • Can include procedural shaders, texture lookups, texture combining, bump mapping, … • The result of the lighting equation is a color to assign to the pixel • The power of ray tracing comes from • spawning new rays • tracing them recursively • known as secondary rays
Shadow Rays • Trace a ray from the surface towards each light • Ray origin is surface point, direction is light vector • Test for object intersections • If the ray hits another object, the surface is in shadow • Note: If dot product of the surface normal with the light direction is negative • The object is shadowing itself • No need to trace a ray.
Shadow Rays • Simpler than other rays • Just want to know whether an object is in the way • Don’t need to compute intersection point, normal, texture coords, etc. • Don’t need to find closest object • If any object blocks the light, the light is blocked • Can stop as soon as we find an intersection • Implementation note when spawning rays: • Allow ray to intersect the same object. • If the object is concave, it may self-shadow • But make sure not to report an intersection with the current surface point • typically offset ray origin slightly to make sure the ray is outside the object
Reflection Rays • If material is reflective: • Spawn a new ray: • Origin is surface point • Direction is eye ray direction reflected about the surface normal • Known as a reflection ray • Trace this ray • Find the nearest object it hits (if any) • Compute the lighting for that object, using the ray direction as the eye direction • If that object is reflective, recurse! • Can have reflections-of-reflections • Stop recursion when reaching a non-reflective object • Sometimes put a recursion limit of ~10 to avoid an infinite loop • As with traditional rendering, can enclose entire scene in an environment map • If the ray hits no other objects, it will hit the environment map • The “lighting” calculation for the environment map is simply to look up the color
Reflections • Surfaces in the real world don’t act as perfect mirrors • Real mirrors absorb light, only reflect 95%-98% of the light • Surface may tint the reflection • Multiply reflected ray’s color with the surface tint color • Partially reflective materials • E.g. polished plastic • Diffuse component as well as shiny component • Add contribution of both • Specular highlights • “Specular highlight” is really just reflection of the light source • Can make models of light source objects (light bulb, etc.) • If reflection ray hits the light source object • “Lighting” calculation for the light source object returns the color/intensity of the light • Shape of light source object determines shape of specular highlight • (We’ll talk about bluriness later…) (http://www.neilblevins.com)
Refraction • AKA Transmission: light passes through material • Light bends (refracts) when it passes from one material to another • If material is transmissive (transparent) • Spawn refraction ray AKA transmission ray • Use Snell’s law to compute direction of refracted ray • Based on index of refraction of the two materials • look up in table of physical constants • vacuum: 1 • air: 1.000277 • water: 1.33 • glass: 1.5-1.75 • (Actually, index of refraction depends on wavelength, which is how prisms work, and the source of chromatic aberration in camera lenses. We tend to ignore that in computer graphics.) • Trace in the same way as for reflection
Computing Refraction Direction n d θ1 n1 z n2 θ2 θ2 t
Reflection and Refraction • A transparent surface typically both reflects and refracts • Spawn two rays: • Reflection ray and refraction ray • Trace both rays and combine the results Reflection ray Normal Primary ray Transmission ray
Combining Reflection and Refraction • The proportion of light reflected vs. refracted depends on the angle of the ray • Coming in along the normal, more light is transmitted • Coming in edge-on, more light is reflected • Proportions given by Fresnel equations • The full Fresnel equations depend on polarization of the light • Simple approximation due to Schlick, commonly used in CG: (http://www.neilblevins.com)