Download
1 / 23
260 likes | 380 Views
Commands in The LINE command allows you to create single straight line or a chain of straight lines. By using this command we can make any object where line is used.<br>AutoCAD

E N D
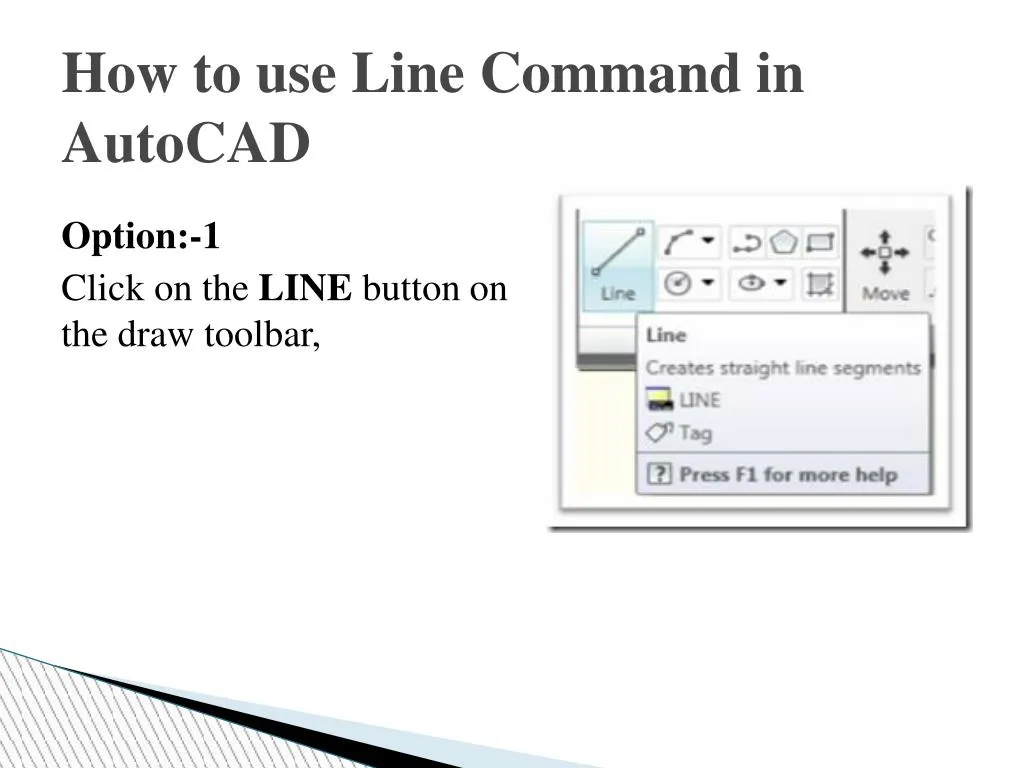
How to use Line Command in AutoCAD Option:-1 Click on the LINE button on the draw toolbar,
Option:-2 • Click on Draw and select Line under the DrawMenu. Option:-3 • Type L (for line) at the command: prompt.
Continue:- • Prompt: LINE from point: click the LEFT mouse button in the drawing area to position the first end of the line. • Prompt: To point: Give the location for the second end of the line. • Prompt: To point: Either give the location for the end of the next line , attached to the last end point you added , or press Enter to end the line and exit the line command.
Want to learn Line Command - Contact Us - ADMEC MULTIMEDIA INSTITUTE Leader in Animation & Digital Media Education ISO 9001 : 2008 CERTIFIED - Visit Our Websites - www.admecindia.co.in www.cadtraininginstitute.com Phones: +91-9811-8181-22, +91-9911-7823-50
POLYGON COMMAND The POLYGON command allows you to create regular polygons (polygons with equal sides and angles).
How to use POLYGON Command • Option:-1 • Click on the POLYGON button on the draw toolbar
Option:-2 • Select Polygon under the Draw Menu,
Option:-3 • Type POL (for the Polygon) and then press ENTER at the command: Prompt
Continue: • Prompt: Number of sides: Type in a value for the number of sides for the polygon. • Prompt: Edge/ <Center of Polygon>: Select the location or specify the center of the Polygon and press Enter. • Prompt: Inscribed in circle/circumscribed about circle: Type I (for across the corners) or Type C (for across the flats) and then press Enter. • Prompt: Specify Radius of circle: Type a value for the radius and then press Enter.
Note: • A Polygon is a group or a single entity in AutoCAD. To modify a polygon, you must Explode it first.
Want to learn Polygon Command - Contact Us - ADMEC MULTIMEDIA INSTITUTE Leader in Animation & Digital Media Education ISO 9001 : 2008 CERTIFIED - Visit Our Websites - www.admecindia.co.in www.cadtraininginstitute.com Phones: +91-9811-8181-22, +91-9911-7823-50
POLYLINE (PLINE) COMMAND The PLINE command allows you to create “grouped” objects that can be extruded, given line width on the screen, and can contain arc segments. I n this we cannot give offset in single line. If we want to give offset in single line then firstly we can Explode the Polyline, and give the offset in single line.
How to use POLYLINE Command • Option:-1 • Click the POLYLINE button on the Draw toolbar
Option:-2 • Select the Polyline under the Draw menu
Option:-3 • Type PLINE or PL (for the Polyline) and then press Enter at the command: Prompt
Continue: • Prompt: Specify start point: To start the Pline, Click on the screen with the Left mouse button. • Prompt: Current line- width is 0.0000 • Prompt: Specify next point or [Arc/ Halfwidth/ Length/ Undo/ Width]: Select an option or select next end of the Pline segment.
NOTE:- It is very useful OPTIONS. • Close- Connect the last segment of a Pline with the first. • Length- Draw a Pline segment at the same angle as the connected to the previous segment using a length you specify. If the last element was an Arc, the new segment is tangent to the Arc. • Undo- Reverse that last last polyline operation.
Arc- Allows you to create a Pline arc, which can be added to an existing segment or used to being a Pline object. When Arc is selected: Prompt changes to: Angle/ Center/ CLose/ Direction/ Halfwidth/ Line/ Radius/ Second pt/ Undo/ Width/ <Endpoint of Arc>:
Want to learn Poly Line Command - Contact Us - ADMEC MULTIMEDIA INSTITUTE Leader in Animation & Digital Media Education ISO 9001 : 2008 CERTIFIED - Visit Our Websites - www.admecindia.co.in www.cadtraininginstitute.com Phones: +91-9811-8181-22, +91-9911-7823-50
ARC Options: • Angle: Create an Arc through a specific number of degrees. A negative value for the angle creates an Arc that is clockwise in direction. • CEnter: Allows you to specify a center point for the Arc segment. • CLose: Close the Pline segment by connecting it to the first segment created.
Direction: Allows you to select a starting direction for arc instead of using the ending direction of the previous segment as a default. • Line: Switches back to drawing line segment instead of arcs • Radius: Allows you to specify a radius for the arc. • Second pt: Allows you create an arc through three points.
Want to learn ARC Options - Contact Us - ADMEC MULTIMEDIA INSTITUTE Leader in Animation & Digital Media Education ISO 9001 : 2008 CERTIFIED - Visit Our Websites - www.admecindia.co.in www.cadtraininginstitute.com Phones: +91-9811-8181-22, +91-9911-7823-50