Download

1 / 27
270 likes | 476 Views
Tomcat Setup. BCIS 3680 Enterprise Programming. Overview. Tomcat installation Getting Tomcat to run Add new environment variables Append new values to system PATH variable Web application deployment Alias and context Deployment folder. Tomcat Installation.

E N D
Tomcat Setup BCIS 3680 Enterprise Programming
Overview • Tomcat installation • Getting Tomcat to run • Add new environment variables • Append new values to system PATH variable • Web application deployment • Alias and context • Deployment folder
Tomcat Installation • Make sure you have JDK installed (version 1.6 or later). If you have multiple versions of JDK, uninstall all except the latest one. • It’s OK to keep JRE. • If you have included Tomcat when you installed NetBeans, you have it already. Skip to Slide #6. • If you haven’t, download the Tomcat file from http://tomcat.apache.org/download-70.cgi.
Tomcat Installation (Windows) • Unzip the downloaded file. The unzipping process may create an additional layer of folder. • Locate the folder right above the Tomcat subfolders (bin, conf, lib, etc.), i.e., apache-tomcat-7.0.56 for the current version. Do NOT copy this Copy this
Tomcat Installation (Windows) • Right-click the folder and select Copy or Cut.
Tomcat Installation (Windows) • Paste the folder to the root of a partition, e.g., C:\, D:\, etc. • It is highly recommended that you rename the folder to a short name, e.g., D:\Tomcat. • Open the folder. Make sure you see the subfolders like \bin, \conf, etc. immediately beneath it.
Setting Up Tomcat on Your Computer • To start Tomcat, Windows needs to know where you installed Tomcat and the JDK, as well as where to find the executable files of Tomcat and Java. • These are done by adding/modifying system environment variables. • To do this, right-click My Computer. Select Properties. Click the Advanced tab. Then click the Environment Variables button. Then click New under System Variables. • Note on Vista or Win7 machines you’ll need admin right to perform this task.
Add New Environment Variables • Click the “New” button in the System Variablespane (bottom pane).
Add New Environment Variables • Enter the variable name and its value. For Tomcat to work • Add JAVA_HOME – Value: Path to the JDK base folder (e.g., D:\Java\jdk1.6.0_16), not its bin subfolder. • Add CATALINA_HOME – Value: Path to the Tomcat base folder (e.g., D:\Apache\Tomcat), not its bin subfolder. • Note in this and forthcoming screenshots, Tomcat was installed to D:\Apache\Tomcat. This is different from previous screenshots showing Tomcat installation, when it was installed to D:\Tomcat. Type variable name exactly as this (not case sensitive) Replace this with your own Tomcat installation path
Verify System Variables • Start a command console by doing the following: • Click Start. • Click Run. • Type in cmd. • Click ‘OK”. • Alternatively, click Start | Accessories | Command Prompt.
Checking CATALINA_HOME Variable • At the prompt, type set catalina_home and hit Enter. • If set correctly, you will see the name=value pair (in the example below, the value of the variable has been set to D:\Apache\Tomcat . Note: The SET command ordinarily is used to set a new value for the variable from inside the command console. But if we don’t provide a new value for the variable (as in this example), the command returns the current value of the variable instead.
Checking JAVA_HOME Variable • At the prompt, type set java_home and hit Enter. • If set correctly, you will see the name=value pair (in the example below, the value of the variable has been set to D:\Java\jdk1.6.0_16.
Appending Values to PATH Variable • In the System Variables pane, find and select the Path variable. Click the “Edit” button.
Appending Values to PATH Variable • Move mouse cursor all the way to the end of what’s in the Path variable. • Add a semicolon, followed by the new value (path to a folder). You don’t have to add a backslash to the end. In this example, I am adding D:\Java\jkd1.6.0\bin. • Click “OK”.
Appending Values to PATH Variable • For Tomcat to work, it is necessary to append the following two paths to the Path system variable: • Append to Path – The \bin subfolder of JDK (e.g., D:\Java\jdk1.6.0_16\bin) • Append to Path – The \bin subfolder of Tomcat (e.g., D:\Apache\Tomcat\bin)
Checking PATH Variable • At the prompt, type path and hit Enter. • Look for the paths to the binary folders for the JDK (in this example, D:\Java\jdk1.6.0_16\bin) and Tomcat (in this example, D:\Apache\Tomcat\bin).
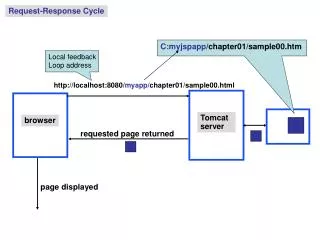
Getting Web Apps to Work • Verify that Tomcat works. • Understand how context works. • Create folders/files for easy deployment of your web app. • Configure server.xml. • Configure web.xml. • Test your web app.
Verification of Tomcat • Start a command prompt and run command: catalina run • Tomcat is up if you see “INFO: Server startup in #### ms”
Exiting Tomcat • To exit Tomcat, get back to the command console. • Press CTRL + C simultaneously. • When asked whether to terminate batch job, type y and hit ENTER. • You often need to stop and restart Tomcat after making changes to configurations or class files.
Alias for Web App • A web application consists of a collection of files that are required to support a particular feature or task you want to publish to the outside world. The set of files are stored in a folder, which is the “deployment folder” for the application. It can contain subfolders. • When provide visitors with the URL to your web app, you don’t want to show them the physical path to the deployment folder. • Instead, you create an “alias” (or “context” or “virtual directory”) for the folder. In the URL, it is appended to the domain name so that the URL points to that web app. • Append any file names and/or subfolder names to the alias when accessing files directly under the deployment folder or under one of its subfolders.
Folders for Deployment • On your USB drive, under the folder you created for BCIS 3680, create a subfolder for each chapter/topic. • Download index.html and default.htm into the deployment folder. • Inside the deployment folder, create a subfolder called WEB-INF. • Download the web.xml file into this subfolder.
Modifying web.xml Under Win8/7/Vista right click
Context for Web Applications • In Tomcat terminology, an alias is a “context”. • We want to set up a context for own our web app for each topic. • Open the server.xml file in the \conf subfolder of Tomcat installation folder. and modify it. • Unlike HTML, XML is case-sensitive! • Inside the “Host” element (tag), modify the “Context” element. For example: <Context path="/jsp" docBase="E:/BCIS 3680/jsp" debug="0" reloadable="true" /> • Restart Tomcat.
Testing Web Site • After you have complete all the previous steps, you can verify whether your web site is up and running by: • First, start Tomcat server from command prompt. • Second, open the browser and enter the following URL: http://localhost:8080/<context>/default.htm • Replace the <context> part with the alias you defined in the server.xml file.