Download
1 / 25
250 likes | 258 Views
HOW TO INSTALL ATTENDANT CONSOLE AND AN AUTO ATTENDANT USING CUCM6.0 AND UNITY CONNECTION 2.0. Cisco Unified Communications Manager Attendant Console.

E N D
HOW TO INSTALL ATTENDANT CONSOLE AND AN AUTO ATTENDANT USING CUCM6.0 AND UNITY CONNECTION 2.0
Cisco Unified Communications Manager Attendant Console • Attendant console clients and attendant console servers communicate through Java RMI, which is also how attendant console servers communicate with each other. • The attendant console server uses a custom RMI socket to bind to specific TCP ports for sending the RMI response to the client. You can configure this by using Service Parameter RMI Bind Port. • RMI uses a TCP Callback Port to send callback messages to the attendant console client. You can configure the attendant console Client Callback Port can be configured using Settings Dialog.
Cisco Unified Communications Manager Attendant Console Use Cisco Unified CallManager Serviceability to activate and start the Cisco CallManager Attendant Console Server service on all servers that are running the Cisco CallManager service and to activate the CTIManager service on one server in the cluster. Refer to the Cisco Unified CallManager Serviceability Administration Guide.
Cisco Unified Communications Manager Attendant Console • 1. Add attendant console users: • Choose Application > Cisco Unified CM Attendant Console > Cisco Unified CM Attendant Console User
Cisco Unified Communications Manager Attendant Console 2. Setup Pilot Points and Hunt Groups. Note – Use the Default Device Pool and Location Once created it should register with the CUCM. If it does not perform a reset and/or reset the CTI and Attendant Console service
Cisco Unified Communications Manager Attendant Console 3. Add the User member to the hunt group, using the username you created earlier
Cisco Unified Communications Manager Attendant Console 3. Create the attendant console application user and the attendant console device authorization user. Just enter username and password then save User Management > Application User.
Cisco Unified Communications Manager Attendant Console 4. Associate attendant phones with the attendant console device user. Before the attendant uses the attendant console, you must associate the attendant console phones to the attendant console device authorization user that you created on the Application User Configuration window. Perform the following procedure: Choose User Management > Application User
Cisco Unified Communications Manager Attendant Console 5. Add the Attendant Console application user to the Standard CTI Enabled group, the Standard CTI Allow Call Park Monitoring group, and the Standard CTI Allow Control of All Devices user group. Choose User Management > User Group.
Cisco Unified Communications Manager Attendant Console 6. Verify that the Cisco CallManager Attendant Console Server service activates and runs on all servers that are running the Cisco CallManager service. Verify that the CTIManager service activates and runs on one server in the cluster.
Cisco Unified Communications Manager Attendant Console 7. Make sure that each attendant Cisco Unified IP Phone is set up correctly for use with the attendant console. 8. Make sure that the attendantconsole PC is set up correctly for use with the attendant console. 9) Install and configure the attendant console on each attendant console user PC. Note: After a Cisco Unified CallManager upgrade, you must reinstall the Cisco Unified CallManager Attendant Console Plug-in on the attendant PCs. Login Screen using the AC login not the user login
Cisco Unified Communications Manager Attendant Console Settings Screen is where you insert the Directory number of the Phone that is using AC. On first start up this window will pop up first before the login box
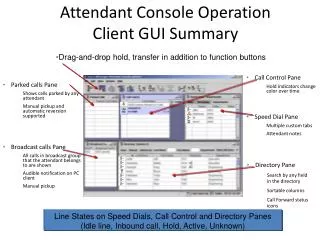
Cisco Unified Communications Manager Attendant Console Attendant Console Screen. Note the Call Control is up indication in the bottom right of the console screen
Cisco Unified Communications Manager Attendant Console • Creating a Unity Connection IVR • A typical process is as follows. • Caller calls the Main number • The call is then transferred to the Unity Call Handler. • The Unity Call handler plays the company recorded message, including details of dialling the extension if they know it. • If no digit is pressed then the number is routed back to the Attendant Console Pilot point. (This is also achieved by pressing 0) • Other options can be added such as leaving a message. • The caller is then in the Attendant Console queue and will be answered or will hear MOH until there call is answered.
Cisco Unified Communications Manager Attendant Console CallManager (Optional). If the customer requires a quick dial to Reception i.e. ‘0’ Configure this in the Translation Pattern
Cisco Unified Communications Manager Attendant Console Create a CTI Port; remember to increase the Max number of calls and Bust Trigger if it’s a high usage number. Use the main reception number as the directory number There is no need to create an end user for Unity as you will be creating a new call handler later.
Cisco Unified Communications Manager Attendant Console CTI Route Point
Cisco Unified Communications Manager Attendant Console Once this has been created go to Unity Connection Admin Page and in the left hand pane select Call Managegment>System Call Handlers Select the Operator Call handler and select Edit>Transfer Option Select the Standard Transfer Option
Cisco Unified Communications Manager Attendant Console Change the Transfer Action from Greeting (the default) to Extension number 0 so the caller can transfer back to reception
Cisco Unified Communications Manager Attendant Console The go back to Call Management> System Directory Call Handlers and press Add New Insert a Name and an extension number and press SAVE
Cisco Unified Communications Manager Attendant Console Once Saved go to Edit>Caller Input and change the 0 key to connect to the Operator remember to SAVE it.
Cisco Unified Communications Manager Attendant Console Select Edit>Greetings In the greeting page Select Standard
Cisco Unified Communications Manager Attendant Console In the Callers Hear section change to My Personal Greeting and SAVE (Save after each Change I have found that if you make all three changes and save, the personal greeting has some additional unity messages attached to it) In the After Greeting section Select Call Handler and from the drop down menu select Operator and Attempt Transfer and SAVE In the Recording section Record your message via the PC or phone and SAVE
Cisco Unified Communications Manager Attendant Console And that’s it how to set up Attendant Console and a Basic Auto Attendant in Unity Connection. You can add things like voicemail etc through manipulation of the Call Handler