Download
1 / 52
540 likes | 740 Views
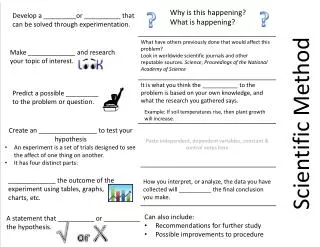
Scientific Method Microscopy and Cytology. Lecture Outline. Scientific method, week 2 Introduction to statistics Compilation of mealworm data Microscopy Introduction to microscopes Principles of microscopy Microscope care Introduction to cytology Unit #7 experiments. Scientific Method.

E N D
Lecture Outline • Scientific method, week 2 • Introduction to statistics • Compilation of mealworm data • Microscopy • Introduction to microscopes • Principles of microscopy • Microscope care • Introduction to cytology • Unit #7 experiments
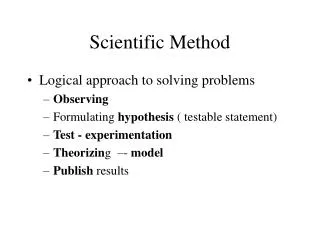
Overview of the Scientific Method Observation Theory/Law Results Hypothesis Experiment
Why Do We Use Statistics? • Natural world is full of randomness • Human mind deals poorly with randomness • Statistics tells the likelihood that a result is due to randomness
Mean, Median, and Range • Mean – Arithmetic average • Median – Middle value • Range – Difference between smallest and largest value • Ex: 2, 2, 3, 4, 4, 4, 5, 6, 10 • Mean: = 4.44 • Median: 2..3..4..5..6..7..8..9..10 6 • Range: 10 – 2 = 8 2 + 2 + 3 + 4 + 4 + 4 + 5 + 6 + 10 9
Standard Deviation • Shows how spread out a set of data is • Small standard deviation – Values are close together, data is reliable • Large standard deviation – Values are scattered farther apart, data is less reliable • Majority of the data will fall within one standard deviation of the mean • Ex: 2, 2, 3, 4, 4, 4, 5, 6, 10 • Mean: 4.44 • SD: 2.45
Defining the Standard Deviation • Define: • a1, a2, a3,…an = values in the dataset • x = mean • n = number of values in the dataset • Deviation = Difference between each value and the mean • Deviation: a1 – x, a2 – x,…an – x • Variance = Sum of squared deviations divided by total number of values minus 1 • Variance: • Standard deviation = Square root of variance • Standard deviation: (a1 – x)2 + (a2 – x)2 + … +(an – x)2 n – 1 √ (a1 – x)2 + (a2 – x)2 + … +(an – x)2 n – 1
Student’s t-Test • Compares two means • Used to determine whether apparent difference between two means is random or nonrandom • Likelihood of nonrandom difference depends on: • Sample size • Standard deviation
The Null Hypothesis • A hypothesis cannot be proven. • A hypothesis can be disproven. • Statistical analysis seeks to disprove/reject an inverted hypothesis: • Hypothesis: There is a difference in mealworm growth between substrate A and substrate B. • Null hypothesis: There is no difference in mealworm growth between substrate A and substrate B.
The Meaning of p • Student’s t-test provides a value (t) • Compare the t-value obtained to table of t-values • Each t-value associated with a % chance that the difference between two means is due to randomness • This % chance is p-value • Set cutoff for p-value as 0.05 = 5% • If p < 0.05 REJECT null hypothesis SIGNIFICANT • If p > 0.05 FAIL TO REJECT null hypothesis NOT SIGNIFICANT
Compilation of Mealworm Data • Take the mass of each mealworm and record as Day 7 • Calculate change in mass: Day 7 – Day 0 • Bring results to front • File with compiled data will be posted to Blackboard
Microscopy Permits Visualization of Objects Too Small to Be Normally Seen http://sciencephoto.com/images/download_lo_res.html?id=670066703 http://sciencephoto.com/images/download_lo_res.html?id=662340142 http://sciencephoto.com/images/download_lo_res.html?id=771800109
Types of Microscopes • Light microscopes • Simple light microscope • Compound light microscope • Dissecting light microscope • Electron microscopes • Transmission electron microscope • Scanning electron microscope • Ultra high power microscope • Scanning-tunneling microscope • Atomic force microscope
Simple vs. Compound Microscope Simple – One Lens Compound – Multiple Lenses http://students.ou.edu/J/Renee.E.Jones-1/Episode%202.html http://www.scienceeducationonline.com.au/microscopes.html
Parts of the Compound Light Microscope http://academic.pgcc.edu/~kroberts/Lecture/Chapter%204/04-04_CompoundLM_L.jpg
Parts of the Dissecting Light Microscope http://i.ehow.com/images/a04/jq/h2/use-stereo-microscope-200X200.jpg
Electron Microscopes Magnify Extremely Small Objects http://sciencephoto.com/images/download_lo_res.html?id=770900084 http://sciencephoto.com/images/download_lo_res.html?id=770900075 http://serc.carleton.edu/images/research_education/geochemsheets/techniques/UWSEM.jpg
Ultra High Power Microscopes Can Resolve Individual Molecules http://www.ounqpi.org/Websites/nqpi/Images/facilities/_full_0_low%20temp%20STM.jpg http://cdn.physorg.com/newman/gfx/news/2005/Yan_pressrelease_fig2d.jpg
Important Concepts in Microscopy • Magnification • Resolving Power • Contrast • Viewing Field • Image orientation • Depth of focus • Size of the field of view • Working distance
Magnification • How much bigger the object under the microscope looks • Depends on the lens or lenses • Total magnification = product of lens magnifications • Oculars: 10X • Objective lenses: 4X, 10X, 40X, 100X • Totals: 40X, 100X, 400X, 1000X
Resolving Power • Ability to tell the difference between two objects that are close together • Higher resolution lets us see smaller things clearly • Depends on: • Light wavelength – shorter is better (blue filter) • Refractive index – keeping constant is better (immersion oil)
Oil Immersion Improves Resolution http://academic.pgcc.edu/~kroberts/Lecture/Chapter%204/04-05_OilImmersion_L.jpg
Contrast • Ability to tell the difference between objects and background • Can be improved using stains Bauman, R.W. (2010). Microbiology with Diseases by Taxonomy (3rd ed.) New York, NY: Benjamin Cummings.
Considerations for the Viewing Field • Orientation – Image is inverted and reversed • Depth of focus – How much thickness of the sample is in focus • Smaller as magnification increases • Parfocal – stays in focus as magnification increases • Field of view – How much area of the slide is seen • Smaller as magnification increases • Parcentral – stays centered as magnification increases • Working distance – How far the objective lens is from the slide • Smaller as magnification increases
Use the Coarse Focus Knob for the Lowest Power Only http://www.olympusamerica.com/seg_section/product.asp?product=1032
Always Store the Microscope With the Lowest Power Objective in Place http://www.scienceeducationonline.com.au/microscopes.html
At the Beginning of the Day… • Remove the dust cover from the microscope. • Inspect for damage. Report anything you find! • Plug in the microscope. • Clean all lenses with lens paper ONLY. • DO NOT clean lenses with anything other than lens paper! • Inform instructor if you find oil on a lens. • Rotate the 4X objective into position above the stage. • Center the stage, and roll it down to the lowest position. • Turn on the microscope light source.
Use of the Oil Immersion Lens • Find specimen and focus on 4X using coarse and then fine focus knobs. • Move up to 10X and focus using FINE FOCUS KNOB only. • Move up to 40X and focus using FINE FOCUS KNOB only.. • Slide 40X objective partly out of the way. • Place ONE drop of immersion oil on slide. • Gently slide 100X (oil immersion) objective into place. • Focus using FINE FOCUS KNOB only!
Use of the Oil Immersion Lens • When finished observing under oil immersion: • Rotate from 100X objective to 4X objective and remove slide. • Clean oil from slide using lens cleaner and lens paper. • Carefully clean oil from the oil immersion lens using lens cleaner and lens paper at the end of each class.
At the End of the Day… • Remove slides from the microscope stage. • Turn off the microscope light source. • Clean oculars, ALL lenses, stage, and base with lens cleaner and wipe with lens paper. • Rotate the nosepiece until the 4X objective is in place. • Center the stage, and roll it to the lowest position. • Unplug the microscope. • Cover the microscope with the dust cover.
NEVER CLEAN THE MICROSCOPE WITH ANYTHING OTHER THAN LENS PAPER!
Cytology is the Study of Cells • Cell = smallest unit of life • Composed of water and macromolecules • H, C, O, N are most predominant elements • Two types of cells • Prokaryotic cells • Eukaryotic cells • Organisms can be one or many cells • Unicellular – Single-celled organism • Multicellular – Organism composed of many cells
Robert Hooke and the Cell Theory • The cell is the smallest unit of life. • All living organisms are composed of cells. • All cells arise from other cells. http://sciencephoto.com/images/download_lo_res.html?id=725050013
Important Features of Prokaryotic Cells External Structures Internal Structures Cytoplasm Nucleoid (chromosome) Ribosomes • Capsule • Cell wall • Plasma membrane • Flagella • Pili
Overview of a Prokaryotic Cell http://micro.magnet.fsu.edu/cells/bacteriacell.html
Bacterial Cell Morphologies Coccus (Sphere) Bacillus (Rod) Spiral http://www.microbelibrary.org/images/atlas-gram/streptococcus%20oralis%20fig5.jpg http://www.microbelibrary.org/images/uploads/0/jpg/1571_bacillus%20subtilis%20fig4.jpg http://www.scientificpsychic.com/health/spirochete.jpg
Important Features of Eukaryotic Cells External Structures Internal Structures Cytoplasm Membranous organelles Nucleus Mitochondria Chloroplasts (plants) Endoplasmic reticulum (R/S) Golgi apparatus Lysosomes Peroxisomes Nonmembranous organelles Nucleoli Ribosomes Cytoskeleton Centrioles (animal cells) • Cell wall (plants) • Plasma membrane • Flagella • Cilia
Overview of an Animal Cell http://millville.sps.edu/allaccess/divisions/science/jdonnelly/Cell%20Page.htm
Overview of a Plant Cell http://millville.sps.edu/allaccess/divisions/science/jdonnelly/Cell%20Page.htm
Introduction to Microscope Use • Light microscope • Exercise 7.1 – field of view • Exercise 7.2 – depth of focus • Exercise 7.3 – image orientation • Dissecting microscope • Exercise 7.4 – introduction to dissecting microscopes
Cytology • PREPARE ALL SLIDES FIRST! • Exercise 7.5 – Models • Exercise 7.6 – Wet mounts • Cyanobacteria – prepared slide • Elodea leaf + safranin • Onion epidermis + iodine • Cheek cells + methylene blue • Ear swab + Romanowsky stain • Exercise 7.7 – Prepared bacterial slides
Elodea Leaf • Drop of water on slide • Transfer Elodea leaf into drop • Place one edge of coverslip against drop • Gently lower coverslip over drop • Drop of safranin on slide next to coverslip – diffuse in • 4X 10X 40X http://lima.osu.edu/biology/images/chlorop.jpg
Onion Epidermis • Drop of water on slide • Transfer onion epidermis into drop • Place one edge of coverslip against drop • Gently lower coverslip over drop • Drop of iodine on slide next to coverslip – diffuse in • 4X 10X 40X http://sciencephoto.com/images/download_lo_res.html?id=670052466
Cheek Cells • Drop of methylene blue on slide • Scrape inside of cheek with toothpick • Swirl into stain drop • Place one edge of coverslip against drop • Gently lower coverslip over drop • 4X 10X 40X http://sciencephoto.com/images/showFullWatermarked.html/P470060-LM_of_epithelial_cells_from_the_human_mouth-SPL.jpg?id=804700060