Download
1 / 28
280 likes | 409 Views
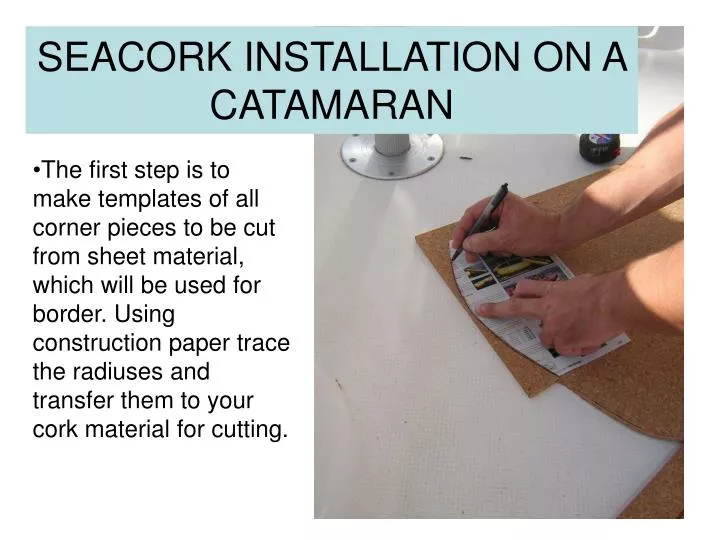
SEACORK INSTALLATION ON A CATAMARAN. The first step is to make templates of all corner pieces to be cut from sheet material, which will be used for border. Using construction paper trace the radiuses and transfer them to your cork material for cutting.

E N D
SEACORK INSTALLATION ON A CATAMARAN • The first step is to make templates of all corner pieces to be cut from sheet material, which will be used for border. Using construction paper trace the radiuses and transfer them to your cork material for cutting.
After tracing, cut pieces in two or three passes keeping the blade perpendicular to the cutting surface. Sand the cut edge using 60 grit paper with a sanding block to smooth and shape your cut edge. CUTTING BORDER PIECES
SIZING THE CUT PIECE Once the first cut is made, trace a parallel line to the cut edge using a piece of cork of border dimension to ensure the accuracy of the piece.
TRACING THE CUT PIECE • Be sure the trace line is smooth and parallel before cutting. This will ensure the uniformity of the piece. Sand the cut edge and inspect the piece for accuracy
MAKING THE CAULK GROOVE • Once cut, one must create the caulking groove. Trace another line 4mm from the edge which will be the cutting line to create the groove.
CUTTING THE 4MM TRACE LINE • Then, using one or two passes with the cutter, cut on this line, half way into the cork, keeping the cutting blade as perpendicular to the cork as possible. • (An adjustable razor knife would be helpful allowing you to set the depth of the blade in this cut and the next cut)
COMPLETING THE GROOVE CUT To complete the groove, lay your piece flat cutting into the side intersecting your cut line, removing the groove piece. Repeat this procedure and make all the border pieces. Please be careful
PROCEEDING WITH THE INSTALLATION • Locate the center line of your work area and mark it, rough fitting your sheets. At times a pattern might assist in cutting of the sheets for the rough fit.
ROUGH FITTING AND MARKING POSITION Lay your rough cut sheets into place, securing one to the other with masking tape. Mark your pieces relative to each other and their position in place on the deck. This will make it possible to return them to the same location when gluing.
FITTING AND CHECKING PRIOR TO GLUING Here the deck pieces have been fitted but not glued. Check your alignment with the center line and the fit to all sides.
Here is another view of the preliminary assembly of this deck. Before proceeding to gluing, reference the location of the entire piece and the individual pieces to each other. Number them prior to your picking them up, this will ensure your accuracy when placing them into position gluing them down. CHECK YOUR WORK CAREFULLY
DECK PREPARATION AND GLUING Remove the pieces in preparation for cleaning. Degrease with acetone after vacuuming. Be sure not to erase any location marks. Be sure the surface is flat and smooth. Correct any deficiencies before proceeding.
GLUING WITH NOTCHED TROWEL • Apply the construction adhesive to the deck area using a 3mm notched trowel, starting at the centerline previously marked. Be sure the adhesive area is slightly larger than the sheet area.
Be sure the adhesive is uniform. Set the first sheet into place on the adhesive. Starting from the center apply pressure working to the outside. Using a rubber mallet and a block of wood will assist. The purpose is to remove any air that may be trapped, setting the sheet well into the glue. PLACING THE FIRST SHEET
CONTINUE GLUING AND JOINING SHEETS • Repeat the gluing procedure securing each sheet to the previously installed one with masking tape, apply pressure at the sheet joints to minimize the joint seam. Clean any excess adhesive from the caulk grooves but do not clean the excess glue from the joint seam or the cork surface at this time.
Once all the pieces have been glued we can trace the border pieces. Using a board and the cut border pieces, Position your pieces and trace them onto the sheet for cutting. Now is the time to locate and consider caulking joint seams in relative position to one another. TRACING THE BORDER PIECES
Once all the border pieces have been traced, check for appearance, you can now proceed with cutting. Cut the traced lines carefully keeping your cutting blade as perpendicular as possible, insuring straight cuts. Inspect your work after cutting. CUTTING YOUR TRACED BORDER
REMOVE CUT PIECES AND ADHESIVE Immediately remove all cut pieces and glue from the deck. It is best to do this the same day while the glue is still pliable. A chisel may be helpful at times if the glue has set.
Insert your border pieces checking their fit. Mark their position relative to each other and the sheet. Check your work and proceed with gluing. PRE-FIT BORDER PIECES BEFORE GLUING
JOINING AND SPACING WHEN FITTING When joining two boards, miter the joint leaving a 4mm caulking space. Once all boards have been glued, check your work for uniform spacing and appearance.
CAULKING YOUR NEW SEACORK DECK Clean all the caulking grooves with a vacuum and a brush. Be certain they are free of dust. Wash the grooves with acetone and vacuum to dry. Cut the tube nozzle square, approximately 12mm in diameter. Holding the tube nozzle particular to the groove apply the deck caulking. Do a small area at a time approximately 8 square feet.
REMOVE EXCESS MATERIAL With a spatula or squeegee flatten and remove excess deck caulk material. Do not attempt to put this excess material into a groove, as it will trap air and you will have to return to repair the void which will show itself when sanding.