Download

1 / 40
400 likes | 546 Views
企業建置前端 Java Server Page 程式設計. 井民全. outline. JSP Container 網頁表單的處理. Web 伺服器( Apache 或 IIS). JSP 執行的過程. JSP page. 1. Request. 瀏覽器 IE Netscape. 產生 Servlet 程式碼. 編譯 Servlet 程式碼. 4. Response. JSP Container. 就是能夠執行 JSP 的伺服器 JSP Container List.

E N D
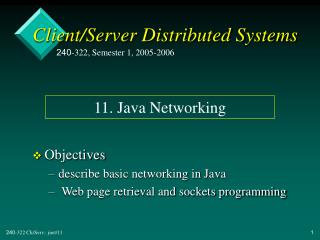
outline • JSP Container • 網頁表單的處理 Web 伺服器(Apache或IIS) JSP 執行的過程 JSP page 1. Request 瀏覽器 IE Netscape 產生 Servlet 程式碼 編譯 Servlet 程式碼 4. Response
JSP Container • 就是能夠執行 JSP 的伺服器 • JSP Container List 所有的container: http://www.flashline.com/Components/appservermatrix.jsp
Caucho Resin 2.1 • 網址: http://www.caucho.com/download/index.xtp • HTTP/1.1 • Servlets • JSP Processing • Load Balancing • 最重要的是, 可以與 IIS 整合
指定 resin home 指定 c:\inetpub\scirpts Resin Installation • 安裝 IIS 套件 in W2000 • 解壓縮 resin-ee-2.1.2.zip 到 c:\ • 會在 c:\建立 resin-ee-2.1.2 目錄 • 設定 • 執行 c:\ resin-ee-2.1.2 \bin\ setup.exe
Resin Installation • 指定 IIS Server: • 設定 C:\resin-ee-2.1.2\conf\ resin.conf • 執行: C:\inetpub\wwwroot C:\resin-ee-2.1.2\bin\ httpd.exe
Test 建立 test.jsp 放到 c:\Inetpub\wwwroot <%@ page language=javascript %> 2 + 2 = <%= 2 + 2 %> 鍵入 http://localhost/test.jsp
Scripting Element • Declarations <%! 宣告要用到的類別或變數 %> • Scriptlets <% out.println(“Hello World”); %> • Expressions (運算式) <%= 1+1 %> 注意分號 注意: 沒有分號
Declarations 可以定義 class 嗎? • 宣告變數 <%! int I=0; %> <%! int a, b, c; %> • 宣告物件變數 <%! Circle a = new Cirlce(2,0); %> • 定義 function <%! public String f(int I) { if ( I < 3 ) return “I 小於三”; } %> <%! class Person { String Name; public Person(){ Name=“Guest”; } } %> <% Person Tom=new Person(); %>
Scriptlets • 可包含任何有效程式片斷 • 主程式的撰寫區,只要合乎 Java 語法即可 <% 起始 程式片斷 %> 結束
Scriptlets範例 <% String name=null; if( request.getParameter(“name”) == null){ %> 沒有輸入 name (html 的部分) <% } else out.println(“Hi….”+ name);
1+…+100 的範例 <!% int I=0 , Sum=0; %> <% for (I=0; I<= 100; I++) Sum+=I; %> <font color="blue"> <%=Sum%> </font> 宣告變數 Scriptlets Html 的部分 試試看!
Resin 設定 • 設定為 NTServer: • 當系統reboot 時, Resin 自動啟動 dos> resin-ee-2.1.2/bin/httpd -install • 取消: dos> resin-ee-2.1.2/bin/httpd -remove
Resin 設定 • 與Jbuilder 整合 • Copy resin-jbuilder.jar到 Jbuilder lib/ext目錄. 參考資料:http://www.caucho.com/resin/ref/ide-jbuilder.xtp
參考資料 • http://www.jsptw.com/ • Resin 操作參考: http://www.caucho.com/resin/java_tut/index.xtp
網頁表單的處理 參考資料: JavaServer Pages 技術手冊
如何利用表單傳送資料 • 表單的功能: • 讓使用者透過網頁輸入資料 • 基本的傳送方法 • Get • Post http:// URL位址 ? Name1=Value1 & Name2=Value2 控制項Name 與 Value 和 URL 位址分開傳送
簡單的 Form 選擇傳送的方法 選擇傳送的地點 <Form method="Get" action="test.jsp"> <Input Type="Text" Name="name"> </Form> Test.htm Test.jsp <% String Name=null; Name=request.getParameter(“name”); out.println(“你輸入的內容“+name); %>
常見的輸入型態 • 本文輸入型態 (Text) • 密碼 (Password) • 選項按鈕 (Radio) • 核取方塊 (Check) • 下拉選項 (Select) • 檔案輸入 (File) • 本文區輸入(Textarea)
本文輸入型態 • 單行輸入 • 屬性 <Input Type= “Text” > 範例: <Input Type ="Text" Name="Jing" MaxLength=10 Size=5 Value="TextInput">
密碼輸入型態 • 遮掩使用者所輸入的資料. (沒有編碼) • 屬性 <Input Type= “Password” > 範例: <Input Type =“Password" Name="Jing" MaxLength=10 Size=5 Value="TextInput">
選項按鈕 • 讓使用者可以選擇 (單選) • 屬性 <Input Type= “Radio” > 範例: <Input Type = Radio Name=“群組1” Value=“M” Checked> 男 <Input Type = Radio Name=“群組1”Value=“W”> 女 <Input Type = Radio Name="群組1“ Value=“None”> 第三性公關
核取方塊 • 可多重選擇 • 屬性 <Input Type= “CheckBox” > 同選項方塊 範例: <p> 興趣:   <Input Type="CheckBox" Name="Habit" Value="Reading">閱讀 <Input Type="CheckBox" Name="Habit" Value="Game"> 打電動 <Input Type="CheckBox" Name="Habit" Value="Travel"> 旅行 </p>
下拉選項 • 所佔空間較小,廣被大家使用 <Select Name=“Old”> <Option Value=“10”> 10 – 20 </Option> <Option Value=“20” Selected> 20 – 30 </Option> <Option Value=“30”> 30 – 40 </Option> </Select>
<Form Name="Example" method="Post" action="Form.jsp"> <input type="submit" value="傳送檢核"> <input type="reset" value="重新輸入"> 傳送按鈕 清除按鈕 </Form> 綜合範例 檔名: Form.htm <html> </html> <p> 姓名:   <Input Type="Text" Name="Name"> </p> <p> 密碼:   <Input Type="Password" Name="Passwd"> </p> <p> 性別:   <Input Type="Radio" Name=“Sex" Value="Man"> <Input Type="Radio" Name=“Sex" Value="Woman"></p> Select 控制項 Check Box 控制項
<p>年齡:   <Select Name="Old"> <Option Value="10"> 10 - 20 </option> <Option Value="20"> 20 - 30 </option> </Select> </p> <p>興趣:   <Input Type="Check Box" Name="Habit" Value=Reading"> 閱讀 <Input Type="Check Box" Name="Habit" Value=Game"> 打電動 </p> Select 控制項 Check Box 控制項 回上一頁
接收資料的JSP端 檔名: Form.jsp <html> <body> <% String Name=request.getParameter("Name"); String Password = request.getParameter(“Password”); String Sex=request.getParameter(“Sex”); String Old=request.getParameter(“Old”); String [] Habit=request.getParameterValues(“Habit”); %> 姓名:  <%=Name%> 進一步的程式處理(push) </body> 下一頁 </html>
進一步的程式處理 <% if(Sex.equals(“Man”) out.println(“男 <br>”); else out.pritnln(“女 <br>”); %> 回上一頁
測試 (最簡單) • 將專案的 defaultroot中的所有內容 Copy -> www root中即可 注意: 要先把 Jbuilder 正在debug的專案停下來
測試 • Step 1: 複製整個 jsp 專案到 c:\test • Step 2: 複製 Form.htm 到defaultroot目錄中 • 在 IIS中加入虛擬目錄 test • Step 3:虛擬目錄連到defaultroot中 • 設定 Resin 目錄mapping • Step 4: 編輯 resin.conf 加入 • Restart the Resin <path-mapping url-pattern='/test/*' real-path='C:\test\Form\defaultroot'/>
檔案上傳 • 允許使用者將自己的檔案上傳到伺服器 • 傳送檔案的編碼方式 • 規格: http://www.ietf.org/rfc/rfc1867.txt <Form ENCType=“multipart/form-data” > <Input Type=“File”> </Form> 伺服器不能直接用 request.getParameter() 取得檔案資料.
利用 O’Reilly 的MultipartRequest • 提供原始碼 • 隨時都在 update • 下載網址: http://www.servlets.com/cos/index.html • 安裝 • Step 1: 解壓縮 cos-27May2002.zip • Step 2: 把 cos.jarResin 目錄下的lib中 cos.jar C:\jakarta-tomcat-4.1.12\common\lib (Tomcat) • Step 3: 重新啟動 Resin (bin/httpd) 參考資料: http://www.servlets.com/cos/index.html http://www.caucho.com/support/resin-interest/9912/0123.html
控制項的名稱 控制項大小 最大可輸入大小 <input type="submit" value="上傳檔案"> <input type="reset" value="清除所有的資料"> 傳送按鈕 清除按鈕 Html 檔的撰寫 檔名: UpLoadFile.htm <Form Name=“Form1” ENCType=“multipart/form-data” Method=“Post” Action=“UploadFile.jsp”> </Form> <p> 上傳檔案 1: <input type="file" name="File1" size="20" maxlength="20"> </p>
加入新的library 1 選擇cos.jar所在的目錄 2 Jsp 檔撰寫–JBuilder 設定 檔名: UpLoadFile.jsp Step 1: 利用 Jbuilder 建立一個 JSP 專案 Step 2: 建立一個新的 JSP 檔 Step 3: 設定Library
MultipartRequest multi=new MultipartRequest(request, "c:\\Test", 5*1024*1024); 讀取資料物件 檔案放置位置 限制檔案大小 取出控制項的名稱 java.util.Enumeration FileName=multi.getFileNames(); 取出檔案名稱 Jsp 檔撰寫 <%@ page import="com.oreilly.servlet.MultipartRequest"%> <Body> </Body> <% %> 下一頁
取出檔案名稱 while(FileName.hasMoreElements()){ String Name=(String) FileName.nextElement(); String SystemFileName=multi.getFilesystemName(Name); out.println(SystemFileName+"<BR>"); } 回上一頁
安裝與測試 • Step 1: 把 Jsp project c:\test • Step 2: 把 UpLoadFile.htm Jsp Project \defaultroot • Step 3: 設定 IIS 虛擬目錄 TEST c:\test • Step 4: 設定 Resin resin.conf 對應 IIS 目錄 • Step 5: 重新啟動 Resin <path-mapping url-pattern='/test/*' real-path='C:\test\'/>