Download
1 / 19
190 likes | 339 Views
More on Processing User Input. BCIS 3680 Enterprise Programming. Overview. More input fields More JSP elements Scriptlet Declaration Directive Useful techniques Session variables Redirecting traffic Comparing strings. Processing User Input.

E N D
More on Processing User Input BCIS 3680 Enterprise Programming
Overview • More input fields • More JSP elements • Scriptlet • Declaration • Directive • Useful techniques • Session variables • Redirecting traffic • Comparing strings
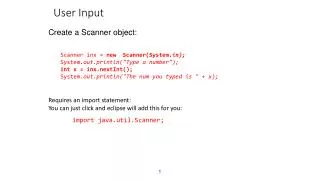
Processing User Input • Again, each piece of user input is passed as a parameter. • Just like with servlets, use getParameter() method to retrieve the value for a parameter. • Be very careful with parameters that may be passed as null (e.g., checkboxes), or textboxes that can’t be made mandatory according to business logic). • If user enters a value, it is passed as a String (with exact capitalization as entered by the user). If user skips a value (and your business logic allows it), it is passed as a null object. • A checkbox is an optional item. So if it is not checked and you try to get it as a parameter, you will get a null object.
Dropdown List • Use the <select> element to create a dropdown list. • The “name” attribute is its unique identifier that distinguishes it from other controls. • Each selectable item is defined in an <option> element, which is a “child” element of <select>. • The item that is selected by default is marked by the “selected” attribute. • The corresponding parameter has: • A name that comes from the nameattribute of the <select> element; • A value that comes from the value attribute of the <option> element selected by the user.
Dropdown List <p>State: <select name="state"> <option value="TX" selected> Texas</option> <option value="FL">Florida</option> <option value="CA">California</option> </select></p>
Hidden Input • Hidden input also is created with the <input> element. • Set the “type” attribute to “hidden”. • It does not appear anywhere in page display, but the <input> element is visible in the HTML source of the page. • Use it only to pass information that would become a distraction or cause confusion for the user if it is displayed. • Don’t use it to hide any data that may cause privacy concern. <input type="hidden" name="agent" value= "007" /input> • This will pass the name-value pair “agent=007” to the “action” page.
Textarea • The <input> element of “text” type creates a single-line input box for textual information. • To have multi-line text boxes, use the <textarea> element instead. • Define the number of rows and columns you want. <p>Comments:<br /> <textarea name="comments" rows="5" cols="30"> </textarea></p>
Declaration • To make your code more modular like that in a Java class, you can use the declaration to define methods inside a JSP file. • Now not only can your JSP expressions refer to variable names, but also make method calls. • This provides more flexibility in how you mix JSP expressions and HTML code.
Directive • <%@ directive attribute1="value1", attribute2="value2", … %> • For now we’re only interested in the page and include directives. • The page directive has an import attribute that is equivalent to the import statement in Java. • The import=value pair is only one attribute. Therefore, to import more than one class, all classes must be included within one pair of quotation marks, separated by commas. • The include directive can be used to attach the same header and footer to a number of pages.
The import Attribute • Make Java classes available to the scripting environment. • Use Java API to add power to your JSP script. • When a Java class is imported to a JSP page, you can reference this class without explicitly specify the class package names. • Syntax <%@ page import="class1[,class2,…classN]" %> <%@ page import="java.util.Date,java.sql.*" %> • Similar to the import statement in Java.
Location of User-Defined Classes • To use those classes that ship with the Java language, the import attribute of the page directive is sufficient. • To use custom made classes, additional work is needed: • First, compile the class from source code into a .class file. • In the deployment folder, create a “WEB-INF” subfolder. • Inside WEB-INF, create a “classes” subfolder. • Inside classes subfolder, create a subfolder whose name is the same as the name of the package to which the class belongs. For example, “unt” subfolder if the class belongs to the “unt” package. • If the package name is hierarchical, the subfolder structure should mirror that hierarchy. For example, store the class files for the wu.andy package in <deployment folder>\WEB-INF\classes\wu\andy.
Include Files • Usage • Provide the same navigation links and footer on each of the pages. • Reuse JSP code.
The includeDirective <%@ include file="relative URL of included file" %> • When the JSP page containing the include directive is requested for the first time, the content of the included file is read and merged with the rest of the JSP page. • The order matters. For example, if the include directive is placed after the <title> tag of the JSP page, the words enclosed by that tag is displayed in the title bar. If the include directive appears before the <title> tag, then the included page’s title takes precedence. • After the JSP page has been displayed, updating the included file has no impact on the JSP page.
Comparing Strings • When used with two strings, the equality operator compares the memory locations of the strings. • The comparison methods compare text. They do not compare the memory locations marked by the two references to the strings. • The addresses are certainly different, unless you assign one to the other. • That’s why we cannot compare the texts stored in two strings by something like: if (str1 == str2). This boolean expression compares the memory locations of str1 and str2, not the texts. • Normally, we simply want to compare the literal values contained in two strings (and by extension, in two memory locations), but not the memory locations themselves.
Comparing Strings • A common task in text processing is to compare two strings and see whether they are identical. • If the comparison is case sensitive (namely, “BCIS” is considered different from “bcis”): • Use the equals() method of the String class. • If the comparison is case insensitive (namely, “BCIS” is considered the same as “bcis”): • Option 1: Use the equalsIgnoreCase() method. • Option 2: Convert both strings into the same case (using either toUpperCase() or toLowerCase() method) and then use the equal() method to compare them.
Redirecting Traffic • Sometimes, you may want to display different pages to the user, depending on his or her input from the previous page. • Retrieve the value of the criterion from the related parameter. • Evaluate the parameter and determine which URL to use. • If another page instead of the current page should be displayed, call the sendRedirect() method of the response object, using that page’s file name or URL as the argument. response.sendRedirect(<destination>); • Do this before any other JSP code in the page is run.