Download
1 / 6
0 likes | 5 Views
Recent years have seen a huge increase in the popularity of epoxy resin due to its adaptability and capacity to turn unremarkable materials into magnificent pieces of art. Understanding the step-by-step epoxy resin treatment procedure is essential to getting stunning and long-lasting results, whether you're making jeweler, tabletops, or other decorative objects.<br>

E N D
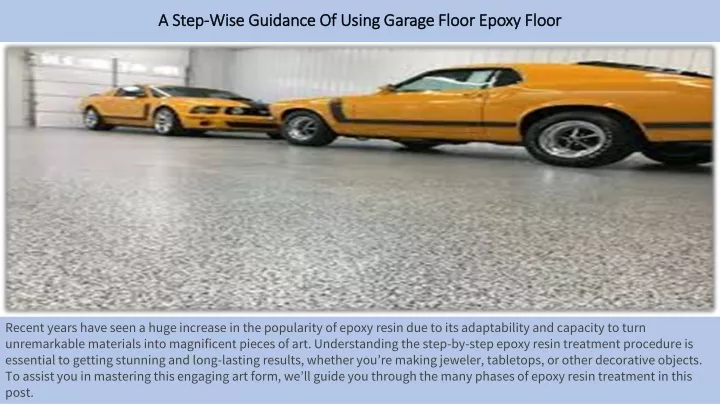
A Step-Wise Guidance Of Using Garage Floor Epoxy Floor Recent years have seen a huge increase in the popularity of epoxy resin due to its adaptability and capacity to turn unremarkable materials into magnificent pieces of art. Understanding the step-by-step epoxy resin treatment procedure is essential to getting stunning and long-lasting results, whether you’re making jeweler, tabletops, or other decorative objects. To assist you in mastering this engaging art form, we’ll guide you through the many phases of epoxy resin treatment in this post.
A Step-Wise Guidance Of Using Garage Floor Epoxy Floor Step 1: Gather Your Materials Before you start, assembling all the important materials and tools is fundamental. Here is a basic rundown to kick you off: Epoxy resin and hardener Mixing cups and sticks Safety gear (gloves, goggles, and a respirator mask) Surface to work on (wood, canvas, or any suitable substrate) Heat gun or torch Pigments or dyes (if you want to add color) Sandpaper Release agent Measuring tools (scales or graduated cups)
A Step-Wise Guidance Of Using Garage Floor Epoxy Floor Step 2: Prepare Your Workspace Ensure you have a well-ventilated and clean workspace. Cover your work surface with plastic sheets or newspapers to catch any spills. Ventilation is essential because epoxy resin emits fumes that can be harmful when inhaled, so work in an area with good airflow or use an appropriate respirator mask. Step 3: Safety First Before you begin handling epoxy resin, put on your safety gear, this includes wearing disposable gloves, safety goggles, and a respirator mask to protect yourself from exposure to resin fumes. Step 4: Adding Color If you have any desire to add tone to your epoxy pitch project, this is the ideal opportunity to make it happen. You can utilize colors, colors, or even acrylic paints. Add the variety gradually and blend it completely until you accomplish the ideal shade.
A Step-Wise Guidance Of Using Garage Floor Epoxy Floor Step 5: Pouring and Spreading Carefully pour the mixed epoxy resin onto your prepared surface. Use a spreading tool, such as a plastic spatula or a foam brush, to evenly spread the resin over your workpiece. Make sure the resin covers the entire surface and reaches all edges. Step 6: Eliminate Air Bubbles Use a heat gun or a torch to gently pass over the surface to prevent unsightly air bubbles from forming in your epoxy resin. This will help release trapped air bubbles and create a smooth, bubble-free finish. Step 7: Curing Time Permit the epoxy sap to be fixed as per the maker’s guidelines. This can take somewhere in the range of 12 hours to a few days, contingent upon the sort of gum and natural circumstances. Ensure your task stays undisturbed during this opportunity to keep away from defects.
A Step-Wise Guidance Of Using Garage Floor Epoxy Floor Step 8: Sanding and Polishing If necessary, sand the cured epoxy resin surface with fine-grit sandpaper to remove any imperfections or uneven spots. You can then polish it to achieve a glossy finish using a polishing compound or resin-specific pads. Conclusion Excelling at Garage Floor Epoxy resin treatment includes scrupulousness and persistence. Keeping these bit-by-bit rules allows you to make dazzling epoxy tar manifestations that exhibit your imagination and craftsmanship. Make sure to focus on security, stick to the producer’s directions, and practice to refine your abilities. With training, you’ll have the option to make wonderful epoxy tar craftsmanship that catches your vision.
Contact Information 7 S Quarantina St, Santa Barbara, CA 93103 Phone: (805) 770-5098 Visit Us: https://www.greensideepoxy.com/ https://www.greensideepoxy.com/service.html https://www.greensideepoxy.com/about.html https://www.greensideepoxy.com/contact.html https://www.greensideepoxy.com/Garage-Epoxy-flooring.html https://www.greensideepoxy.com/Polished-Concrete-flooring.html