Download
1 / 56
570 likes | 662 Views
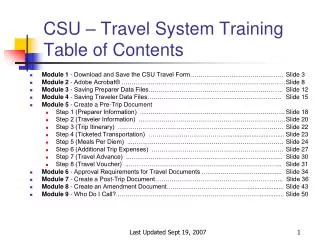
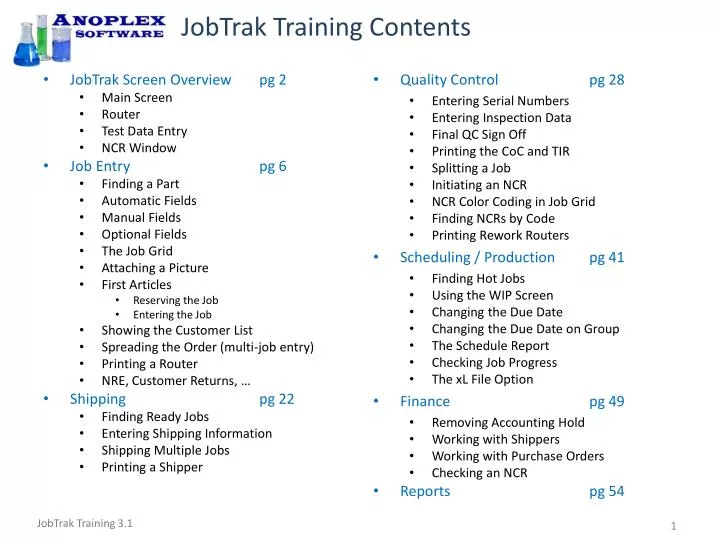
JobTrak Training Contents. JobTrak Screen Overview pg 2 Main Screen Router Test Data Entry NCR Window Job Entry pg 6 Finding a Part Automatic Fields Manual Fields Optional Fields The Job Grid Attaching a Picture First Articles Reserving the Job Entering the Job

E N D
JobTrak Training Contents • JobTrak Screen Overview pg 2 • Main Screen • Router • Test Data Entry • NCR Window • Job Entry pg 6 • Finding a Part • Automatic Fields • Manual Fields • Optional Fields • The Job Grid • Attaching a Picture • First Articles • Reserving the Job • Entering the Job • Showing the Customer List • Spreading the Order (multi-job entry) • Printing a Router • NRE, Customer Returns, … • Shipping pg 22 • Finding Ready Jobs • Entering Shipping Information • Shipping Multiple Jobs • Printing a Shipper • Quality Control pg 28 • Entering Serial Numbers • Entering Inspection Data • Final QC Sign Off • Printing the CoC and TIR • Splitting a Job • Initiating an NCR • NCR Color Coding in Job Grid • Finding NCRs by Code • Printing Rework Routers • Scheduling / Production pg 41 • Finding Hot Jobs • Using the WIP Screen • Changing the Due Date • Changing the Due Date on Group • The Schedule Report • Checking Job Progress • The xL File Option • Finance pg 49 • Removing Accounting Hold • Working with Shippers • Working with Purchase Orders • Checking an NCR • Reports pg 54
JobTrak Screen Overview Main screen allows job entry, selection , editing, sorting and filtering of the Job Grid. Search/Sort Job Dashboard Part List Commands 1 Job Grid Part Data Job Grid shows jobs received or shipped during Grid Date Range. Date Range defaults to include today and six prior months. You can change this if you want more history (may run slower).
JobTrak Screen Overview Router display control is Show Job Router / Hide Job Router button. Search/Sort Job Dashboard Part List Commands 1 Job Grid Router Part Data
JobTrak Screen Overview Test Data Entry window opens when a test is selected in the router. Search/Sort Job Dashboard Part List Commands 1 Test Data Entry Router Part Data
JobTrak Screen Overview NCR window controlled by Show NCR button in the Job Grid. Search/Sort Job Dashboard Part List Commands 1 NCR Job Grid Part Data
Job Entry : Finding a Part • Click Clear button • Enter part number • Click Find button • This will filter the Part List down to the parts that match the part number • There may be multiple parts with … • different Rev (customer revision) • different DRev (the document revision) • different Version (process variations) • If there are multiple parts with the same DRev and Rev, you must find the correct Version by checking each part. 3 1 2 3 1 2
Job Entry : Finding a Part • Select the correct part • Click on the button in the left column • This will enable command buttons • Click the New button • This will cause the job dashboard to populate with all default information 1 2 1 2
Job Entry : Automatic Fields • Customer Name • Part OEM entered in DocTrak • You can type a different name if the customer is not the OEM. • Rcvd Date • Automatically set as today’s date • Hold • Jobs are automatically entered with Accounting Hold set • Accounting permission needed to remove Hold before shipping • Due Date • Today + Lead Time (working days) • Default Due Date is optional (by changing the Path.txt file). • The Due Date can be changed with the drop down calendar. 1 3 1 2 3 4 2 4
Job Entry : Manual Fields • Rcvd Qty • Quantity of parts received • If Qty > Max Lot Qty, JobTrak will automatically split job for you. • Prc (Unit Price) • The Unit Price from part data • Automatically populates after the Rcvd Qty is entered. • Chg (Job Charge) • The total charge for job • Automatically calculates after the Rcvd Qty is entered. • PO Amt • The purchase order total • May not equal the charge for job if multiple jobs entered for PO • Finance can adjust this later if new PO issued or other change • PO Number • Scan/View • During job entry or while job is selected, the PO may be scanned so it can be viewed later. • Other items (job router, POD, …) may also be scanned/viewed. 1 6 2 3 5 4 1 2 3 4 5 6
Job Entry : Optional Fields • RMA Number • Used for Customer Returns • Ref Job must match the Ref Job on the original job order • SO (Sales Order / Second Ref) • Used to synchronize jobs to corporate ERP/MRP systems. • Enter ERP/MRP Sales Order • Note (Job Note) • May be used to capture serial numbers at job entry, requests for ship-to changes, or for any other purpose. • Rush Checkbox • Check if job is to be expedited. • This is a flag to Accounting. • Freight • Check if freight is charged. • This is a flag to Accounting. • Ref Job • Normally entered by system • Used to group related jobs • Jobs used to process order in Production lots or batches • Rework jobs • Customer return jobs 1 4 2 3 5 6 1 2 3 4 5 6
Job Entry : Optional Fields • Click to Show CoC Data • This will open new text boxes • C_Lot (Customer Lot) • For customer lot traceability • Used by medical customers • Can also be used for customer work orders, etc. • This is a searchable field • Add CoC Text • This box can be filled in with any job-specific information that is needed on the CoC • Actual thickness / bake time • Batch / Lot numbers • Customer’s customer’s PO and/or WO flow down • This is NOT a searchable field 2 3 1 1 2 3
Job Entry : The Job Grid • Ref Job number will be assigned • Ref Job is the main job number • Ref Job can be entered before entering the job or it can be changed after entering the job. • Router numbers on rework lots, split lots, and customer returns should be grouped by Ref Job • Router number will be assigned • New job is entered into Job Grid • Job Grid is sorted by Ref Job so if you change the Ref Job, the new job may not appear at the top; it will appear with the other jobs grouped by the Ref Job. • “Hot” column shows number of days until the Due Date. • Does not include weekends. • Red highlighting shows when a Due Date is getting close. 1 4 2 3 1 2 3 4 After all information is entered, click Enter
Job Entry : Attaching a Picture Parts may have a picture attached when they are entered into DocTrak. However, if there is no picture you can attach one in JobTrak. • Select the correct part • Click the Attach New Picture button • This will open a dialog for you to browse to your picture in a folder or on an attached USB camera. • Select the picture and click Open. 1 2 3 1 2 3
Job Entry : First Articles (Reservations) • Select Special Job in the Part List • All Part Information fields will disable • Click New • Fill in Customer • Fill in Qty • Fill in PO Amt/PO Num • Fill in the Note … this is critical • “First Article” • PN : ___________ Rev : ____ • Click Enter • The job will appear in the Job Grid • Part Number and Name will be blank 8 1 4 6 7 5 2 3 When there is no Part Num, PRev and Version to match an order, enter a First Article … 6 7 4 5 3 2 1 8
Job Entry : First Article Cover Sheet • Select the job reservation • Click Print button • Select First Article Cover Sheet • Click Print button • The Cover Sheet header area is similar to a job router: JobTrak will automatically populate the header with the job data. • Template for the First Article Cover Sheet is in the Forms folder. The routing and checks can be changed to match QMS requirements and can evolve with your QMS.
Job Entry: First Articles (Job Entry) After the First Article Cover Sheet has been signed off and a new part router has been entered in DocTrak, you must enter a job to process the part(s) … • Select the new part (723-94587-00) • Click New • Enter the Ref Job number from the First Article job reservation • The Ref Job is on the First Article Cover Sheet and in the Grid • If the Ref Job is correct, the new job will sort with the reservation. • Put the total quantity on the new job • Change the Qty in the reservation (Router 1000022) to zero • Adjust job charge ($395 is NRE). 3 4 5 6 5 1 2 3 4 5 6 7
Job Entry : Show the Customer List • Click the Show button next to the Customer text box to open … • the Customer List showing both code and full customer name. 2 1 1 2
Job Entry : Spreading the Order JobTrak will automatically spread quantities over multiple routers if the PO quantity exceeds the Max Lot Qty for the part. • Select part for a job • Max Lot Qty should be set in DocTrak • ClickNew and enter PO Num / Amt • Enter total quantity received on PO • Click Enter • Answer Yes to the dialog 2 3 1 5 6 4 1 2 3 4 5 6
Job Entry : Spreading the Order • Rcvd Qty = 20 generates 4 routers with Qty = 5 parts each. • The Job Chg on each router is adjusted to match Qty of parts. • Ref Job 1000024 • Router 1000024 • Router 1000025 • Router 1000026 • Router 1000027
Job Entry : Printing a Router • Select the job to print • Click the Print button • Select Job Router • Check Entire Ref Job to print all routers on the Ref Job • Click the Print button 2 3 1 4 1 2 3 4
Job Entry : Printing a Router 1 1 Each router in a Ref Job is printed on a different worksheet in Excel. To print all routers, select Print Entire Workbook. (Excel 2010 shown in example.)
Job Entry : Final Notes • NRE for process development is entered as a Special Job exactly like a First Article. Use the Note field to record details. • Due Date can be used for scheduling NRE work • Test runs on scrap material and customer supplied material can be given the same Ref Job as the NRE reservation to keep the project organized. • Customer returns are entered as normal jobs with the Ref Job set to match the original job. This keeps the customer return job and original job sorted together.
Shipping : Finding Ready Jobs • Routers that are ready to ship have green Ship Date fields • Green fields mean that the router Final QC step is checked and Accounting Hold is removed.
Shipping : Finding Ready Jobs • We want to ship these two jobs together on the same shipper. • To see jobs that are ready to ship, select Rdy and click Find in the Search area
Shipping : Entering Shipping Information • Select a job to ship • Click Edit button • Enter Ship, Qty & List (pack list) • Click Save button * • Inserts today’s date • Inserts job Qty • Inserts nextpack list number. Do not click if you want to put this job on an existing shipper. 1 1 2 3 3 4 5 6 7 • Select next job to ship • Click Edit button • Enter Ship, Qty & Paste List from the other job on the shipper or click to insert the next pack list number. * The job will disappear from the Grid because it is no longer ready to ship. Copy the List (pack list) if you want to ship other jobs on the same shipper.
Shipping : Shipping Multiple Jobs Select the first job to be shipped (must be the top of a contiguous group). With the Shift key held down, select the last job to be shipped (must be the bottom of a contiguous group). The group will highlight (dark background). 1 2 4 3 Click the New Shipperbutton. Check the customer field! All selected jobs will be placed on a new shipper with today as the ship date. The ship quantity for each job will be set to match the received quantity. If any job in the group is already shipped, the shipper and ship date will change. Shipper will not be created if any job is shipping to a different customer.
Shipping : Printing a Shipper • Select any job on the shipper • Click Print button • Select Shipper • Click Print button 2 4 1 3 1 2 3 4
Shipping : Example Shipper • The shipping address is populated from the Customer List. • When new customers are entered, shipping addresses should be loaded. • Management of the Customer List is done using DocTrak or BizTrak. • Different part numbers and different POs may be on the same shipper • Jobs from different POs should not be on the same invoice if you are using BizTrak for invoicing and customer management.
QC : Entering Serial Numbers • Select Job • Click Show Job Router • Select Incoming Inspection step • Job Trak recognizes the text in the Description Field • Alternate text for Incoming • Incoming Inspection • Incoming QC/QA • QC/QA Incoming • Receiving QC/QA • QC/QA Receiving 1 2 3 1 2 3
QC : Entering Serial Numbers • Enter serial numbers into boxes • Click Save Serials when done • Click Hide Job Router • Hiding router will also hide the QC Data window. • Click to hide QC Data without hiding router. 5 4 6 4 5 6
QC : Entering Inspection Data Select Job and Click Show Job Router • The router will advance to the last completed step. • Click the button in the Select Test column to enter test data The QC Test window will open and serial numbers will populate • Select the tested serial number • Enter test data • Click Save Results • When tests are done for all parts on router, click step select button. 4 1 3 2 5 6 1 2 3 4 5 6
QC : Job-Specific CoC Text • Router steps can require certain information to be recorded on the Certificate of Conformance • Customer work orders / lots • Processing data such as bake times/temps, thicknesses • Flow down data such as paint / primer batch numbers • To record information for the CoC • Click the Show CoC Data button • Enter the information into the text fields following QMS procedures for formatting • The C_Lot field is searchable, so this is where you should put the most important record number. 1 3 2 3 1 2
QC : Final QC Sign Off Final Inspection must be completed before a job can ship. * • Step may also be called QC Final, QA Final, Final QC or Final QA. To clear Final Inspection • Click the button by the step • The Job Grid will show the Final QC date and the Ship Date field will highlight green 2 1 3 1 2 3 * Accounting Hold must also be removed before a job can ship.
QC : Printing the CoC and TIR • Select Job • Click Print • Select CoC/TIR from the menu • Click Print button 3 2 1 4 1 2 3 4
QC : Example Certificate of Conformance The CoC uses a spreadsheet as a template form. The Certification Statement and Approval and Sign-off areas can be changed. Serial numbers, job data, part information, etc. are populated by JobTrak. Certification Statement Part Information CoC Text entered into DocTrak CoC Text entered into JobTrak Maximum of 24 serial numbers per job router Sign-offs and Approvals
QC : Example Test Inspection Report Part Information The TIR is the second sheet of the CoC spreadsheet. Custom TIRs can be developed to print more data and to format it as desired. Job Information Test results from all parts tested on this job up to a maximum of 90 data points. Sign-offs and Approvals
QC : Splitting a Job To split a job for partial shipment, rework, return or any other reason … enter the quantity of parts to be split from the router and 1 3 2 3 4 5 click the Split button 4 2 5 1 3 a new router will be entered (1000029 with NCR field shown green) quantities and prices will be adjusted on new and original routers
QC : Serial Numbers on Job Splits • Find and select a new split router. • Click Show Job Router • Click the Incoming Inspection step • Enter the serial numbers of all parts on the new router. • Click Save Serials • Click the Final Inspection step when the job is ready to ship. 3 1 2 3
QC : Initiating an NCR • When a split router is selected, you may open an NCR by clicking the NCR button. The NCR button will not be enabled unless a split job is selected. • Select the Process Step at which the discrepancy was discovered. • Select the best description of the non-conformance – avoid using “Other”. • Select the disposition for the parts. • Enter notes in the MRB Notes box • Check if this is a customer problem • Click Save NCR Note that a job must be split before an NCR may be attached to the job. Also, the NCR and disposition must apply to all parts on the split job. Split the job again if there is more than one discrepancy or disposition. 5 2 4 3 7 6 1 2 3 4 5 6 7
NCR and Split Color Codes • Grn – no #: job split without NCR • May be for partial shipment or other reason. • Red : job split with NCR for scrap • All parts on job to be scrapped • Yel : job split with NCR for rework • All parts to be stripped and rerun • Grn – with # : job split with NCR not requiring rework or scrap • MRB may have decided to use as is or minor touchup after split • May be add plate, spot ano, or other non-strip process • May be a return for evaluation 1 2 3 4 1 2 3 4
QC : Finding NCRs by Code To see all jobs with NCRs occuring at a particular step, click Clear, select Step code, and click Find. 1 2 3 4 7 6 6 7 5 Grid will show all jobs with NCRs found on selected step. (If you forget Step codes, select any NCR to see definitions. 4 5 3 2 1 To find all jobs with NCRs having a particular Discrepancy, select the Discrepancy code as shown. To find all jobs with NCRs having a particular Discrepancy found at a particular Process Step, select both codes as shown.
QC : Printing Rework Routers • When a rework split is complete, there is a new job in the system for reprocessing the parts. • Nadcap requires documentation of the strip and detail process to be used prior to reprocessing. • JobTrak allows you to set up a list of rework routers that can be printed and attached to the virgin part router. When the rework router is printed, it will have the job number, quantities, etc. • When the job is selected, click the Printbutton • Select the Rework router • Click Print button 2 3 1 1 2 3
Scheduling : Finding Hot Jobs After a Clear- Find refresh, the Job Grid will sort by Ref Job. The Hot column shows the jobs that are due to ship next with a red highlight. The closer a job is to its Due Date, the more intense the red color.
Scheduling : Using the WIP Screen To see jobs in WIP and sort with the hot jobs on top, The WIP sort removes all shipped jobs and puts the later jobs at the top of the Job Grid. Note also that the Pipeline boxes show the revenue planned for click Clear, select WIP, and click Find. 1 3 2 3 1 6 5 5 6 4 2 4 this week next week week after
Scheduling : Changing the Due Date Router 1000027 appears toward top of Grid with 1 day left before the Due Date. To reschedule router 1000027, select the job and click Edit; then click the arrow on the Due Date box. The calendar shows today’s date and the current scheduled date. Select a new date (Oct 1) and click Save.
Scheduling : Changing the Due Date The Pipeline revenue totals show $250 shifted from this week to next week. With the new Due Date, router 1000027 now appears at the bottom of the Grid with 3 days left to target ship date.
Scheduling : Changing Due Date on Group Select the first job to be changed (must be the top of a contiguous group). With the Shift key held down, select the last job to be changed (must be the bottom of a contiguous group). The group will highlight (dark background). 1 2 3 Click the Due button. When a date in the calendar is clicked, Due Date will change on all selected jobs. In the example, two jobs are ready to ship and there are three different customers ; nevertheless, Due Date will be changed on all of the selected jobs.
Scheduling : The Schedule Report Job/dollar totals for this week do not match WIP screen pipeline because shipped jobs are included on Report. Late jobs Jobs planned for this week + jobs that have shipped earlier during the week. Jobs planned for next week. Jobs planned for week after next week. Job and Part Information
Production : Checking Job Progress JobTrak saves the last router step that was clicked and uses this to show job progress when routers are opened. Normally, QC steps are clicked after inspections are done and all data is entered, so when a router is opened again, the completed inspection step and all previous steps are tagged with a green color code. In the example, the last step clicked is Step 4 : Post-Tool Inspection. If a company chooses to put a PC on the shop floor and click each process step as it is completed, corporate visibility into job progress will be improved.
Production : xL File Options • xL File is created in DocTrak for a particular part number • xL File can be opened in JobTrak for reference and/or data capture • Reference documents • Tooling Instructions • Masking Instructions • Testing Instructions • Data documents • Process Run Sheets • General Purpose Data • When xL File is saved, it is tied to router and serves as a record. • If reference only, do not save file. • Open with xL File button