Download
1 / 6
60 likes | 340 Views
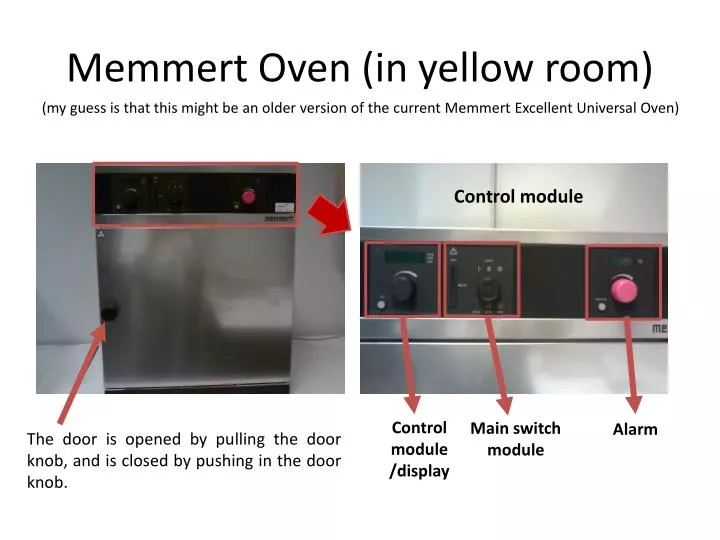
Memmert Oven (in yellow room). (my guess is that this might be an older version of the current Memmert Excellent Universal Oven). Control module. Control module /display. Main switch module. Alarm. The door is opened by pulling the door knob, and is closed by pushing in the door knob.

E N D
Memmert Oven (in yellow room) (my guess is that this might be an older version of the current Memmert Excellent Universal Oven) Control module Control module /display Main switch module Alarm The door is opened by pulling the door knob, and is closed by pushing in the door knob.
Main power switch Position 0: oven is shut down Position I: continuous operation ON operation in program mode (see next pages) Indicator LEDs (GREEN) ready for operation (RED) fault indicator (YELLOW) oven is heating Slot for programming card ? (not used)
Control module / display Normally displaying the current temperature The controller is operated with the aid of : - rotary knob & - ’set’ button • Heat/cool to setpoint • functionality activated by putting the main power switch (previous slide) on position I • (I haven’t been playing with this much, but I think it just heats the oven to the setpoint, with no particular control on the rate etc.) • Setting the target temperature (done from the control module shown herabove): • - press the ’set’ button • and simultaneously • - turn the knob to select the desired temperature value • once you release the ’set’ button the setting is automatically stored in the memory
Program option • functionality activated by selecting the following indicator: • on the main power switch (slide #2) • Programming the oven: • (done with the control unit of the previous slide, shown here again for convenience) • To visualise the different options, go in the different menus and set the parameter values one uses just the two controls of this panel, namely: - the rotation knob • and • - the set button • As a general guideline: • Once you are in a program menu you can scroll through its different items just by turning the knob: then you’ll see the different options appearing on the display. • When you want to access sub-menus for a specific item, you select them as in 1. and then press ’set’. Turning the knob at the same time as you push the set button will allow you to see the different submenus and to set parameters such as e.g. time and temperature for different segments in the program. • As an example, on the next page we describe a procedure to create a program with the following temperature profile: TIME3 TIME1 TEMP1=TEMP2 TIME2 TEMP3 t START
Turn the oven on by selecting on the main power switch • Turn the knob to scroll through the program menu, then you’ll have the following options: • PROG/ EDIT / PRINT/ SETUP • select the EDIT option • you have 2 options in the EDIT submenu at this point: ’YES’ and ’NO’ (you shall read them on the display). Press the set button and turn the knob at the same time to select the ’YES’ option. • Now you’ll access the first temperature segment. You can scroll through its menu by turning the knob. • For each segment (here below n=1) there are 4 parameters/options : • TIME1 sets the duration of segment #1 . To adjust its value press ’set’ and turn the knob until you get to the desired value • TEMP1 sets the temperature to be reached at the end of segment #1 . Value adjusted as above: press ’set’ and turn the knob • FLAP1regulates the flap opening during segment 1 (there must be an air inlet in the oven controlled by this command). The flap options go from ’close’ to ’open’, through intermediate steps. • HOLD1/LOOP1/SPWT1/NEXT1/END1 • SPWT1 it waits for the oven to stabilise at the target temperature and then moves to the next segment in the program. • NEXT1 • LOOP1 for temperature loops • HOLD1 holds the temperature TEMP1 • END1 ends the program at this point • If you have activated any of the above options except for ’END’, then you’ll be able to access the parameters for the next segment (e.g. TIME2/TEMP2/FLAP2/SPWT2...) as you keep turning the knob. For each segment you’ll be able to set TIME/TEMP/FLAP and finally choose between the hold-loop-spwt-next-end options. • For our temperature profile, we would for instance choose 3 segments with: • (TIME1, TEMP1,FLAP1,SPWT1), then (TIME2, TEMP1=TEMP2,FLAP2,SPWT2) and finally (TIME3, TEMP3,FLAP3,END3) • In order to finish at segment # n • select the option ’ENDn’ in the HOLD/LOOP/SPWT/NEXT/END submenu for segment n • then the ’EXIT’ option will appear on the display. • if you push the ’set’ button and select ’YES’ with the knob, then you’ll store the program and get out of the edit menu. • In order to run the current program: • select the PROG option from the top menu (PROG/EDIT/PRINT/SETUP) • there you’ll have two options: • START (starts the program, then the green LED indicator will light on) • STOP (stops the current program) • push the set button and turn the knob to select ’START’ • To stop the program you go in a similar manner into PROG STOP from the top menu.
Alarm setting Overtemperature protection Rotary knob ’set’ button Displaying the current temperature alarm setting (currently at 210oC, we haven’t changed it) • Although we haven’t touched on these settings, the alarm control is likely to operate as the previous programming module, i.e. to set the alarm temperature: • press the ’alarm set’ button • simultaneously turn the knob to set the alarm temperature to the desired value