Download
1 / 7
70 likes | 188 Views
Dreamweaver – Inserting Images. Now things are starting to shape up. We got color, we got design, we got links. Oops we don’t got pictures or text. Gotta have ‘em Inserting a picture is easy First click in the cell you want the picture to appear in Then choose Insert and Image

E N D
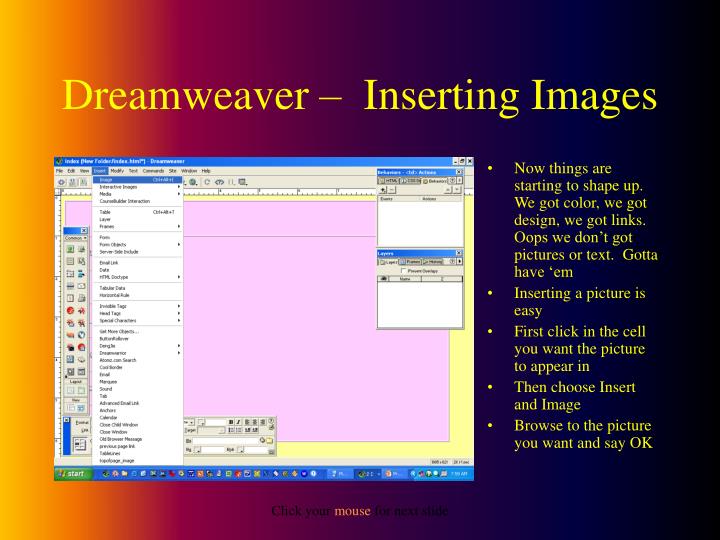
Dreamweaver – Inserting Images • Now things are starting to shape up. We got color, we got design, we got links. Oops we don’t got pictures or text. Gotta have ‘em • Inserting a picture is easy • First click in the cell you want the picture to appear in • Then choose Insert and Image • Browse to the picture you want and say OK Click your mouse for next slide
Dreamweaver – Inserting Images • Holy Hanna!! We got the picture but it’s huge – what do we do? • Well that’s easy – we reduce it – here’s how • Scroll down using the scroll bars on the right side of the page until you see the bottom right hand corner of the picture. • Place your cursor on the handle (the little black square) – if you do it right you will see your cursor change to a double headed arrow Click your mouse for next slide
Dreamweaver – Inserting Images • If you drag your cursor now it will reduce the size of your image BUT and this is a big BUT you will also change the proportion of your picture making it squeezed either horizontally or vertically • To avoid this hold the Shift key down before your start to drag and Dreamweaver will keep the same proportions on the picture • If you look carefully at this picture you will see a faint box outlined in double dots showing the new size of the image Click your mouse for next slide
Dreamweaver – Inserting Images • Once you are done release the picture will be re-sized • But heck and tarnation looks at our table – it’s all distorted now • Don’t worry about that – if you want to see what your page will look like when on the web press F12 and your browser will start up and show you the page – without the distortion in your cells • Experiment with the size until your picture is the size your want Click your mouse for next slide
Dreamweaver – Inserting Images • Even though my picture is the size I want, I can see that when I F12 it the picture is not centered in the cell (Yes I know I’m picky) • To do this click on your picture then tap the right arrow key once to move outside the picture but inside the cell • Now look at the Property Inspector and drop the list down which say Horz and Vert and choose Center and Middle respectively Click your mouse for next slide
Dreamweaver – Inserting Images • Now F12 it and your picture will be nicely centered Click your mouse for next slide
Super Giant Big Fun Assignment • Now wasn't that fun?! • So open up your web page from the last lesson and insert a G-rated picture of your own choosing. • Re-size it so that it fits on one screen • Center it horizontally and vertically in the cell it sots in • Proudly display to FST so he can TICK YOU OFF Click your mouse for next slide