Download
1 / 97
970 likes | 987 Views
Learn ArrayList manipulation, JList display, keyboard shortcuts, & iterator usage to build a Shipping Hub App.

E N D
Tutorial 19 – ShippingHubApplicationIntroducing Collections, ArrayList and Iterators Outline19.1 Test-Driving the Shipping Hub Application19.2 Parcel Class19.3 JList Component19.4 Using Mnemonics (Keyboard Shortcuts)19.5 Collections19.6 Constructing the ShippingHub Application19.7 Using Iterators19.8 Wrap-Up
Objectives • In this tutorial, you will learn to: • Create and manipulate an ArrayList object. • Create a mnemonic for a component. • Use an iterator to iterate through an ArrayList. • Display items in a JList.
19.1 Test-Driving the Shipping Hub Application (Cont.) • Running the completed application • Open a Command Prompt • Change to ShippingHub directory • Type javaShippingHub
JPanel contains fields for user to view or edit the Parcel JComboBoxes list available states 19.1 Test-Driving the Shipping Hub Application (Cont.) Figure 19.1 Running the completed ShippingHub application.
User can now enter Parcel information 19.1 Test-Driving the Shipping Hub Application (Cont.) Figure 19.2 Scanning a new Parcel.
NewParcellisted inJList 19.1 Test-Driving the Shipping Hub Application (Cont.) Figure 19.3 Entering a new Parcel’s information.
Fields are made editable UpdateJButtonis enabled 19.1 Test-Driving the Shipping Hub Application (Cont.) Figure 19.4 Parcel information is editable when EditJButton is clicked.
Updated zip code 19.1 Test-Driving the Shipping Hub Application (Cont.) Figure 19.5 New information is stored when UpdateJButton is clicked.
When a Parcel is removed, the next Parcel is displayed 19.1 Test-Driving the Shipping Hub Application (Cont.) Figure 19.6 Next Parcel is displayed when RemoveJButton is clicked.
All Parcels being sent to South Carolina 19.1 Test-Driving the Shipping Hub Application (Cont.) Figure 19.7 Viewing all Parcels going to South Carolina.
19.2 Parcel Class • Store each Parcel’s shipping information. • Each Parcel has a unique ID number. • Multiple packages can be shipped to the same person at the same address. • Instance variables are made private • recipient’s name, address, city, state and zip code.
19.3 JList Component • Displays a series of items from which the user may select one or more items. • setListDatamethod sets the items displayed in theJList.
19.3 JList Component (Cont.) Figure 19.9 Declaring new references to a JList and a JScrollPane.
Initializing parcelStateJList with a new JList 19.3 JList Component (Cont.) Figure 19.10 Creating a new JList object.
Adding the parcelStateJList to the parcelStateJScrollPane 19.3 JList Component (Cont.) Figure 19.11 Declaring a new JScrollPane containing the JList. • JScrollPaneallows user to scroll through items if there are more items in the list than the number of visible rows.
19.4 Using Mnemonics (Keyboard Shortcuts) • Mnemonics allow users to perform an action on a component using the keyboard. • Specifying a mnemonic key • Set the component’s mnemonic property • Use setMnemonic method • Virtual key code
Setting the mnemonic of scanNewJButton to S 19.4 Using Mnemonics (Keyboard Shortcuts) Figure 19.12 Creating a mnemonic. • Pressing Alt+S will have the same effect as if the user clicks the JButton.
Mnemonic underlined 19.4 Using Mnemonics (Keyboard Shortcuts) Figure 19.13 JButton with mnemonic property set to 'S'.
19.4 Using Mnemonics (Keyboard Shortcuts) Figure 19.14 JButtons with mnemonics.
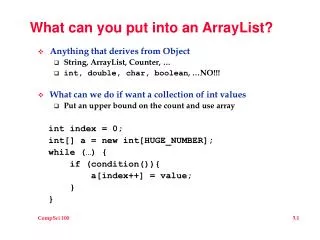
19.5 Collections • Predefined classes • Provide methods that make it easy for you to store, organize and retrieve data • ArrayList class • Provides all of the capabilities of an array • Dynamic resizing capabilities. • enables anArrayListobject to vary its size.
19.6 Constructing the ShippingHub Application When the Edit JButton is clicked Enable the input components (nameJTextField, addressJTextField, cityJTextField, zipJTextField and stateJComboBox) When the Update JButton is clicked Store the new name, address, city, state and zip code values in the Parcel object Update the parcelStateJList based on the user’s changes When the < Back JButton is clicked Display the previous Parcel in the parcelsArrayList (or the last Parcel if the current Parcel is the first in the parcelsArrayList) When the Next > JButton is clicked Display the next Parcel in the parcelsArrayList (or the first Parcel if the current Parcel is the last in the parcelsArrayList) When the user chooses a different state in the Parcels by State JComboBox Iterate through each Parcel in the parcelsArrayList Add IDs of Parcels destined for the selected state to the parcelStateArrayList Display the Parcel iDs from the parcelStateArrayList in the parcelStateJList
19.6 Constructing the ShippingHub Application (Cont.) Figure 19.15 ACE table for the Shipping Hub application. (Part 1 of 4.)
19.6 Constructing the ShippingHub Application (Cont.) Figure 19.15 ACE table for the Shipping Hub application. (Part 2 of 4.)
19.6 Constructing the ShippingHub Application (Cont.) Figure 19.15 ACE table for the Shipping Hub application. (Part 3 of 4.)
19.6 Constructing the ShippingHub Application (Cont.) Figure 19.15 ACE table for the Shipping Hub application. (Part 4 of 4.)
Importing the java.util package 19.6 Constructing the ShippingHub Application (Cont.) Figure 19.16 Importing class ArrayList. • The ArrayList class is located in java.util
Creating the ArrayList 19.6 Constructing the ShippingHub Application (Cont.) Figure 19.17 Creating the ArrayList.
Parcel’s arrival time and ID not yet displayed 19.6 Constructing the ShippingHub Application (Cont.) Figure 19.18 Entering information for a new Parcel. • Save the changes to your code • Compile and run in the CommandPrompt
19.6 Constructing the ShippingHub Application (Cont.) • toString method of the Date class • Returns a String that represents the Date • String is in format: Tue Feb 13 16:50:00 EST 2003
Displaying the arrival time and Parcel’s ID number in the JTextFields 19.6 Constructing the ShippingHub Application (Cont.) Figure 19.19 Displaying the Parcel’s number and arrival time.
Create a new Parcel object with an ID and arrival time 19.6 Constructing the ShippingHub Application (Cont.) Figure 19.20 Creating a Parcel object.
Adding a Parcel object to the ArrayList 19.6 Constructing the ShippingHub Application (Cont.) Figure 19.21 Adding a Parcel to the ArrayList. • Use ArrayList’s add method.
Arrival time and ID now displayed 19.6 Constructing the ShippingHub Application (Cont.) Figure 19.22 Newly scanned items have the Parcel’s arrival time and ID displayed.
New Parcel not yet added to JList Panel information is made uneditable 19.6 Constructing the ShippingHub Application (Cont.) Figure 19.23 Adding a new Parcel with the AddJButton.
Removing the current Parcel from the ArrayList 19.6 Constructing the ShippingHub Application (Cont.) Figure 19.24 Removing a Parcel from the ArrayList. • Use ArrayList’s remove method • ArrayList updates its indices automatically
19.6 Constructing the ShippingHub Application (Cont.) Figure 19.25 Adding a Parcel to parcelsArrayList.
19.6 Constructing the ShippingHub Application (Cont.) Figure 19.26 Removing a Parcel from parcelsArrayList.
19.6 Constructing the ShippingHub Application (Cont.) • To edit parcel information • Click EditJButton • Enable all JTextFields, except for ID number and arrival time • Enter new information • Click UpdateJButton to submit new information
Updating the ArrayList with the new Parcel’s information 19.6 Constructing the ShippingHub Application (Cont.) Figure 19.27 Removing and inserting a Parcel to update data.
19.6 Constructing the ShippingHub Application (Cont.) Figure 19.28 Entering a new Parcel.
City name is modified 19.6 Constructing the ShippingHub Application (Cont.) Figure 19.29 Modifying a Parcel after the EditJButton is clicked.
New city name is stored in parcelsArrayList 19.6 Constructing the ShippingHub Application (Cont.) Figure 19.30 Storing changes to a Parcel information when the UpdateJButtonis clicked.
19.6 Constructing the ShippingHub Application (Cont.) • Displaying a Parcel after a removal • When element removed is the last element in the ArrayList • Display first Parcel in ArrayList • When element removed is the only element in the ArrayList • Clear application’s components • Otherwise, display the next Parcel
Set position to display first Parcel when last Parcel is removed Clear application’s components when there are no more Parcels 19.6 Constructing the ShippingHub Application (Cont.) Figure 19.31 Setting position to 0 (to display the first Parcel) when the last Parcel in parcelsArrayList is removed.
Call method Parcel to display next Parcel 19.6 Constructing the ShippingHub Application (Cont.) Figure 19.32 Display next or first Parcel after a Parcel is removed.
Decrement position if the current Parcel is not the first Parcel Otherwise, set position to the final element 19.6 Constructing the ShippingHub Application (Cont.) Figure 19.33 Set position to the index of the previous Parcel when <BackJButton is clicked.
19.6 Constructing the ShippingHub Application (Cont.) Figure 19.34 Calling the loadParcel method to display the previous Parcel’s information.
Increment position if the current Parcel is not the last Parcel Otherwise, set position to the first element 19.6 Constructing the ShippingHub Application (Cont.) Figure 19.35 Set position to next Parcel when Next>JButton is clicked.