Download
1 / 18
180 likes | 357 Views
Movie Maker 2. Flip book pages. Planning a New Project. Video Effects. Editing Clips. Transitions. Storyboard/Timeline. Saving and Sharing. Titles and Credits. Audio Editing. Getting Started. Introduction. Welcome to Movie Maker 2. Introduction

E N D
Movie Maker 2 Flip book pages
Planning a New Project Video Effects Editing Clips Transitions Storyboard/Timeline Saving and Sharing Titles and Credits Audio Editing Getting Started Introduction Welcome to Movie Maker 2
Introduction Movie Maker 2 allows you to assemble a personalized movie from a wide variety of file types and sources. It may then be saved in a number of different file types for distribution in a wide variety of media. Editing Clips Transitions Storyboard/Timeline To begin a Project in Movie Maker 2 collect all the Source Files you wish to include in your movie into one common location. The Source Files are protected and not altered as you create your movie. The Project File holds all the information needed to create the final movie and performs the non-destructive editing on the source files but does not actually hold the finished movie file. Introduction Getting Started
Getting Started Collecting and identifying the locations of all your intended Source Files is a great place to start. It is recommended, that you store your Source Files in one location where you create a separate folder for each type of file such as Pictures, Movies, Music, Graphics, etc. on a fast hard drive that does not include the operating system, for fastest file access. Editing Clips Transitions Storyboard/Timeline To begin a Project, select File, New and give your Project a Name. Then drag the Source Files into a Collections Folder for the current Project. Movie Maker creates Thumbnail views of each Source File, called Clips, to help you visualize your project. Remember; the source files are not changed as the Collections Folder simply maintains the Links to the actual Source Files. Deleting thumbnails removes these links and the source file will no longer be available. Getting Started
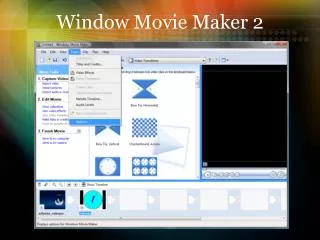
Storyboard/Timeline The Storyboard view allows you to build the Movie in visual segments much like a Cartoon. This is how many animated films are made today. This View is great for selecting Video and Still Clips, inserting Transitions between Clips and applying Effects to existing Clips. The Toolbar at the top of the Storyboard provides you with the typical types of tools needed to view and implement changes to the Clips. Simply Drag and Drop Clips into the Storyboard, then Drag and Drop the Clips to change the order they appear in the Sequence you create. Standard Cut and Paste methods also apply. Timeline view is best when editing Sound Tracks that accompany your Video and Still Clips. The Timeline view can be expanded to display Three Tracks, Video, Audio/Music and Title Overlay. Each of these Tracks can be further Expanded to reveal additional Tracks that provide the user the space to create remarkable custom effects. Simply Drag and Drop Clips into the Track of the Timeline where it is best suited. Trimming and Effects are similarly available for Music and other Audio Tracks as they were to the Video Clips. Storyboard/Timeline Transitions
Transitions Transitions are used to improve the visual effect when changing from one clip to another. There are many types of Transitions including the most common ones like Fades, Wipes, Patterns, Rotations, Slides, Mixes and Curls. Transitions may be used as they come or they may be manipulated to the users preference. They can even be downloaded from Microsoft on the Web. Transitions appear in the Video Transitions Collection Pane. They are placed into the Storyboard by Dragging and Dropping the desired Transition Icon onto the Storyboard between the two clips you wish to connect. In the Timeline View Transitions will appear in their own Track below the Video Track. Transitions can also be applied to Audio Tracks in a similar manner and allow the user to create seamless connections between individual sound tracks. Transitions may be deleted from any placement by selecting the Transition and pressing the Delete key. Transitions
Editing Clips Your Clips are stored in the Collections folders created earlier in the project. The Collections store only the links and information necessary to create the movie. Once the Clips make it into the Storyboard the clips in the collection are technically unnecessary. Double click any Thumbnail to preview it. Clips may be Joined or Separated using the Seek Bar and the Split Clip button in the tool bar on the bottom edge of the Video Monitor where the clip is viewed. Editing in the Collection Content Pane will not alter the original Source File so this type of editing works best for rough cutting a larger file into useful smaller clips. Editing in the Timeline View works best for final editing and timing adjustments in a nearly finished movie.
One can capture Still Images from Clips while Editing in any mode. Just Preview the Clip in the Preview Monitor. Pause the Clip at the desired image and click on the Take a Picture button in the lower right corner of the Preview Monitor. Select a location to save the Image and then use the Image exactly as you would any other file. Clips may be Trimmed, Clipped and Moved in the Timeline View. Clips may also be Copied and Pasted using the customary process supported by most Windows applications. Clips can also be copied to other Projects using this same process. Editing Clips
Video Effects Video Effects allow the user to add professional looking “special effects” to your movies. This is accomplished by simply choosing from the 28 available video effects in the Video Effects Collection including the most popular effects listed below: Still Effects : Blur, Brightness, Gray Scale, Sephia Tone, etc Film Effects: Grain, Old Age, Older Age and Oldest Age Fades: Fade In, Fade Out, both to and from Black and White. Zooms: Ease In and Ease Out Effects over Time: Pixelate and Hue which cycles the Spectrum Speed: Faster and/or Slower Using the Play button in the Preview Monitor will allow you to view the Video Effect before you apply it in order to make decisions regarding effect selection.
Planning a New Project All the Video Effects may be manipulated to suit the users needs. This Manipulation occurs while applying the Video Effects one at a time in the Storyboard or Timeline View. When an Effect is applied the Clip will display a small “Doubled Star” icon in the lower left of the Clip Frame. In the Storyboard View the Effect name will be displayed when the Mouse is Hovered over the Double Star Icon however this will not be displayed in the Timeline View. Additional Effects are available On Line. Use these effects sparingly as they may become overwhelming to the viewer and may actually detract from the actual message of your film should the viewer/s begin to pay too much attention to the effects and less attention to the actual content. Video Effects Saving and Sharing Titles and Credits Audio Editing
Audio Editing Sound is added to Moviemaker in Clips called Audio Clips. Ordinarily the Audio Track from your Video Clips automatically comes along with the Video itself. You may decide to keep this Track or Delete it all together in favor of another Audio Clip from a second Video Source. The important thing to remember is that this Audio for Video Track is not your “Sound Track” it is simply the Sound that accompanies the original Video. To add an additional Sound Track such as a Music CD or a voice over Narration you will use the Audio/Music Track. Here you can import Sound Files of all types to create an individualized Sound Track the is fully Synchronized with the Video Clips already in place in your Movie. To add Music Files to your Audio/Music Track simply Drag and Drop the Music File from the Collection where it is stored onto the Timeline in the location you would like to apply the particular Clip.
Planning a New Project Saving and Sharing Titles and Credits All Audio/Music Tracks can be manipulated using the Toolbars in the Timeline View. These tools allow you to change the start and end positions of the sound clip. They allow you to use many of the same effects as the Video Effects we discussed in the previous page. You may fade in and out of Audio Clips and even Overlap them for a desired effect. The volume levels of each clip are adjustable by selecting the Audio Clip in the Timeline View and opening the Audio Clip Volume dialog box. In this box you are provided with a slider that enables you to adjust the Clip Volume independently. Other effects are available including; Muting, Fading and Wave Form adjustment. Narrating can be accomplished by using your system Microphone and Narrate Timeline Icon in the Toolbar of either the Storyboard or Timeline View. Editing of these tracks and correcting mistakes is made possible by applying previously mentioned effects to the track in order to correct the unwanted features. Audio Editing
Titles and Credits The use of Titles and Credits is a fun way to personalize your movies. You may use this process only in the beginning and closing frames of a movie or as often as you like within the movie to achieve the desired effect. Titles and Credits are simply Text Items that are added to the movie in a separate track called the Title Overlay Track. It is critical to note that when you want a Title to appear over the top of a Clip instead of a plain background you must first Select the Clip then start the process of creating the Title. There are many choices when creating a Title including how and where they appear in each clip, what Font and even Size of Font they will appear in, the color of each individual letter and even whether or not a Word Art will be applied to the Title.
Planning a New Project Saving and Sharing To create a Title simply begin the process by selecting the “Make Titles or Credits” from the Movie Task Pane. Title Tracks can be placed on either the Video Track or the Title Overlay Track. If the Title is placed in the Video Track it will be treated a an individual Video Track and will be completely editable as all Video Clips previously discussed. If the Title is placed in the Title Overlay Track then it will play over the Video Clip and the Video Clip will be seen through the Title background. Multiple effects and animations can be created by creating individual Titles and placing them concurrently in the Video Track and the Title Overlay Track to create a complex simultaneous effect that is completely editable by the effect tools as described earlier. Titles and Credits
Saving and Sharing Saving and Sharing your Movie files is the most necessary part of any project. When you desire to finalize your project into a Movie you must first decide how you will be distributing it. This decision will impact the File Type you create when you begin the Save Movie Wizard. When Saving your project Movie Maker 2 will be using all the Audio and Video Clips, Animations, Effects and Titles along with the links it has established between the Source Files and Collects to create the finished product, your Movie. This Movie may be posted directly to a Web Address, attached to an Email, saved to your computers Hard Drive, burned to a CD Rom or even a DVD Rom. To begin this process select “Save Movie File” from the Tasks Pane. Many choices will be presented to you in the window. Make your selection based on the choices discussed above. It is important to note that if you intend to make a VCD or DVD with your movie you must first open your project with another software package and then save it as an .AVI file.
Planning a New Project Saving movies to your computers Hard Drive is the most common first step to saving your movies. This is the most efficient way to save and manipulate your movie files. However this is also the most Memory Intensive method so be aware of file size when doing so. If File Size and available Space becomes an issue you can reduce the size of your Movie Files by reducing the Bit rate, Display size and Aspect ratio of your movie. Saving movies to a CD Rom will avoid this pitfall but it too is limited by the capacity of the CD Rom itself, usually around 650 MB. During this process Movie Maker 2 uses a format called HighMAT which creates a compressed version of your movie with high quality Audio and Video. Most movies you make will easily fit into this size media and as such are easily exchanged among computers that have Movie Maker 2 installed on them. Saving and Sending movies as attachments to Emails is also a Memory Intensive process and much thought must be given to File Size as you complete the Wizard. Not all Email clients will support large file size attachments and it is a good idea to limit your attachments to less than 2 MB and for best results under 1 MB. Saving and Sharing
Planning a New Project Planning a new Project begins before you shoot the video. It involves many decisions that will ultimately impact the quality of your final Movie. Many of the key steps in planning a successful Project are listed below. 1. Consider the Format of the Video you will be shooting. 2. Consider the number of individual Video Clips you plan to include. 3. Choose the Music Files you plan to include in advance. 4. Consider the Hard Drive Space you have on your computer. 5. Consider the availability of additional Video Sources. 6. Consider the Format of the final Movie. Once you begin the Project with Movie Maker 2 a whole new realm of possibilities exist. 1. Capturing the Video from the Camcorder 2. Creating the Source Files 3. Arranging the Collections 4. Creating and placing the Audio & Video Clips 5. Importing Sills and Background Music 6. Adding Video and Audio and Title Effects 7. Editing and Adjusting Effects 8. Saving and Sharing the finished product
While viewed as a whole this task may appear quite overwhelming and rightly so. However, when taken individually each of the steps can be a fun and challenging experience that will ultimately lead you step by step through the creation of your finished Movie. The Sections of this booklet are specifically designed to make it possible for a beginner to move at their own pace through the process starting from the introduction page. An experienced user will find much of this information redundant but from time to time mat find themselves returning to the booklet for specific instructions on a particular skill. The Help File within Movie Maker 2 is an excellent source for continued skill development and further problem solutions and as such this booklet is meant to be used along with those help files. Congratulations, you are now ready to go forward and create your own Movies. Enjoy Movie Maker 2. Planning a New Project