Global Enzyme-Linked Immunosorbent Assay (Elisa) Testing Market 2015-2019
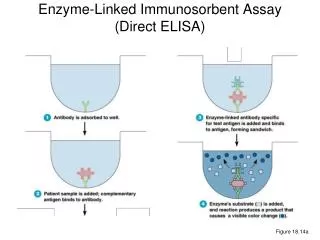
Most up-to-date research on "Global Enzyme-Linked Immunosorbent Assay (Elisa) Testing Market 2015-2019" to its huge collection of research reports. ELISA test is one of the most common laboratory technologies that is used for measuring the concentration of analytes such as antigens and antibodies in solution. ELISA test uses various types of enzymes such as carbonic anhydrase, glucose oxidase, and alkaline phosphatases and the result is detected by photometry or fluorometry. ELISA is used as a screening test in the treatment of various infectious diseases such as HIV, pernicious anemia, rotavirus, Rocky Mountain spotted fever, and syphilis. It finds application in different segments such as hospital, diagnostic laboratories, research laboratories, academics, and food industry. Market analysts forecast the global ELISA testing market to grow at a CAGR of 4.58% during 2014-2019. Browse Detail Report With TOC @ http://www.researchmoz.us/global-enzyme-linked-immunosorbent-assay-elisa-testing-market-2015-2019-report.html Covered in this report The report includes the present scenario and the growth prospects of the global ELISA testing market for the period 2015-2019. The market can be segmented into five segments based on application: immunology, cancer, infectious disease, inflammation, and others. Global ELISA Testing Market 2015-2019, has been prepared based on an in-depth market analysis with inputs from industry experts. The report covers the market landscape and its growth prospects in the coming years. The report includes a discussion of the key vendors operating in this market. Key regions Americas APAC EMEA To Get Sample Copy of Report visit @ http://www.researchmoz.us/enquiry.php?type=sample&repid=310742 Key vendors R & D Systems (a Biotechne brand) Thermofisher Scientific (brand: Life Technology) ZEUS Scientific Other prominent vendors Abbexa Abcam Abelisa Abnova Active Motif Affinity Biologicals Affymetrix Agdia Biofords ALPCO AMS Biotechnology ANIARA Beckman Coulter Bhat Bio-tech Bio-Rad Laboratories Biorbyt Biosensis BioVision Boster Bio Calbiotech Cayman Chemicals Cell Sciences Creative Diagnostic Crystal Chem Cygnus Technologies Dako Diaclone Diagenics Eagle Biosciences Euro Diagnostica Genasia Genway Biotech Gold Standard Diagnostics Helica BioSystems Hycult Biotech IBL America Immuno Laboratories IVD Technologies JEI DANIEL BIOTECH KOMABIOTECH Labor Diagnostika Nord Life Diagnostics Lifespan Biosciences MitoSciences MOLECULAR INNOVATION Monobind NEOGEN Neurotune Omega Diagnostics Oranoxis PeproTech Pribolab QIAGEN Quidel Randox Life Sciences RayBiotech Rockland Immunochemicals Stellar Biotechnologies United States Biological Vector Laboratories x-OvO Key market driver Rise in incidence of diseases For a full, detailed list, view our report Key market challenge Threat of low-cost products For a full, detailed list, view our report Key market trend Development in automation of immunoassay For a full, detailed list, view our report Key questions answered in this report What will the market size be in 2019 and what will the growth rate be? What are the key market trends? What is driving this market? What are the challenges to market growth? Who are the key vendors in this market space? What are the market opportunities and threats faced by the key vendors? What are the strengths and weaknesses of the key vendors? For Market Research Latest Reports Visit @ http://www.researchmoz.us/latest-report.html About ResearchMoz ResearchMoz is the one stop online destination to find and buy market research reports & Industry Analysis. We fulfill all your research needs spanning across industry verticals with our huge collection of market research reports. We provide our services to all sizes of organizations and across all industry verticals and markets. Our Research Coordinators have in-depth knowledge of reports as well as publishers and will assist you in making an informed decision by giving you unbiased and deep insights on which reports will satisfy your needs at the best price. For More Information Kindly Contact: Mr. Nachiket, Tel: 1-518-621-2074 USA-Canada Toll Free: 866-997-4948 State Tower 90 State Street, Suite 700 Albany, NY 12207 United States Email: sales@researchmoz.us Website @ http://www.researchmoz.us/
205 views • 7 slides


![Enzyme-Linked Immunosorbent Assay [ ELISA ]](https://cdn1.slideserve.com/2423074/enzyme-linked-immunosorbent-assay-elisa-dt.jpg)