Download
1 / 19
190 likes | 203 Views
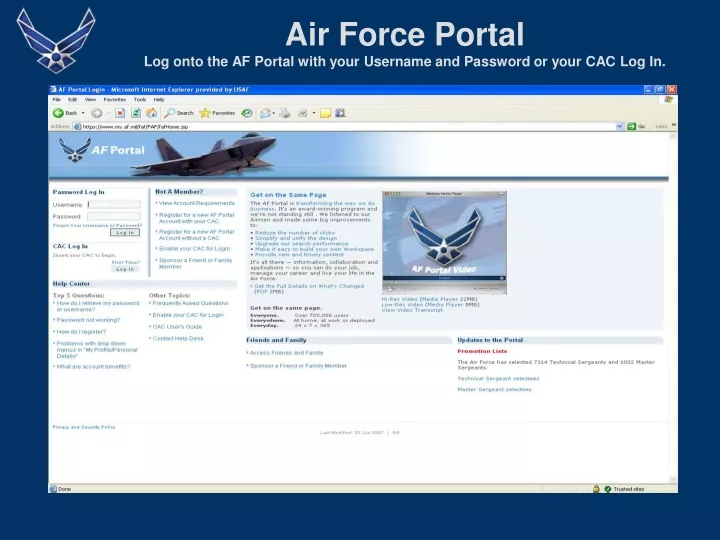
Air Force Portal Log onto the AF Portal with your Username and Password or your CAC Log In. Air Force Portal. Once you’re logged into the Portal, select the Air Force Virtual Education Center from the Featured Links. AFVEC.

E N D
Air Force PortalLog onto the AF Portal with your Username and Password or your CAC Log In.
Air Force Portal Once you’re logged into the Portal, select the Air Force Virtual Education Center from the Featured Links.
AFVEC To apply for TA, select “Apply for TA” from the Self Service Options menu.
On-line Tuition Assistance Request Getting Prepared Gather all your course information, and then select “Begin Tuition Assistance Application.”
On-line Tuition Assistance Request Step 1 A new dialog box will pop up containing the application. Located on top is the application progress view. There are six steps involved in completing your application. On the bottom, you will see the previous, cancel, and next buttons. These are used to navigate through the applications steps. 1. On this page, you will select the type of TA that you are applying for. 2. Then select Civilian Degree from the Enrollment Reasons section.
On-line Tuition Assistance RequestStep 2 In Step 2, you’ll select your school and enter your Term Dates.
On-line Tuition Assistance RequestStep 2: Select School Search for the University of Oklahoma by entering all or part of the school name, or by entering OK for the state. Then select Find. Choose OU from the list provided.
On-line Tuition Assistance RequestStep 2: Enter Term Dates For OU Advanced Programs students receiving TA from Tinker AFB: a class’ term dates are the Add/Drop date to the last day of class. For example, if HR 5093-101, Intro to Graduate Studies in Human Relations has an Add/Drop date of Jun 28 and class dates of Jul 27-29 and Aug 3-5, your term dates for the class would be Jun 28 to Aug 5. Please note that the Tinker education center WILL NOT process TA requested after the Add/Drop date for a particular class without a Memo for Waiver of Late TA (see the Tinker site manager or an education center counselor for this form). Note: most other AF education centers only require the dates of your actual class time. If you will be receiving TA from another base’s education center, please check with them to verify what dates you should use.
On-line Tuition Assistance RequestStep 3: Add Course Information Now you’re ready to add your course! This can be done by either selecting from a preloaded course catalog or by manually entering the course information. Start by selecting “Add Course.”
On-line Tuition Assistance Request Step 3: Course Catalog The Course Information Window, or course catalog, will pop up. The Tinker education center maintains a course catalog for all OU Advanced Programs courses offered in Oklahoma, whether on-site, on-line, or independent study. This does not mean that your course will be loaded. If you try to find a course in the catalog and it is not in the database, you will be required to enter the information manually. First, however, we’ll try to find your course in the course catalog. Unfortunately, there is no shortcut to finding your course. Scroll through the catalog until you locate a match, and then select it to add it to your request.
On-line Tuition Assistance Request Step 3: Course Catalog The next screen you will see will show you the pre-loaded course information as entered by the education center staff. Double check this information! You want to make sure all of this data is correct before you proceed. Then select “Add Course.” “But wait!” you say. “My course wasn’t in the catalog!?!” First, select Cancel to go back to the Course Information Window. In the next slide, we’ll discuss how to enter a course manually.
On-line Tuition Assistance RequestStep 3: Add Course Manually From the Course Information Window, select “Add Course Information” to start the manual entry process.
On-line Tuition Assistance RequestStep 3: Add Course Manually Course Number: Enter course number and section without spaces (ex. HR5093101) Title: Enter the course title, abbreviating if necessary (ex. Intro to Grad Studies in HR) Level/Type: Select the course level from the drop down list (i.e. Graduate) Location: Select the course location from the drop down list *Tinker = On base *Online, Independent Study, and Directed Reading = Distance Learning *Norman, Ft Sill, or any other CONUS Advanced Programs site = Off base Hour Type: OU Advanced Programs courses run on Semester Hours # of Hours: Enter the number of hours for this particular course (typically 3 Semester Hours; some directed reading courses are variable credit, so make sure to confirm how many hours you are taking) Follow these steps to enter your course. “Then select Add Course.” Cost Per Hour: Enter the PER HOUR rate. Do not enter the entire cost of the course here. (i.e. on-site classes in Oklahoma = $250 per semester hour; the HR internship and other mandatory directed readings and research project enrollments = $250 per semester hour; independent study courses = $281 per semester hour; online classes = $281 per semester hour. Lab Fees: Advanced Programs has no fees other than tuition
On-line Tuition Assistance RequestStep 3: Confirm course entry Confirm that your course information is correct. Then click the green arrow to go to Step 4. If you find that something isn’t correct, select “Delete” to enter the course again.
On-line Tuition Assistance RequestStep 4: Registration Fees There are no additional fees for Advanced Programs courses. Skip this step and proceed to the next section.
On-line Tuition Assistance RequestStep 5: Verify TA Information Verify that all of the TA request information on the form is correct. Please be careful to note school, term, and course information to ensure that the information provided is accurate. Use the back buttons to correct any incorrect information. If AFVEC finds that TA cannot cover some or all of the tuition, and if you are MGIB qualified, you will be notified and given the option to elect the “VA Top-up” MGIB option. You may use this option to supplement any cost not covered by TA. Please check with your education center if you are unsure of your eligibility. Lastly, make sure your email address is updated! This is the address where all communications between you and education services will occur.
On-line Tuition Assistance RequestStep 6: Agree to Conditions/Certifications Read each of the conditions and certifications. You must agree to all conditions and certifications by checking them off prior to submitting your application for approval. Once you have agreed to the conditions and certifications, enter your full name and AFVEC password to submit.
On-line Tuition Assistance RequestComplete! Your application will be submitted to your local education center for final approval. Please allow up to 2 business days for a response. Please note that your submission does not guarantee approval. Do not factor this TA into defraying tuition costs until you receive final approval from the education center. And that’s it! You’re done! If you have any problems at all, please feel free to contact your site manager for assistance.
After the on-line TA is approved • Student receives notification of approved TA form. • Approved TA form will have both the student & approval officials digitally signed signature. • Student keeps a copy of the TA form for his or her records. • TA is digitally sent by the AFVEC system to the Advanced Programs billing office. • After the first weekend of the student’s class, the AF is billed for the TA amount, thereby clearing the student’s bursar account.