Download
1 / 24
240 likes | 362 Views
eArmy Family Messaging System. Webinar Training. eAFMS Topics. The eAFMS Webinar covers the following topics: Signing into eAFMS Uploading Recipients Template Options Sending a Message Phone Email Reports Managing Your Site’s Information Caller ID Email ID. Signing into eAFMS.

E N D
eArmy Family Messaging System Webinar Training
eAFMS Topics • The eAFMS Webinar covers the following topics: • Signing into eAFMS • Uploading Recipients • Template • Options • Sending a Message • Phone • Email • Reports • Managing Your Site’s Information • Caller ID • Email ID
Signing into eAFMS • The single sign on is still active for eAFMS. • Log into Army FRG. • Go to the Featured Links tab. • Select the link for the eArmy Family Messaging System. • A new tab will open to eAFMS. • You must have an account on Army FRG to use eAFMS.
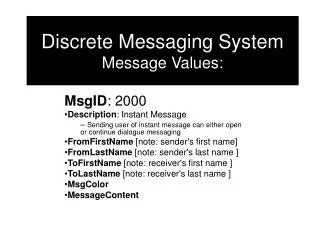
Uploading Recipients - Template • First, download the Template: • https://www.armyfrg.org/eAFMS_Template OR • Go to the Resources tab, then into the Download Center, and go to the eArmy Family Messaging System category to get the eAFMS Upload Template. • The Template requires the following fields (required in bold.): • AGENCY: This is the name of the Unit you are adding the person to (required). • CONTACTTYPE: This should be set to "Resident" for all entries (required). • REFERENCECODE: Leave this blank. • FIRSTNAME: The user's first name (required). • LASTNAME: The user's last name (required). • PRIMARYPHONE: The user's primary phone number to be contacted at (required). This number should be the same as one of the Home, Work, or Mobile numbers (required). • HOMEPHONE: The user's home phone number. • WORKPHONE: The user's work phone number. • MOBILEPHONE: The user's mobile phone number. • EMAILADDRESS: The user's email address. • EMAILADDRESSALT: The user's alternative email address. • HOMEADDRESS: The user's street address. • HOMECITY: The user's city. • HOMESTATE: The user's state. • HOMEZIP: The user's ZIP code. • LANGUAGE: If the user wishes to receive messages in another language, set it to be one of: English, French, German, Korean, Spanish. • GROUP: The group the user is to be put into. You can use this to create the group if it doesn't already exist. If the user is to be put into multiple groups, simply add GROUP columns.
Uploading Recipients - Template Please note that the Template is a .csv file. When you save it, make sure you keep it as a .csv file. Excel should do so by default. Do not change the formatting of the Template in any way such as by adding borders, colors, shading, fonts, centering, etc. Do not change the headers of the Template. While you can add extra GROUP columns if a user belongs in many groups, do not change the headers of any of the other columns. Any groups you create in this file that do not already exist will be created automatically. Check your spelling to ensure an accurate upload.
Uploading Recipients - Options • Click on Recipients in the top navigation. • Then click on Import Data. • You’ll be asked for some information regarding the file you are uploading. • Click on Select to locate the file you are uploading. • Select the site this information should be uploaded to. This will usually be your site. If you are an admin for a higher Unit such as a Brigade and you are making an upload for a child site such as a Battalion, choose that Unit. • Set the Contact Type to Resident. • Leave the Data Provider as CLIENT. • If you are doing a delete-and-replace, click on Advanced options. • Check the Resident checkbox in Remove contact types not provided in the import file. This will delete all old entries marked as Resident. • When ready, click Import. • You will receive an email notice when your file has been imported. You can view the results by clicking on View import history on this page.
Uploading Recipients - Options • Click on Select to locate the file you are uploading. • Select the site this information should be uploaded to. This will usually be your site. If you are an admin for a higher Unit such as a Brigade and you are making an upload for a child site such as a Battalion, choose that Unit. • Set the Contact Type to Resident. • Leave the Data Provider as CLIENT. • If you are doing a delete-and-replace, click on Advanced options. • Check the Resident checkbox in Remove contact types not provided in the import file. This will delete all old entries marked as Resident. • When ready, click Import. • You will receive an email notice when your file has been imported. You can view the results by clicking on View import history on this page.
Sending a Message To send a message in eAFMS, click on Message Center: From the Message Center, indicate if you are sending an Emergency message or an Outreach message. An Emergency message will use all contact methods available for the user while an Outreach will only use the preferred method of contact.
Sending a Message • The system will then ask you information about the message: • Message Type • This is set to either Emergency or Outreach based on your previous choice. You can change it if you clicked the wrong one. • Title • The title of the message • To • Who is going to receive the message? You can type in the name of the Group. The system will match what you type to the Group names available. Select the Group from the list that appears to add that Group to the recipient list.If you want to send the message to everyone, type All. • Add Languages • Select any additional languages to use with the message not included from the Language settings of the users. • Translate All • Perform a machine translation of the messages in the default language to the other languages being used by the message. • Languages • Click on the language to set up the messages to be sent in that language. • Delivery Modes • Click to edit that particular method of delivery. The system lets you know how many people will receive the message via that method. See below for details on each method. • Time Zone • The time zone for the message. • When • When should the message be delivered?
Sending a Message: Phone To send a Phone message, first set the CallerID that the message will come from. Then click on either Add Voice or Add Text to Speech. You can add up to five voice messages total.
Sending a Message: Phone When you click on a Voice message you will get the following screen: Follow the instructions on the right to call the system and record your message. The system will give you a scratch pad where you can write out the message you would like to send. This way, when you call the system to record it, you can read it rather than trying to compose the message off the cuff. This also allows you to use the Insert Variable option. This allows you to have the text-to-speech insert a recipient-dependent option such as the person’s name. For example, you would compose a message: Hello, [FIRST_NAME]. As you record your message, you hit the * key on your phone at the appropriate time to insert the variable. When the message goes out, the system will have the text-to-speech engine insert the recipients First Name at that point.
Sending a Message: Phone When you click on a Text to Speech message, you will get the following screen: Write whatever message you wish to have the system read out when it calls the users. Just like with a recorded voice message, you can use the Insert Variable option to have the system pull information from the recipient’s profile to read at that point. In either case, voice or text-to-speech, you can copy over information from one of the other modes by using the Copy from Mode dropdown. That is, if you have already put in an email message and the phone message is going to be the same, you can pull the text over from the email message without having to retype it in. You can then edit the text to customize it for voice.
Sending a Message: Email When sending an Email, you will see the following: Indicate where the message is coming From and then enter the Subject and the body of the message. You can use the Insert Variable option and if you have a message from another mode (such as Phone), you can copy it from that other method by selecting it from the Copy from Mode dropdown.
Sending a Message When you are ready, click Next to review the details of the message: If the message is good to go, click Send. The system will warn you if you are sending to more than 75% of your contacts. This is to help prevent you from accidentally sending a message to everyone. It will also warn you if the message is being sent at a late time in order to prevent interruptions of people at odd hours.
Sending a Message: Reports To view the results of your message, click on Sent after the message has finished processing. Hover over the message and click on the hourglass to view the details of the message.
Sending a Message: Reports The system will show you the details of the message including how many people were successfully contacted for each delivery method. To see the specific details, click on View Detailed Results.
Sending a Message: Reports From here, you can see how the messages were delivered. For details regarding the delivery method for each individual contact, click on Export. The system will generate an Excel spreadsheet listing every person who received a message and the results of the delivery (Bad Phone Number, Live Delivery, etc.)
Managing Your Site’s Information To manage your site’s name, time zone, etc., click on Admin in the top navigation: Find the site you wish to edit and click on the pencil icon for it.
Managing Your Site’s Information From here you can edit your sites name, contact information, location, primary language, and time zone.
Managing Your Site’s Information: Caller ID To manage the Caller IDs available for your messages, click on the Settings tab in the Admin section and then on Caller IDs. Click on Add New to create a new ID. Hover over an entry and then click on the pencil icon to edit an entry.
Managing Your Site’s Information: Email ID To manage the Email IDs available for your messages, click on the Settings tab in the Admin section and then on Email IDs. Click on Add New to create a new ID. Hover over an entry and then click on the pencil icon to edit an entry.