Download
1 / 16
180 likes | 1.48k Views
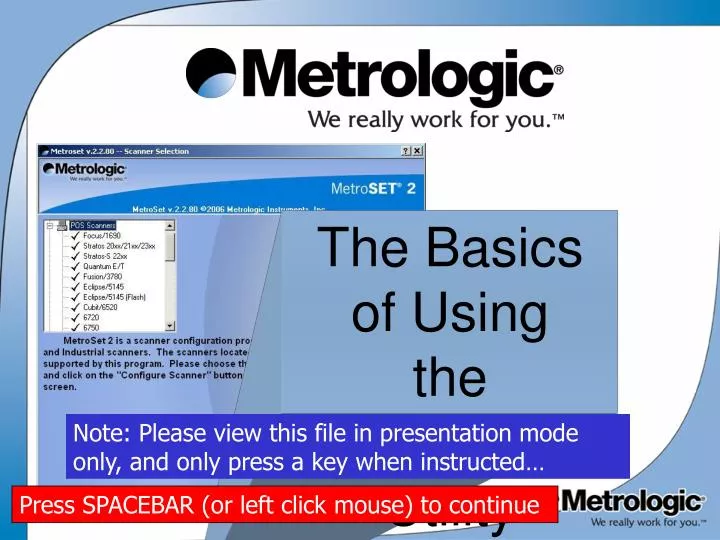
The Basics of Using the Metroset2 Utility. Note: Please view this file in presentation mode only, and only press a key when instructed…. Press SPACEBAR (or left click mouse) to continue. To begin, start the Metroset utility and then select POS Scanners….

E N D
The Basics of Using the Metroset2 Utility Note: Please view this file in presentation mode only, and only press a key when instructed… Press SPACEBAR (or left click mouse) to continue
To begin, start the Metroset utility and then select POS Scanners… Click on your scanner model in the list… Then click on the button to Configure that scanner… Press SPACEBAR (or left click mouse) to continue
There’s the OPEN FILE command which is used to open an existing or saved .MST configuration file… And finally, the TERMINAL WINDOW can be used by advanced users to monitor communications to and from the scanner. The PRINT BARCODES button can be used to print out program barcodes to program a scanner with the selected options. There’s the UPLOAD and DOWNLOAD buttons used to upload settings from the scanner and to download settings back to the scanner. This usually requires using a RS232 cable 54-54014. The Download All function is rarely used for customers. There’s the version level of the Metroset Utility The GLOBAL DEFAULTS button is used to reset all options for the current selected scanner back to the factory default settings… The SCREEN DEFAULTS button resets the options on the active (open) screen only to the factory defaults. There’s the scanner model selected… And there’s the configuration file you’re currently working with… You should also know that HELP is available anywhere you see the “?” by clicking on it and then clicking on the item you want to get information on… When the main screen appears, There’s several things to note… Press SPACEBAR (or left click mouse) to continue
The first step should almost always be to UPLOAD the settings from the scanner connected… To UPLOAD the settings, click on UPLOAD…. Click “OK” to the overwrite warning message… Press SPACEBAR (or left click mouse) to continue
The software version of the scanner will then be displayed… The progress of the UPLOAD will be shown… Click on “OK” to continue… Press SPACEBAR (or left click mouse) to continue
There’s the Operation’s section that deals with the interface and functional controls… There’s the Code Type section that has options regarding the various symbologies… There’s the Data Formatting section that deals with the format and the output of the data from the scanner to host… And finally, there’s the section with the integrated Flash Utility… The utility is divided into 4 main categories… Press SPACEBAR (or left click mouse) to continue
And the options for the selected interface… Looking in more detail at the Operations Section… The Interface Section Has the interface options… Press SPACEBAR (or left click mouse) to continue
And finally, the Mode of Operation determines how the scanner operates in presentation mode or trigger mode, in and out of stand… The MISC options control when program codes can be scanned, control test modes, and define how much variance determines it is a different barcode. The Host Controls section has various options that affect communications with the host terminal. The Beeper / LED Section controls both the sound and LED visual indicators… The Delay / Stand options include the range in and out of stand, and more importantly, the same symbol timeout value. The same symbol timeout value is how much time must expire before the exact same barcode can be scanned again in presentation mode. It is overridden with the manual trigger press. Press SPACEBAR (or left click mouse) to continue
The Code Supplements section, where you enable supplements or coupon codes… And the MISC/ Code Length section, where you can set minimum code lengths, or lock on given lengths for all codes allowed… The Code Types section is where you enable the various symbologies, and control the options for each… There are several other options available in the Code Type section… It’s probably important to note at this point that all options indicated by bold print are the default options for that scanner… Press SPACEBAR (or left click mouse) to continue
Extended parsing extends the flexibility of user defined parsing by setting up various conditions and actions… Reserved Codes are exactly that. They are special options that are reserved for use by Metrologic. Only select if told to do so by an authorized Metrologic representative… Prefix / Suffix characters are those that are transmitted to the host at the beginning and end of a barcode… Or as pre-defined code ID sets, as shown here… Character replacement identifies what character should be transmitted in place of the character identified any time it is seen… Special code selects and locks let you specify what lengths of a particular symbology are allowed, or to block symbologies of a particular length, as shown above… User defined Prefixes and Suffixes allow the user to define exactly what prefix or suffix is transmitted to the host… The data parsing allows users to identify what characters they want to be transmitted from a given symbology and length, and in what order… The Code ID’s are used to identify symbologies to the host, and can be selected manually as above… ISBT options are user selectable options that are only available if they are enabled. Auxiliary mode setup is used to configure scanners connected to another’s AUX port… The Data Formatting section has some very important options… Press SPACEBAR (or left click mouse) to continue
The progress of the download will be shown… Once all configuration options are set, download the selected options to your scanner… The download is now complete. You should continue with the next section for information on how to save your files… Click on “OK” to the warning message about overwriting your settings… Click on OK to continue… Press SPACEBAR (or left click mouse) to continue
With your options set in the utility as you want them on your scanner, click on “FILE”, then “SAVE AS”… This section will assist you with saving your configuration files… Your .MST configuration file will be saved in the selected directory… Then click on SAVE… Type your filename here Press SPACEBAR (or left click mouse) to continue
With the options set in the utility set as you want your scanner programmed, click on “FILE”, then “SAVE AS”… This section will guide you through creating a sheet of programming barcodes you can scan to program your scanner with the selected options… The output should look something like this when you locate and open the .PDF file from the location you saved it in… You have now completed reviewing the configuration options and the various “save to” options within Metroset… Type a Title for your sheet here Then Click “OK” Then click on SAVE… The next section will cover the steps to upgrade the firmware on your scanner using the Flash Utility… Type your filename here Select the file type as .PDF file… Press SPACEBAR (or left click mouse) to continue
The last section to review is the Flash Utility. To begin the flash update process, click on the Flash Utility option here. Note: this usually requires a cable 54-54014A to connect the scanner… Press SPACEBAR (or left click mouse) to continue
The current file progress and the overall flash progress will be shown. DO NOT INTERRUPT THIS PROCESS! This message indicates that the flash update completed successfully. It is now recommended that you reprogram the scanner with the correct configuration file, and test the scanner. The flash update is now complete… The file will be verified, and if it is the correct file for this scanner, you will be able to continue. Click on FLASH SCANNER to start the update process… When the flash utility starts, click on “OPEN FILE” to load the correct flash file for your scanner… (NOTE: contact Metrologic support to obtain or verify the correct file required)… Select the correct file from the location it was saved to… Then Click on OPEN… Press SPACEBAR (or left click mouse) to continue
This completes the review of the Metroset Utility. We hope you have found this information useful. If you have and questions, please contact Metrologic Technical Support at the following number: 1-800-436-3876 Or, that is 1-800-ID-METRO