Download
1 / 7
70 likes | 186 Views
TS4120 Adjustments. Next Screen, Page Down. Using a medium Philips blade screwdriver, loosen the locking screw holding the belt tension pulley, adjust the tension as desired, then tighten the screw. Do not over-tighten. Too tight can cause exit jams during sorting.

E N D
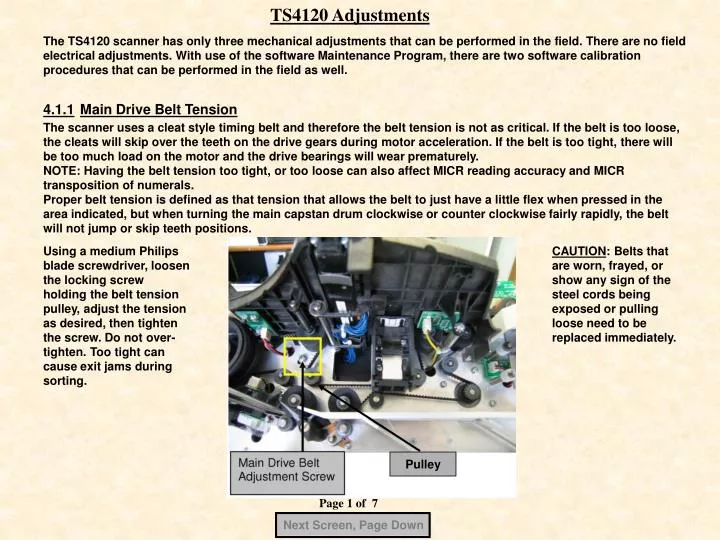
TS4120 Adjustments Next Screen, Page Down Using a medium Philips blade screwdriver, loosen the locking screw holding the belt tension pulley, adjust the tension as desired, then tighten the screw. Do not over-tighten. Too tight can cause exit jams during sorting. CAUTION: Belts that are worn, frayed, or show any sign of the steel cords being exposed or pulling loose need to be replaced immediately. Pulley Page 1 of 7
Next Screen, Page Down Page 2 of 7
Double Feed Roller Screw Access Hole (on all -22 & -22P units) Next Screen, Page Down • Adjustment Procedure: • Turn off the power to the scanner • Using a small or medium Philips screw driver, insert the screw driver until it contacts the screw (about ¾”) • Turn the screw Counter Clockwise (CCW) one half turn to tighten the adjustment • Power the scanner back on and test • It maybe require one more ½ or full turn depending upon the environment (temperature, humidity, documents, etc) Page 3 of 7
Next Screen, Page Down • Ballpark Adjustment Procedure: • Slide a standard check into the second set of rollers, and pull up vertically • There should be a modest amount of drag. If too little or too much, adjust in ½ turns, CCW to tighten or CC to loosen. Then recheck until close. Run scanner for final testing. Page 4 of 7
Next Screen, Page Down New inner separation roller New entry roller and outer separation roller Page 5 of 7
Next Screen, Page Down New inner separation roller guide Adjustment Procedure: The guide should cover the top and bottom of the inner roller. Recess the guide toward the center of the scanner to allow enough of the roller flanges to engage the outer roller. Page 6 of 7
Next Screen, Page Down New separation roller Adjustment Screw Adjustment Procedure: This adjustment is the same as the screw adjustment which is recessed.If you are getting piggybacks, tighten the adjustment by turning the screw CCW, in the direction of the arrow shown, ½ turn and retest. Page 7 of 7