Download
1 / 90
900 likes | 1.04k Views
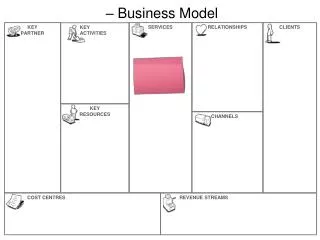
Services. EGL Services Workshop. Workshop 1 Create a new service, test the service in a Rich UI, and Deploy to a Server. Workshop 2 Use an existing Service, test the Service in a Rich UI, and Deploy to a Server. Workshop 3

E N D
EGL Services Workshop • Workshop 1 • Create a new service, test the service in a Rich UI, and Deploy to a Server. • Workshop 2 • Use an existing Service, test the Service in a Rich UI, and Deploy to a Server. • Workshop 3 • Create a new Service that accesses a database, test the Service in a Rich UI, and Deploy to a Server.
Workshop 1 • In this workshop you will do the following • Create a simple Service that validates Zip Codes for the state of California. The code is provided in the Notes section of the slide. • Create a Rich UI to prompt the user for a Zip Code and then, upon return, display a Dojo Dialog with a message. Code is provided in the notes section • Test the Rich UI for both successful and unsuccessful situations. • Deploy the Rich UI Application to a Tomcat Server. This will allow you to configure your workspace for the Runtime environment in preparation for subsequent Services Workshops.
Create a Services Project • You will create two types of programs for this workshop • A service program that is reusable across multiple applications. • A Rich UI Handler that will allow the user to interact with data via a browser and use this service as part of that activity. • As mentioned in earlier lectures, the Project is one of the fundamental units of organization within the EGL development environment. Here you will group your Services in one Project and the Rich UIs in another type of project. • To create the EGL Services Project, Select File -> New -> EGL Project. • Enter the following in the New Project window: • EGLGeneralProj in the project name field • Select the General Project radio button. • Click Next > • In the next window, go with the defaults but verify that the target runtime is Java. • Click the Finish button
Associate the Services Project with the Rich UI Project • This is another fundamental capability in RBD: Linking Projects together • There may be the requirement to organize your code into Common Code that is used across multiple functional applications where each functional application is in its own project. • By setting the EGL Build Path you can link a common project with one or more functional application projects, i.e. the Rich UI Project. • So, to link the General Project to the Rich UI Project, Select the Rich UI Project, press ctrl + enter, then select the EGL Build Path. • Select the EGLGeneralProj as shown:
Create a new Service Right Mouse Click on EGLSource New -> Service Copy paste source code from Notes below and overlay template code. Click Save Package: services EGL source file name: zipService Click Finish
Copy paste source code from Notes below and overlay the template code. Click Save Create a New Rich UI In the EGLRichUIProj, Right Mouse Click on EGLSource New -> Rich UI Handler Package: handlers EGL source file name: ZipCheck2 Click Finish
Test The Rich UI Application At this point your workspace should look like this: Select the Preview Tab See the Notes section if you have any problems
Test the New Service Enter a valid zip code for California, i.e. 95764 Enter an invalid zip code for California, i.e. 85647
Note: Remember to install your Server before starting this step. Deploy your Rich UI Application If this is the first time deploying a Rich UI application you will need to specify a Web project to deploy to. Click the New button, Project name: RichUIWebProj, Click the New button next to the Target Runtime field. Select your Project, Right Mouse Click, Select Deploy EGL Project
Deploy Note: If you do not have Tomcat application server, click here to go to the appendix for instructions on downloading Apache Tomcat. Select the Target Runtime environment of your Web Project, i.e. Apache Tomcat v6.0 Click Next > Click the Browse… button to find the location of your Tomcat installation directory Click Finish Click Finish
Deploy Rich UI Application Click the Deployment Icon The application will now be deployed to your new Web Project When done, note the messages in the EGL Deploy Results view. There should be no errors. Note: You may have to restart the Server.
Run the Zip Check Application To test the deployed application, Expand the folders in the Web Project, Select ZipCheck2-en_US.html, right mouse click, Select Run As -> Run on Server.
Workshop 1 Summary • In this workshop you did the following: • Created a simple Service that validated Zip Codes for the state of California. The code was provided in the Notes section of the slide. • Created a Rich UI to prompt the user for a Zip Code and then displayed a Dojo Dialog with a message. Code was provided in the notes section • Tested the Rich UI for both successful and unsuccessful situations. • Deployed the Rich UI Application to a Tomcat Server. This allowed you to configure your workspace for the Runtime environment for the subsequent Services Workshops.
Workshop 2 • In this workshop you will do the following • Use an existing Service that returns the current weather in the City and Country you specify. The WSDL code is provided in the Notes section of the slide. • Import the WSDL into RBD v8. • Create an EGL Client Interface using the WSDL. • Create a Rich UI to display the results of the Weather Service, prompt the user to enter a City and Country, and then, upon return, display the result. Code is provided in the notes section. • Test the Rich UI. • Deploy the Rich UI Application to a Tomcat Server.
3rd Party WSDL Files • www.xmethods.net is a website where you can get all kinds of 3rd Party WSDL files. • For this workshop, to keep it simple, we will use the Global Weather Service. To download this WSDL file, copy/paste this into your Browser or click on the link: • http://www.xmethods.net/ve2/ViewListing.po?key=uuid:49AA3AC6-D7F4-2818-5C51-E0FDF35E55DB • In case you can not get to this website the WSDL is in the Notes section below.
Download the WSDL file Click on the WSDL link shown in Red On the WSDL page, from the Browser Menu, File -> Save As Give the file a name of globalweather.wsdl. Click Save
Create the wsdl package • Note: It is important that the file downloaded has an extension of .wsdl • Create the wsdl package. • From RBD EGLRichUIProj, Select the EGLSource Folder. • Right Mouse Click, File -> New -> Package • Package name: wsdl • Finish
Import the wsdl file • Import the wsdl file • Select the wsdl package • Right Mouse Click, Select Import • General -> File System -> Next > • Use the Browse button to find the wsdl file, Select it. • Click Finish
Create the EGL Client Interface You will be warned that the wsdl file contains SOAP 1.2 wsdl. This is ok. Click the OK button. Select the globalweather.wsdl file Right Mouse Click, Select EGL Services -> Create EGL Client Interface
Global Weather EGL interface Notice the resulting interface part created. There are two functions with parameters. Note the datatypes of the parameters. We’ll need to know that later when we create the call to the Service.
Code the Rich UI to “Consume” the Service EGL source file name: GlobalWeather Click Finish. Select handlers package Right Mouse Click Select New -> Rich UI Handler
Create the Rich UI • The UI Editor opens up with the default GridLayout. • In the Properties view, change the Rows and columns as shown
Code the Rich UI – Add the Button • Drag a Button to Row 2 column 2 of the GridLayout • Name it : GetWeatherBtn • Click on the Layout tab of the properties view and set as shown:
Code the Rich UI – Add the Title • Drag a TextLabel to Row 1 column 2 of the GridLayout • Name it : TitleLbl • Click on the Layout tab of the properties view and set as shown:
Code the Rich UI – Add the Input Fields and Labels Drag a TextField into row 3 column 3 Variable name : CityFld Repeat for row 4 column 3 Variable name : CountryFld Drag a TextLabel into row 3 column 2 Variable name : CityLbl Repeat for row 4 column 2 Variable name : CountryLbl
Code the Rich UI – Add a ResultsBox and Results Field Drag a Box widget to row 5 column 1. Box variable name: ResultsBox Drag a TextLabel into the ResultsBox Label variable name: ResultsFld Ctrl + S to Save
Enhance the Rich UI • Edit the EGL Source or use the properties view to enhance your Rich UI screen. • Here: • the background color was added • the text was added for • TitleLbl • WeatherBtn • CityLbl • CountryLbl • Width (400) was changed for • the Results Box • Feel Free to enhance your Rich UI even more. Code to this point is below in the notes section Remember to Preview!
Code Functions to call Weather Service Select the Design Tab Select the WeatherBtn In the Properties view, Select onClick and Click on the “plus” at the far right column. You will be prompted for a New Event Handler name. Accept the default and Click OK.
Code Functions to call Weather Service (Cont.) Type the functions above OR, better yet, copy/paste this code from the Notes section below
Test the Global Weather Rich UI • Start the Server • Select the Preview Tab. • Enter: Los Angeles • Enter: United States • Click the Get Weather button • Click OK if prompted for which Interface to use.
Deploy your Global Weather Rich UI Select your Rich UI Project, Right Mouse Click, Select Deploy EGL Project When done you will see (hopefully) the following message
(Optional) Add Google Map to your Application • 1. Add utils folder under WebContent of your Rich UI project. (i.e. , File -> New -> Folder ) • 2. Copy GoogleMaps.js and GoogleMaps.html to the utils folder. • (Included with the workshops Zip file) • 3. Create a package in the EGLSource folder and copy the MapSource.egl into it • (Included with the workshops Zip file) • 4. Comment out ResultsFld, then Add: map GoogleMap{}; to the Rich UI Handler. Ctrl +Shift +o to resolve GoogleMap{}. Rich UI Proj Copy to here
Add Google Map • 5a. Change the box code to add the GoogleMap as a child part to the Results Box and adjust the size of the box : • In the Source view:
(Optional) Add Google Map and show results on the Map • 5b. Copy/Paste the following code (Record to format data) to the end of the handler code: • (make sure record is put AFTER the 'end' statement of the Handler) • (Code is in Slide Notes) • 5c. Copy/Paste the following code to replace the returning to function statements: • (Code is in Slide Notes) • 6. Press Ctrl + S to save.
Test the GoogleMap widget • Test! • Select the preview button • Enter : • City : Seattle • Country: United States • Bam! • Was that COOL or WHAT?!
Workshop 2 Summary • In this workshop you did the following: • Used an existing Service that returns the current weather in the City and Country you specify. • Imported the WSDL into RBD v8. • Created an EGL Client Interface using the WSDL. • Created a Rich UI to display the results of the Weather Service, by prompting the user to enter a City and Country, and then, upon return, display the result. • Tested the Rich UI. • Optionally Added a GoogleMap to your Rich UI Application
Workshop 3 • In this workshop you will do the following: • Create a data access record. • Create a Service that Accesses a Derby Database. The Code is provided in the Notes section of the slide. • Create a Rich UI using a Grid widget that will prompt the user to push a button, and then, upon return, display the result. The Code is provided in the notes section. • Test the Rich UI. • Enhance the Rich UI Data Grid • Deploy the Rich UI Application to a Tomcat Server.
Verify the Database Connection • Before you can create a database access record, you need to make sure you have a connection defined to the database. • If you have already created a database connection to the Derby Database continue to the next slide. • Otherwise, skip down to the Appendix section of this workshop presentation file and follow the steps to create a Database connection. Then go to the next slide
Create a Web Service to Populate a Rich UI DataGrid • This workshop will show you an end-to-end process where you: • Create a Web Service that returns an array of customer records • Create a RUIHandler that: • Calls the service that accesses the database • Returning (in the Callback function) all of the rows found into the Rich UI Grid • The visual representation of the run-time architecture is shown in this picture… onClick Event RUIHandler Call Service Function RUIHandler Callback Function Browser Tomcat Service EGLDerbyR7 Server
Create a Library part Remember from Workshop 1, we put our Services in a separate Project : EGLGeneralProj. Create the Library and Services here. Put the Library in the package : data Name the Library part : CustomerServLib
Create the Data Access Record Erase the template code. Type the following OR Paste (from Notes) the code replacing everything. Place your Cursor here Right Mouse Click -> SQL Record Select Retrieve SQL Ctrl + S to Save RBD will retrieve and create all of this for you!
Code the Data Access Service Type: customerArray Customer[]; function getCustomerListAll (customerArray Customer[]) end Press Ctrl + Shift + o (oh, not zero) to resolve Customer[].
Code the Data Access Service (continued) Type: get customerArray; Place the cursor in between get and customerArray Press Ctrl + Shift + A. RBD “Adds” the SQL Code statement to the function. Note: this is completely customizable. Ctrl + S to Save
Create the Rich UI Screen Create the Rich UI Handler in the EGLRichUI project. Package : handlers EGL source file name: CustomerList
Create the Rich UI to Display the data • Switch to the Source view • Add: custList Customer[]; • Press Ctrl + Shift + o to resolve the red x.
Create a DataGrid from the customer list record • Switch back to the Design mode. • Notice the custlist record is now a member in the EGL Data view. • Select it and drag to the third row, second column.