Download
1 / 10
100 likes | 236 Views
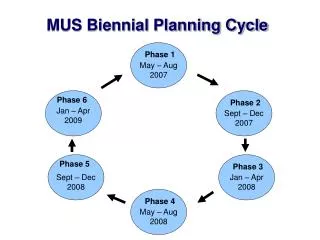
eSign Phase 2 Demo Setup. Sign Display Unit 100001. MATRIX24x7 Dashboard URL : http://esigndemosrvr/esigndemo/. Administrator. Sign Display Unit 100002. Handheld Application (Set Sale Demo App). Transcryptor TRX001 -192.168.6.145. 915 MHz ISM RF Network. MATRIX24x7 Server

E N D
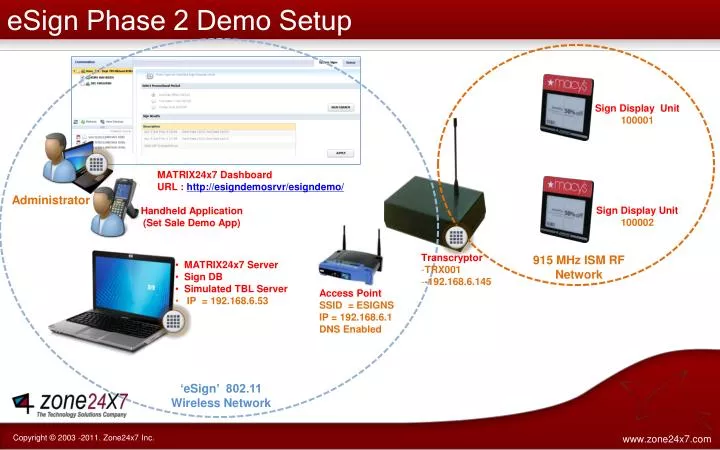
eSign Phase 2 Demo Setup Sign Display Unit 100001 MATRIX24x7 Dashboard URL : http://esigndemosrvr/esigndemo/ Administrator Sign Display Unit 100002 Handheld Application (Set Sale Demo App) • Transcryptor • TRX001 • -192.168.6.145 915 MHz ISM RF Network • MATRIX24x7 Server • Sign DB • Simulated TBL Server • IP = 192.168.6.53 Access Point SSID = ESIGNS IP = 192.168.6.1 DNS Enabled ‘eSign’ 802.11 Wireless Network
Initial Staging Process • Associate to SDU (Sign Display Unit) to eSign Network • Power up the Transcryptor • Place the SDU near a merchandise and Power ON the SDU • SDU associates with the nearest Transcryptor • Information retained in the MATRIX24x7+ eSign Backend • IP address of the attached Communicator • Derive REGION, DIVISION, STORE information based on the IP address Organization of Signs in the MATRIX24x7 Dashboard(Location Tree)
Initial Staging Process • Associate to SDU to mSign • SetSale App flow • Scan the merchandise • Scan the SDU Serial Number • Select a Sign to be displayed • Associate a Sign content to the SDU • Information retained in the MATRIX24x7+eSign Backend • Department, Vendor, Mark, Style of scanned merchandise • Association of scanned merchandise and SDU serial number Organization of Signs in the MATRIX24x7 Dashboard(Community Tree)
Operational Flow of the demo • Push new Signs to SDUs using MC 3190 Handheld Application • Select the Promotional period (One Day, Two Days, Today) • Scan a Merchandise barcode and load item details • Search Signs contents and select a Sign to be displayed • Scan or key-in the SDU serial number • Send selected Sign content to SDU • View the status from the Status Report
Operational Flow of the demo • Push new Signs to SDUs using MATRIX24x7 Dashboard • Select the SDU from the Dashboard • Select the Promotional period (One Day, Two Days, Today) • Search Signs using the associated merchandise UPC • Display retrieved Sign Descriptions from TBL • Select the required Sign and push to the SDU • View the status from the Status Report
Operational Flow of the demo Dashboard User Interface to Select Sign Content
Operational Flow of the demo Dashboard User Interface to Schedule and Push content
Operational Flow of the demo Proposed Dashboard User Interface to View Status
SDU Monitoring Capabilities • Information available in the dashboard related to a SDU • SDU registered date/time with the eSign System - Alert View
SDU Monitoring Capabilities • Information available in the dashboard related to a SDU • Last updated Sign content – Property Report