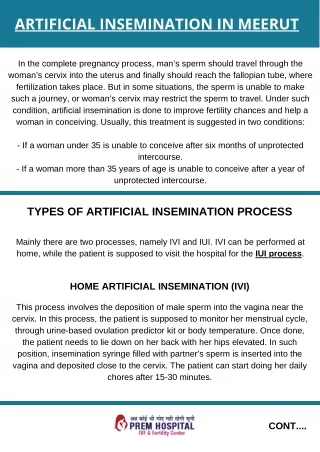
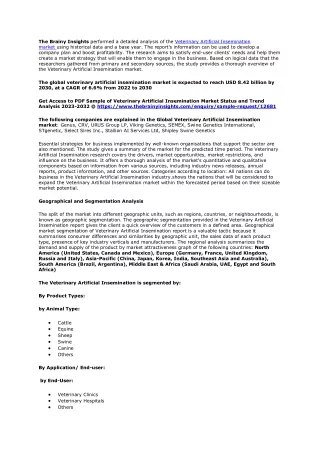
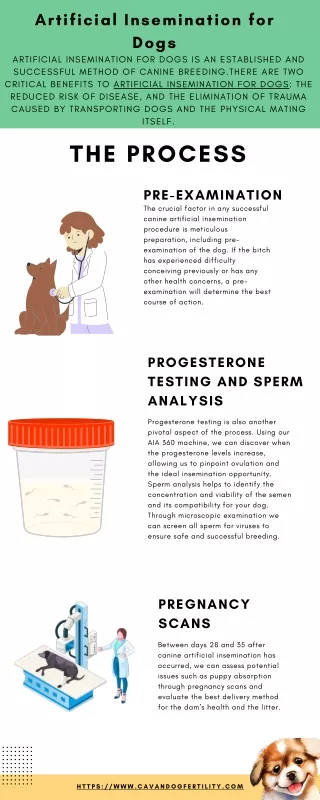
Download

1 / 38
400 likes | 656 Views
B111 Artificial Insemination. Advantages of Artificial Insemination Disadvantage of Artificial Insemination The Process of Artificial Insemination. Lesson Outline. Advantages. Superior genetic improvement

E N D
Advantages of Artificial Insemination Disadvantage of Artificial Insemination The Process of Artificial Insemination Lesson Outline
Advantages • Superior genetic improvement • More cost effective when compared with the cost of purchasing, maintaining and replacing bulls. • Better breeding records. You will know exactly which bull bred which cow. That may not be the case in a herd situation. • Spread of disease can be controlled. • Fewer injuries with large bulls breeding small cows or heifers. • Crossbreeding is easier. • Shortened calving season. • More uniform calf crops will result in better prices at the sale ring.
Disadvantages • Artificial insemination is labor intensive.
Process • It is recommended that the left hand be used in the rectum to manipulate the reproductive tract and the right hand be used to manipulate the insemination gun. • This is because the rumen or stomach of the cow lays on the left side of the abdominal cavity, displacing the reproductive tract slightly to the right.
Step 1 Restrain the Animal • Restrain the animal to be inseminated. • There are several things that should be kept in mind when choosing a location for inseminating cattle. • Safety of both the animal and the inseminator. • Ease of use. • Shelter from adverse weather.
AI Chute • For improved conception rates, cows should be handled gently for artificial insemination (AI) and not allowed to become agitated or overheated. • Do not use the same chute for AI that you use for branding, dehorning or injections; the cow should not associate the AI chute with pain. • Cows can be easily restrained for AI or pregnancy testing in a dark box chute that has no headgate or squeeze.
AI Chute • The dark box chute can be easily constructed from plywood or steel, with solid sides, top and front. • Once inside the box, the cow will be in a quiet, snug, dark enclosure. Latch a chain behind her rump to keep her in. • After insemination, release the cow through a gate in either the front or side of the dark box.
Step 2 Feeding the Inseminating Gun to the Cervix • Raise the tail with the right hand and place the tail on the back side of the left forearm so it will not interfere with the insemination process. • Cup the fingers together in a pointed fashion and insert the left hand in the rectum, up to the wrist.
Feeding the Inseminating Gun • With the left hand, make a fist and press down directly on top of the vulva. • This will open the vulva allowing clear access to insert the gun tip several inches into the vagina before contacting the vaginal walls.
Feeding the Inseminating Gun • Insert the gun at a 30° upward angle to avoid entering the urethral opening and bladder located on the floor of the vagina. • With the gun about 6 to 8 inches inside the vagina, raise the rear of the gun to a somewhat level position and slide it forward.
Feeding the Inseminating Gun • To become a successful inseminator, it is very important to always know where the tip of the insemination gun is located. • The walls of the vagina consist of thin layered muscle and loose connective tissue. The insemination gun can be easily felt with the left hand in the rectum. • As the breeding gun is inserted into the vagina, keep the gloved hand even with the gun tip.
Passing Your Arm Through the Rectum • Manure in the rectum can often interfere with the inseminator’s ability to palpate the cervix and gun tip. • However, it is seldom necessary to remove all the manure from the bowel. Instead, keep the open hand flat against the floor of the rectum, allowing the manure to pass over the top of the hand and arm.
Passing Your Arm Through the Rectum • With the hand in the rectum, the inseminator may notice colon constrictions or "rings" attempting to force the left arm from the cow. • To relax these rings, place two fingers through the center of a ring and massage back and forth. • The constriction ring will eventually relax, pass over the hand and arm, and the inseminator can continue the palpation process.
Feeding the Inseminating Gun to the Cervix • Because the reproductive tract is freely movable, cows that have strong rectal and abdominal contractions in response to being palpated may actually push their reproductive tract back into the pelvic cavity. • This will cause many folds to form in the vagina which can cause the insemination gun to get caught in these folds. • Locate the cervix and gently push it forward. This will straighten the vagina and the gun should pass freely up to the cervix.
Step 3: Feed the Inseminating Gun Through the Cervix • The cervix consists of dense connective tissue and muscle. • It has often been described as having the size and consistency of a turkey neck. • The size will vary, however, with post partum interval and age of the animal. • The cervix usually has three or four annular rings or folds. The opening into the cervix protrudes back into the vagina.
Locating the Cervix • In most cows, the cervix will be located on the floor of the pelvic cavity near the anterior (front) end of the pelvis. In older cows, the cervix may rest slightly over the pelvic bone and down into the abdominal cavity.
Feeding the Inseminating Gun • Once the gun is in contact with the external surface of the cervix, the inseminator is ready to begin threading the cervix over the end of the gun. • Place the cervix on or over the insemination gun; the gun is not passed through the cervix. Excessive movement or probing with the insemination gun during this step is seldom productive. • The key to mastering this step of the insemination process is knowing how to hold and manipulate the cervix and concentrating on doing the work with the hand inside the cow, not the one holding the gun.
Feeding the Inseminating Gun • When the gun first contacts the cervix, the inseminator will usually find that the tip is in the fornix area directly over the top of the opening of the cervix. • If this happens, grasp the external opening to the cervix with the thumb on top and forefingers underneath.
Feeding the Inseminating Gun • With gentle probing, the opening of the cervix should be located. The inseminator will feel the gun slide forward until it contacts the second cervical ring. • Maintain gentle but steady forward pressure on the gun and slide the thumb and forefingers just in front of the gun tip and re-grasp the cervix.
Feeding the Inseminating Gun • Because the cervix is composed of dense connective tissue and muscle, it is difficult to clearly distinguish the gun tip when it is located within this structure. • However, the inseminator can determine the approximate location by bending the cervix gently until the second ring of the cervix slides over the gun tip.
Feeding the Inseminating Gun • Repeat the process until all the rings have been passed over the gun tip. • When all rings of the cervix have been cleared, the gun should slide forward freely with little resistance. • Since the uterine wall is very thin, the inseminator will once again be able to feel the tip of the gun.
Step 4 Depositing the Semen • It is now time to check the gun placement and deposit the semen. • With the index finger, locate the far end of the cervix. • Pull back on the gun until the tip of it is directly underneath the index finger near the internal opening of the cervix.
Depositing the Semen • Raise the finger and slowly deposit the semen. Push the plunger slowly so that drops of semen fall directly into the uterine body. • With proper AI technique and gun placement, semen will be deposited in the uterine body. • Uterine contractions will then transport spermatozoa forward to the horns and oviducts with a good distribution of both sides.
Depositing the Semen • When the insemination gun is more than 1 inch through the cervix, all the semen will be deposited in only one horn. • Be sure to raise the index finger after checking gun placement. Not doing so may obstruct one horn, creating a situation of uneven semen distribution. • When checking gun tip placement, be careful not to apply excessive pressure. The delicate uterine lining is easily damaged, potentially causing infections and reduced fertility.
Depositing the Semen • Make sure to push in with the plunger and do not pull back on the gun. Pulling back may result in much of the semen dose being deposited in the cervix and vagina instead of the uterine body. • After properly depositing semen, slowly pull the gun from the reproductive tract.
Depositing the Semen • Remove the gloved hand from the rectum. Check the gun tip for signs of blood, infection or semen leakage inside the sheath. • Remove the sheath from the gun and hold it in the gloved hand. • Remove the glove starting at the top of the arm by turning it inside out trapping manure, the sheath, and dirt inside.