Download
1 / 31
310 likes | 497 Views
Some LaTeX features. By Andreas Grondoudis. Contents. This week we'll look at some TeX features Before specifics Already uploaded on my website; the PDF version of : http://en.wikibooks.org/wiki/Latex So this week Inserting and aligning images Inserting urls

E N D
Some LaTeX features By Andreas Grondoudis
Contents • This week we'll look at some TeX features • Before specifics • Already uploaded on my website; the PDF version of : http://en.wikibooks.org/wiki/Latex • So this week • Inserting and aligning images • Inserting urls • Inserting citations and creating a list of references
As you can see • Latex has more feature than any one person can know and learn by heart • It is the most complete, document management and preparation system • It is the choice of academia • Most of the times (just like any other application) we learn what we want to use • So this session • Inserting images • Inserting URLs • Citations and references
Basics – document with graphics • Step 1 – create a new document • Step 2 – use the wizard for a 'Quick Start' • Step 3 – remember to tick the 'graphiccx Package' and click OK
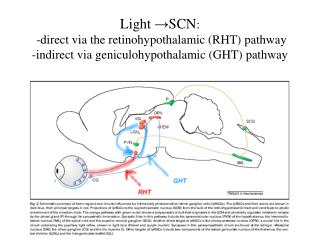
So we have • Assuming we have an image ready • Step 4 – Use LaTeX and select includegraphics(file) • Step 5 select, customise and click ok
So we got • Here is the image we use and the whole page 'default' result • Or we can use scale and instead of 1 go to .25-times or 3-times as big
placement • The [hbtp] • The h is for here • The b is for bottom • The t is for top • The p is for page • Lets add some text and manipulate to see the results
The alignment • If we don't tick 'center' which inserts \centering • Or \begin{flushleft}… \end{flushleft} • Same as \raggedright • Or \begin{flushright}… \end{flushright} • Or use \raggedleft • Notes: • Yes they are vise versa • Not much we can do about the caption (as it is now) • Packages: wrapfig; floatfl; picins • The above (ragged) commands will have effect until another command or the end of a markup section }
Inserting URL • Need to insert • \usepackage{url} or \usepackage{hyperref} • Both will allow a url address to be entered • Only with using the second one will make the link clickable • Notes: • Both will use equispaced (/code) font • The clickable will have a border around it • To make it look number normal text (while still being a link) • \urlstyle{same} • To remove the border • \hypersetup{pdfborder={0 0 0}} • Or 4 0s if 3 don’t work
References • Very important for academic writing. • There are more than one way and system of writing and using references. A wiki book is available • Embedded listing: • easy, using numbered references • Separate .bib file: • a little bit more work, using a separate file
Embedded listing • Just before the end of the document • Use the \begin{thebibliography} .. \end{thebibliogaphy} environment • Then list all items used using the \bibitem • \begin{thebibliogaphy} • \bibitem{familiar_name} • author, title, year, pages (what we talk about) • \bibitem{another_familiar_name} • author, title, year, pages (what we talk about) • …. • …. • \end{thebibliography}
Embedded listing - citing • After you have created the bibliography the document can refer to anything in the bibliography with the {familiar_name} • Just use \cite{familiar_name} and the citation will be created • Creates automatic numbering • Inserts a hyperlink cross-referencing the number with the list of references at the bottom of the document • To hide the box from around the link use • \hypersetup{pdfborder={0 0 0}}
Separate .bib file • In addition to the .tex file you must create a .bib file which will include your references • The .bib file is a text file that you can create in TexMakerusing the Bibliography menubar item • For every element on that you are given placeholders for the information • Checkout the example on the next page
The .bib file • Pulled own • Master • PhD • Book • All you have to do is to go in the {•} and simply complete the appropriate detail. • Note the first • of every entry is where you insert the familiar_name
Here is the file from my example • The file is called 7_source.bib
Now that we have the .bib file • We let the .texsource file know what it will use it. • Achieved with two commands at the end • The first one is the style of the references • The second is the source file (the .bib file without the extension) • If you want to use more than one you can, separate them by commas (but no space after each comma)
\bibliographystyle {x} • http://en.wikibooks.org/wiki/LaTeX/Bibliography_Management#BibTeX
Citations • Citations is the text inside the text that will refer to a name of one of the reference..So as before • Just use \cite{familiar_name} and the citation will be created • Creates automatic numbering (when plain is used) • Inserts a hyperlink cross-referencing the number with the list of references at the bottom of the document • To hide the box from around the link use • \hypersetup{pdfborder={0 0 0}}
The .tex file • We are not done yet… • Have to process .tex, then the .bib, and then the .tex again (and possibly again)
In order to biblio to work • Multiple processing is required • First press F1 to quick build • You might get some prompts mentioning that some references are unused • Then press F11 (Tools BibTex) • This makes the bibliography and you get an output to confirm • Note, you might get mistakes, read them and correct them • After that you have to F1 one (or maybe more times) to update the pdf
\bibliographystyle{alpha} • At F1 • It does NOT change • At F11 • The .aux file is changed • At F1 • At the next F1, no output
The end result ({alpha}) • Obviously a year 2000 does not look good • Use authordate1 instead
This week’s summary • Just mentioned the categories in which LaTeX can be used (and there are many) • So we looked at only some specifics • Looked at inserting images • Looked at inserting URLs • Looked at creating references and citations