Download
1 / 30
300 likes | 374 Views
Basic HTML. What and Where. Our biolinx computer has a web server on it. “Apache” is the brand name: it is Open Source software, and it is probably the most common web server in existence.

E N D
What and Where • Our biolinx computer has a web server on it. “Apache” is the brand name: it is Open Source software, and it is probably the most common web server in existence. • From a practical point of view, the web server makes all files located in the /home/httpd/html directory (and any sub-directories under it) visible to the World Wide Web. Pointing your web browser at http://biolinx.bios.niu.edu gives you access to this directory. • For example, look at the “hello.html” file from within biolinx (/home/httpd/html/hello.html) and from your web browser ( http://biolinx.bios.niu.edu/hello.html ). They are the same file! Try comparing the source code using “View Source” in your web browser. However, we can manipulate the file from inside biolinx; from the Web all we can do is look at it. • You each have your own sub directory for HTML: /home/httpd/html/z012345 (or whatever your z-number is), viewed through the web as http://biolinx.bios.niu.edu/z012345 . Put all your HTML documents in this directory.
What is HTML • Hyper Text Markup Language is a “markup language”. It is a set of instructions to your web browser to cause the text to be displayed in a certain way. • HTML is not a programming language in that it doesn’t allow decisions (if statements) or loops. • You can see what the actual HTML document looks like (as opposed to how it is displayed) using the “View Source” control on the browser. • HTML is a subset of SGML, Standard Generalized Markup Language, which is a generic way of representing any document. SGML is more or less too complicated to be useful, but it has spawned two important subsets, HTML and XML (which we will discuss later.
HTML Standards • HTML is an evolving language. I am presenting approximately HTML version 3.2, which is quite simple but which should work with all current browsers. We want to be able to generate HTML documents “on the fly”, from programs written in Perl, to display data dynamically. This is best done using simple HTML rather than the more complex forms used by large commercial web pages. • HTML 4.0, a more recent version has “deprecated” many of the tags that determine style (notably the <font> tag), and asks that you put style information in “Cascading Style Sheets”. Despite the deprecation, billions of web documents were (and continue to be) written without style sheets. For this reason, all browsers continue to support older version of HTML, and will do so for the indefinite future. However, HTML 4.01, which was released in late 1997, is the current standard for the web. • “Deprecated” means that there is a newer and better way of marking up the information than the old tag. However, deprecated tags still work. “Obsolete” tags may not work. • XHTML (Extensible HTML) is still being developed. It is an attempt to convert HTML into XML. Version 1.0 has been released.
Document Type Definition • HTML standards are defined in documents called DTDs (document type definitions). There is a default DTD used by the browser, and thus we don’t have to explicitly define a DTD. All XML documents come with a separate DTD file. • If desired, we can explicitly used a DTD by starting the HTML file with the line: <!DOCTYPE HTML PUBLIC "-//W3C//DTD HTML 4.01 Transitional//EN"> • This line says that the document follows the guidelines of the World Wide Web Consortium (W3C) transitional standards for HTML 4.01. “Transitional” means that some HTML 3.2 is still involved. W3C is the body that sets standards for the web. • However, you should be aware that approximately 90% of the browsers these days are Microsoft’s Internet Explorer. This semi-monopoly allows Microsoft to ignore standards or create its own at will. • In practical terms, a web site that displays correctly for both Internet Explorer and Mozilla Firefox will probably cover just about all situations: IE because of the above-stated Microsoft 900-pouind-gorilla problem, and Firefox because it follows the W3C standards that all other browser use.
HTML Tags • The basic feature in HTML documents is the “tag”. • Tags are set off by angle brackets (“<“ and “>”), with the tag name between them. For example, the entire HTML document is placed between the opening tag <html> and the closing tag </html>. • Most tags occur in pairs, indicating what is supposed to happen to whatever text is between them. The closing tag has the same name as the opening tag, but the closing tag stars with a slash (/). For example, <b>make this bold</b>. The text between the <b> and </b> tags is made boldface by the browser. • Pairs of tags are supposed to be nested: you close all inner tags before closing outer tags. Thus, <b><i>bold and italicize</i></b> CORRECT <b><i>bold and italicize</b></i> WRONG
More on Tags • Opening tags often contain attributes as well as tag names. Attributes are separated from each other by spaces, and they are in the form of: name=“value”. For example: <h2 align=“center”>Title</h2> creates a centered headline. The default is left-justified. • HTML tags are case-insensitive: <table>, <TABLE>, and <tAbLE> are all equivalent. However, the current XHTML standard suggests that we should use small letters: <table>. • Some tags don’t have a closing tag. <br>, a line break, is a common example. The XHTML standard suggests putting a slash into the single tag in these cases: <br />.
Character Entities • The other commonly seen feature in HTML documents is the “character entity”, a group of characters starting with & (ampersand) and ending with ; (semicolon). The entity represents a single character in the browser display. • For example > represents the > greater than sign. Since > is part of each tag, browsers have a hard time displaying the actual > character. By having > in the HTML document, the browser will display the character you want and not try to interpret as part of a tag. • Very useful is , a non-break space, which is how you get multiple spaces. If you just use the space bar, HTML browsers will compress all those spaces into just 1 space. So, to get multiple spaces, use several • All entity tags have a number: > is the same as > . Not all have a mnemonic name. • All characters have entity tags, but most are rarely used. Thus, a represents the letter “a”. There is no mnemonic tag for this letter; mostly we just type in the letter itself.
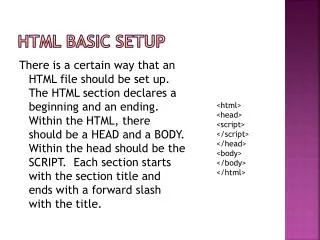
HTML Document Structure • HTML documents are supposed to have the form of a tree, or equivalently, in the form of a set of nested tags. • The document should open with <html> and close with </html> • Within the <html> tags are 2 sections: <head> ... </head> and <body> ... </body>. • In the head section is a <title> ... </title> line. The title is displayed at the very top of the browser window. • The body section contains all the tags and text that are displayed in the main window. • See the “Basic HTML Commands” web page (http://www.bios.niu.edu/johns/bioinform/htmlcom.html )
A Few Tags • Headlines are within tags like <h1> ... </h1>. H1 is the largest, H6 is the smallest. The “align” attribute can be used to move the headline: <h1 align=“center> or <h1 align=“right”>. The default is left alignment. • Text is set off in paragraphs within <p> ...</p> tags. Note that the closing tag is often left off. However, that is a sloppy practice that I discourage. • The <br> or <br /> tags introduce line breaks: less space between lines than with <p>. There is no ending tag for <br>” it is considered part of the previous <p> paragraph.
Lists and Tables • <ul> starts an unordered (bulleted) list; <ol> starts an ordered (numbered) list. Items within the list are set off with <li> ... </li> (list item) tags • <table> starts a table. <table border> puts a border around it. Tables are built row by row, and cell by cell within each row. Table rows are <tr> ... < /tr>. Cells within rows are <td> ... </td>
Images • Images are placed with <img> tags, with no closing tag. The basic syntax is: <img src=“source_file” alt=“tool tip text”> • The src= value is a local file, the path to a file in a different directory under the HTML root directory, or a URL. • The tool tip text is displayed when the mouse hovers over the image, or if for some reason the image won’t display. It is also very useful for the visually impaired.
Links • To put in a hyperlink, the anchor <a> ... </a> tag is used. Syntax: <a href=“URL”>text to use as link</a> • You can also use an image between <a> and </a>. In this case, clicking on the image sends you to the linked URL. • If the linked page is on the same server, you can just use the file name, or the path to the file name, as the URL. However, if the linked page is on a different server, you should use the entire address, including the http://, as the URL.
Comments • Anything within <!-- your comment --> is a comment: it is not displayed in the browser even though it appears in the source code. • Comments can be many lines long. • Note that there is no real closing tag: the entire tag is enclosed within the opening <!-- --> tag.
Forms • The form tag <form> ... </form> is used to send user-specified information back to the server. The server then sends back its response, a new HTML document. • The form tag itself needs at least 2 attributes, the “action” attribute and the “method” attribute. • Although there are other methods, we generally use method=“post” for our interactive programs. • The “action” of a form is the program on the server that the form’s contents are sent to. That program processes the information and returns the response document. • Only programs in the cgi-bin directory can be processed under our system. Thus, a typical form tag will look something like: <form action=“/cgi-bin/bios546/hello.cgi” method=“post”> ...form contents...</form> • Note that since the program that responds to this form is on the same server, the action’s URL doesn’t need to contain “http://biolinx.bios.niu.edu”. However, it does need to start with “/cgi-bin”. • The form sends name=value pairs to the server. “name” and “value” are both specified within each form element.
Basic Form Elements • All forms need a “Submit” button: clicking this button sends the form to the server. Syntax: <input type=“submit” value=“button label”>. If you don’t specify a value, the button is labeled “Submit” by default. • Radio buttons: You typically use them in groups, all which have the same name but different values. Only one button can be checked; the parameter is given the value associated with the checked button. It is possible to have one button checked as a default, by putting the word "checked" after the value=par_value statement. <input type=“radio” name="parameter“ value="par_value"> The parameter specified by the “value” attribute in the checked radio button is sent to the server.
More Form Elements • Check boxes: If checked, the value “TRUE” is sent to the server. If not checked, neither name nor value is sent to the server. If you want it checked by default, include the word “checked” within the tag. <input type=“checkbox” name="parameter"> • Text boxes: if you want to enter a single line of text. Whatever is typed into the box gets sent as a string to the program given by the form action mentioned above, as the value of a parameter whose name is given by "name=". You can change the size of the text box with the attribute “size”; its value is the number of characters that can be displayed: <input type=“text” name="parameter“ size=“25”>
Select Boxes • Select boxes: a drop down list of options. It has a different syntax than most of the other input tags: <select name=”parameter”> ... </select>. • Each option in the select box is specified by the <option> ... </option> tag. When the form is submitted, the text between the opening and closing tags is sent as the value of the parameter specified in the <select name=“parameter”> tag. • By default only 1 option is displayed. You can use the size=“number” attribute in the <select> tag to display as many options as you want. • To allow the user to select multiple options, use the keyword “multiple” in the <select> tag: <select multiple name=“whatever”> • A default value is created by adding the keyword “selected” to the option tag: <option selected>this one!</option>
A Basic Form <html> <head> <title>Basic Form</title> </head> <body> <h1> Basic Form</h1> <p><form action=“/cgi-bin/bios546/hello.cgi” method=“post”> What is your name?<input type=“text” name=“your_name”> <br>Please select your favorite color: <select name=“color”> <option>Red</option> <option>Blue</option> </select> <br /><input type=“submit” value=“Click Me!> </form> </body> </html>
Processing Forms • Once a form is submitted, it is sent to a specific program on the server. • This procedure uses the Common Gateway Interface, or CGI. The programs run under the CGI are called “CGI scripts”. We will be writing ours in Perl, but other languages are also used. • In our configuration, programs that process forms must be located under the CGI root directory: /home/httpd/cgi-bin. You have a personal directory under this. • For example, the “hello.cgi” program is located at /home/httpd/cgi-bin/bios546/hello.cgi • As with HTML addresses, this program has an alias used as the “action” attribute of the form tag: <form action=“http://biolinx.bios.niu.edu/cgi-bin/bios546/hello.cgi” method=“post”>
CGI Basics • CGI programs are simply Perl programs with a few minor modifications that alter input and output. • A key point: you need to change permission on your CGI programs so that anyone can execute them. When going through the Web, you are the anonymous user “nobody”. • Any program in your CGI directory can be run through the CGI interface (i.e. invoked through a form on an HTML page). I often use the “.cgi” extension on my programs just to remind me that they are meant to be used on the Web.
Input to CGI Programs • To get input, we use the CGI module. Near the top of the program, put in “use CGI;”, just as you would put in “use strict;”. • The CGI module is a complex thing that allows you to do many interesting things, but I prefer to use only the simplest functions in it. • The CGI module uses “object-oriented” syntax. Nothing mysterious about this, it is simply an alternate way of writing things down.
Input Parameters • To get parameters from the form into a CGI program, you first need to create a new “CGI object” with the command: my $cgi_obj = new CGI; • Then, each parameter on the form needs to be captured into a Perl variable. my $var1 = $cgi_obj->param(“parameter1)”; my $var2 = $cgi_obj->param(“parameter2”); • The parameter names are the values of the “name” attributes in the various form elements. • You then process the input parameters as you would any other Perl variables.
CGI Output • All “print” statements in programs in the cgi-bin directory have their standard output re-directed to the web server. That is, you send information back to the submitter of the form by simply printing it. • One small qualification: in order for your browser to understand that this is HTML, you need to print the line “Content-type: text/html\n\n” at the beginning of the printing. Note the “\n\n”: there MUST be a blank line between the Content-type line and the <html> tag that starts the actual document. • Otherwise all printing is exactly as we have described for other Perl programs. • Note that you must print an HTML document to get a good display!
Multi-line Printing • Sometimes called a “here” statement, because you print down to “here”. • The statement “print <<WZRT; “ causes every line from that point to where “WZRT” appears on a line by itself to be printed, with no need for “\n” or any other format commands. • Variables are interpreted as usual.
File Permissions • When you access a CGI program through a web browser, you are an anonymous user with minimal permissions to do anything. Even though you think you are you, the owner of the program, the web browser causes you to become anonymous. • Thus, you must grant execute permission on your CGI file to everyone: chmod 755 program.cgi. • More complex is the problem of using a CGI program to write to another file. Three things need to be done: • Create the file you wish to write. “touch /home/httpd/html/z123456/prog_results.htm”. The touch command creates the file without putting anything into it. • Change the permissions on that file so anyone can write to it: “chmod 666 prog_results.htm”. • Be sure to use the full path to that file. Typically, the CGI file is in /home/httpd/cgi-bin/z123456 and you are writing an image file at /home/httpd/html/z123456. So, in the printed output from your CGI program, access the image file with a tag like “<img src=‘http://biolinx.bios.niu.edu/z123456/my_image.png’>”.
Useful Debugging Tools • The CGI::Carp module sends error messages to your browser. If you don’t use it, you get cryptic “Internal Server Error” messages with no debugging information. Syntax: use CGI::Carp qw(fatalsToBrowser); • on the biolinx command line, perl -c “your_program.cgi” checks the program’s syntax. It will either return “syntax OK” or an error message. This allows checking the syntax without having to run the program. • Remember that running a program through the web means that you are the anonymous user “nobody”, who has very few privileges. Be sure to check permissions, especially if your program writes to any files.
Recap of CGI Processing of Forms • Start with an HTML file in your HTML directory: /home/httpd/html/z012345/prog1.htm. • This HTML file can be accessed through the web using a web browser, at the URL: http://biolinx.bios.niu.edu/z012345/prog1.htm • The HTML file contains a form, whose action sends parameter name=“value” pairs to a CGI program on the server: <form action=“/cgi-bin/z012345/prog1.cgi” method=“post”> • The CGI program “prog1.cgi” is a Perl script located in your CGI directory: /home/httpd/cgi-bin/z012345/prog1.cgi
Recap of CGI Processing of Forms, pt. 2 • Your CGI program contains the lines use CGI; use CGI::Carp qw(fatalsToBrowser); at the top, just below the #!/usr/bin/perl -w line. • You must first create a new CGI object: my $cgi_obj = new CGI; • Parameter values from the form are put into Perl variables using object-oriented syntax: my $var1 = $cgi_obj->param(“parameter1”); • The Perl variables are then manipulated by the program as you see fit.
Recap of CGI Processing of Forms, pt. 3 • Output is printed just as in any other Perl program, except that it is re-directed to the web browser that requested it by submitting the form. • Output needs to have the line Content-type: text/html\n\n at the beginning of the output.