Download

1 / 42
420 likes | 522 Views
Working with Reports, References, and Mailings. 5. Chapter. 5. 5 -1 Using AutoCorrect 5 -2 Checking Grammar 5 -3 Using the Thesaurus 5 -4 Using the Tabs Dialog 5 -5 Adding Tab Leaders 5 -6 Inserting a Table of Contents 5 -7 Inserting Footnotes and Endnotes 5 -8 Adding a Caption

E N D
5 5-1 Using AutoCorrect 5-2 Checking Grammar 5-3 Using the Thesaurus 5-4 Using the Tabs Dialog 5-5 Adding Tab Leaders 5-6 Inserting a Table of Contents 5-7 Inserting Footnotes and Endnotes 5-8 Adding a Caption 5-9 Selecting a Reference Style 5-10 Adding Citations to Documents 5-11 Creating a Bibliography Working with Reports, References, and Mailings
5 5-12 Marking Entries 5-13 Creating an Index 5-14 Using Views 5-15 Using Read Mode 5-16 Creating a New Document Using a Template 5-17 Starting a Mail Merge 5-18 Selecting Recipients 5-19 Adding an Address Block 5-20 Adding a Greeting Line 5-21 Previewing and Finishing the Merge 5-22 Creating Envelopes 5-23 Creating Labels Working with Reports, References, and Mailings
Using AutoCorrect To add a new AutoCorrect entry: • Click the File tab. • Click the Optionsbutton. • Click the Proofing button. • Click AutoCorrect Options… button.
Using AutoCorrect • Key commonly made mistake in the Replace box. • Key the correct spelling in the With box. • Click OK in the AutoCorrect dialog. • Click OK in the Word Options dialog.
Checking Grammar To check for grammar errors: • Click the Review tab. • Click the Spelling & Grammar button. • Select a suggestion and click Change to correct or click Ignore to skip. • Click OK.
Using the Thesaurus To replace a word using the Thesaurus: • Position cursor in word. • Click the Review tab. • Click the Thesaurus button, and preview suggested list. Provides list of synonyms (words with similar meaning) Provides list of antonyms (words with opposite meaning). Skill 1.5
Using the Thesaurus • Point to a synonym or antonym. • Click the Spelling & Grammar button. • Click the arrow that displays. • Click Insert
Using the Tabs Dialog To set tab stops in the tabs dialog: • Click the Home tab. • Click the Paragraph dialog launcher. • Click the Tabs… button. • Text desired number in the Tab stop position: box. • Click a radio button in the Alignment section. • Click OK.
Adding Tab Leaders To add tab leaders: • Select the text. • Click the Home tab. • Click the Paragraph dialog launcher. • Click the Tabs… button. • Click the desired leader option. • Click OK.
Inserting a Table of Contents To insert a table of contents: • Position insertion point at beginning of document. • Click the References tab. • Click the Table of Contents button. • Select an option from the gallery. Placed at beginning of document. Lists topics and associated page numbers. Created from heading styles. Skill 1.5
Inserting a Table of Contents To update the table of contents: • Click on the table of contents. • Click the Update Table button. To remove the table of contents: • Click the Table of Contents button. • Select Remove Table of Contents.
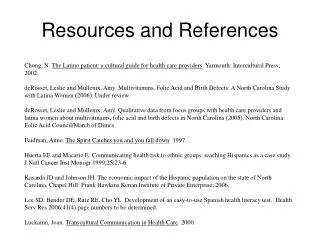
Inserting Footnotes and Endnotes Provide reader with additional information. Often used for source references. Comprised of two parts – Reference mark and associated text. Footnotes appear at the bottom of a page. Endnotes appear at the end of the document.
Inserting Footnotes and Endnotes To insert a footnote: • Position insertion point. • Click the References tab. • Click the Insert Footnote button. • Key footnote text. • Click in document area. To insert an endnote: • Position insertion point. • Click the References tab. • Click the Insert Endnote button. • Key endnote text Skill 5.7
Adding a Caption To add a caption to a figure: • Select the figure. • Click the References tab. • Click the Insert Caption button. • Click the Label arrow, and select a figure type. • Click the Position arrow, and select an option. • Key text. • Click OK. Skill 5.8
Selecting a Reference Style • Set of rules to display references in a bibliography. • Includes order of information, when and how punctuation is used, and the use of character formatting. Skill 5.9
Selecting a Reference Style To change the reference style for a document: • Click the References tab. • Click the arrow next to Style, and select a style from the list. Skill 5.9
Adding Citations to Documents To add a citation: • Position insertion point. • Click the References tab. • Click the Insert Citation button, and select Add New Source… • Select an option for the Type of Source. • Add information about the source to the appropriate fields. • Click OK. Skill 5.10
Adding Citations to Documents To add the same source to another part of the document: • Position insertion point. • Click the References tab. • Click the Insert Citation button, and select the source from the list. Skill 5.10
Creating a Bibliography To add a bibliography to a document: • Position insertion point at end of document. • Click the References tab. • Click the Bibliography button. • Select a bibliography building block. Compiled list of sources referenced in a document. Appears at end of document. Skill 1.5
Marking Entries To mark entries: • Select the text to mark. • Click the References tab. • Click the Mark Entry button. • Click the Mark button. • Click the Close button Used to locate specific information in a document. Marked topics are used to create an index. Skill 1.5
Creating an Index To mark entries: • Place cursor at end of document. • Click the References tab. • Click the Insert Index button. • Click Formats arrow, and select a format. • Modify options and click OK. List of topics and associated page numbers Appears at end of document. Can reference a single word, phrase, or topic spanning several pages. Skill 1.5
Using Views Skill 5.14
Using Views To switch between views: • Click the appropriate icon located in the status bar. • Outline view and Draft view are only accessible from the View tab. Skill 1.5
Using Read Mode To display a document in read mode: • Click the Read Mode button. • Click the Next or Back button. To change the page color in read mode: • Click the View menu. • Point to Page Color and select an option.
Creating a New Document Using a Template A document with predefined settings that can be used as a pattern. Makes creating a fully formatted and designed new file easy, saving time and effort. Templates available for letters, memos, resumes, newsletters, and more. Skill 1.5
Creating a New Document Using a Template To create a new document from a template: • Click the File tab. • Click New. • Click on desired template. • Click the Create button.
Creating a New Document Using a Template To search for more templates online: • Click the File tab. • Click New. • Text keyword in search box. • Select template and click the Create button.
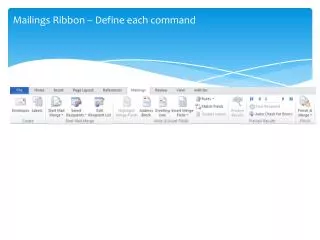
Starting a Mail Merge To set up the main document: • Click the Mailings tab. • Click the Start Mail Merge button and select Letters.
Selecting Recipients To select recipients for the mail merge: • Click the Mailings tab. • Click the Select Recipients button. • Select Use an Existing List... • Select a data source and click Open.
Selecting Recipients To enter recipients manually: • Click the Mailings tab. • Click the Select Recipients button. • Select Type a New List... • Enter the information in the appropriate boxes. • Click New Entry to add another. • Click OK when done.
Selecting Recipients To edit the recipient list: • Click the Mailings tab. • Click the Edit Recipients List button. • Click in desired field to change information. • Click the checkmark next to name to deselect it if recipient is to be excluded from the mail merge. • Click OK when done.
Adding an Address Block To add an address block merge field: • Click where you want the merge field to appear. • Click the Mailings tab. • Click the Address Block button. • Make desired changes. • Click OK when done.
Adding a Greeting Line To add a greeting line merge field: • Click where you want the merge field to appear. • Click the Mailings tab. • Click the Greeting Line button. • Make desired changes. • Click OK when done.
Previewing and Finishing the Merge To preview the mail merge: • Click the Mailings tab. • Click the Preview Results button. • Click the Next Record and Previous Record buttons to preview the documents.
Previewing and Finishing the Merge To print the documents in the mail merge: • Click the Mailings tab. • Click the Finish & Merge button. • Select Print Documents. • Click the All radio button. • Click OK.
Creating Envelopes To create and print an envelope: • Click the Mailings tab. • Click the Envelopes button.
Creating Envelopes • Text the delivery address. • Text the return address. • Click the Print button.
Creating Labels To create labels: • Click the Mailings tab. • Click the Labels button.
Creating Labels • Key text in the Address box. • Click the Options button.
Creating Labels • Click the Label vendors arrow and select vendor. • Scroll list of products and select a label type. • Click OK. • Click the New Documents button.
Key Terms AutoCorrect Thesaurus Tab leaders Table of contents Footnotes Endnotes Reference mark Caption Reference style Citation Bibliography Index Read Mode Print Layout view Web Layout view Template Mail merge Recipients list Merge fields Address block Greeting line Labels