Download
1 / 64
700 likes | 1.02k Views
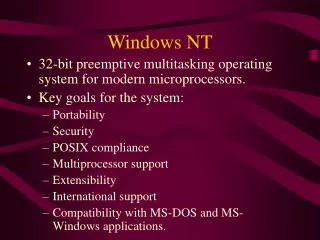
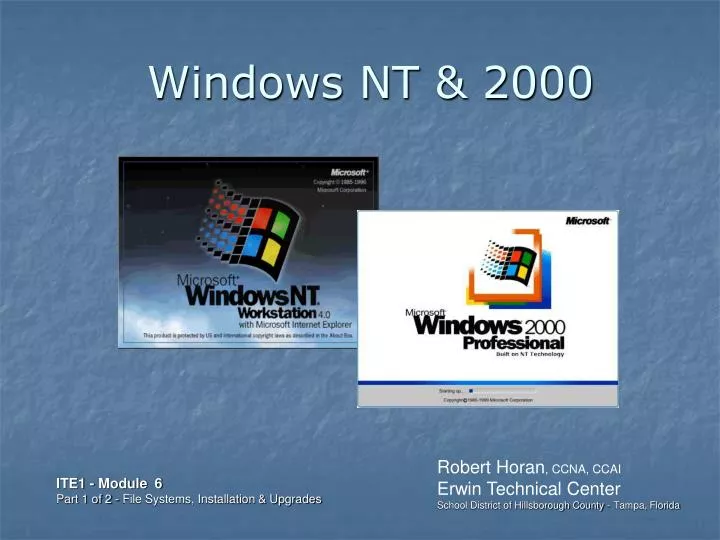
Windows NT & 2000. Robert Horan , CCNA, CCAI Erwin Technical Center School District of Hillsborough County - Tampa, Florida. ITE1 - Module 6 Part 1 of 2 - File Systems, Installation & Upgrades.

E N D
Windows NT & 2000 Robert Horan, CCNA, CCAI Erwin Technical Center School District of Hillsborough County - Tampa, Florida ITE1 - Module 6Part 1 of 2 - File Systems, Installation & Upgrades
FAT16, used originally with DOS, will only work with partitions up to 2 GB. The FAT32 file system supports hard drives up to 2048 GB. FAT32 also solves the problem of limited cluster size. FAT32 stores data on the hard disk in a more efficient manner. FAT16 has cluster sizes of 32 KB on a 2 GB partition, wasting space. The FAT32 file system has a 4 KB cluster on a 2 GB partition. FAT16 limits file names to 8 characters with a 3 letter extension. This is referred to as the eight dot three naming convention. Fat32, under Windows 9x, supports Long File Names (LFN) up to 255 characters. File Allocation Table (FAT)
With FAT16, the root directory must be located at the start of the hard disk. If this part of the hard disk becomes damaged, then the whole hard disk can become unusable. With FAT32 the root directory can be located anywhere on the hard disk. File Allocation Table (FAT)
The FAT structure also maintains a set of attributes for each file. These include the following: • R – adds or removes the read-only file attribute • A – adds or removes the archived file attribute used for disk back-up • S – adds or removes the system dataset file attribute (System File) • H – adds or removes the hidden file attribute for the directory display • There is also a date and time stamp that is placed on the file when it is last changed. • The attrib command is used to display, set, or remove one or more of the four attributes that can be assigned to files and directories. The four attributes are read-only, archive, system, and hidden. A plus (+) or minus (-) sign used in the attrib command sets or clears an attribute. • Example: attrib +h command.com would hide the file command.com from showing up in the directory. All file systems have some form of attributes. NTFS adds the compressed file attribute C. File Allocation Table (FAT)
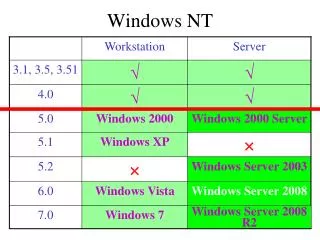
Both FAT16 and 32 maintain two copies of the FAT, the default and backup copy. However, only FAT32 can use the backup copy as well as the default copy. This means that if FAT32 is being used and the file allocation table becomes corrupted or fails, then the backup copy can be used until the default copy is repaired. FAT16 can use only the default copy to run the operating system, so if the FAT becomes damaged or fails, the system will crash and become unusable. File Allocation Table (FAT) Win 9x supports Fat 16 & 32 Win NT supports Fat 16 & NTFS Win 2K/XP support Fat 16, 32 & NTFS
NTFS supports the Windows NT Family made up of the NT, 2000, and XP operating systems. The main reason for creating the NTFS file system is that the FAT file system is too limited to provide advanced features. The NTFS file system provides added features like file and directory security and system access control. NTFS allows an administrator to set permissions on files and folders to specify which users have access to them and the level of access that is permitted. The original version of NTFS that was released with Windows NT is now referred to as NTFS 4. Windows 2000 and XP use NTFS 5. Note:Windows NT supports only FAT16 and NTFS. Windows 2000 and XP support FAT16, FAT32 and NTFS. New Technology File System (NTFS)
New Technology File System (NTFS) Windows NT Series Workstation Server Windows 2000 Series Professional Server Advanced Server Data Center Server Windows XP Series Home Edition Professional Media Center Edition Professional 64-bit
New Technology File System (NTFS) Using NTFS you have much tighter control over File Sharing & Permissions than you had under Windows 9x.
NTFS file and folder permissions apply both to users working at the computer and over the network from a shared folder. Share rights for folders work in combination with file and folder permissions. The FAT file systems only support simple share rights. New Technology File System (NTFS)
NTFS 5 can control file encryption and compression as well as provide additional security that NTFS 4 could not. NTFS 5 also includes a feature called disk quotas, which provide the system administrator with the ability to assign limits to the amount of hard disk space that users are allowed to occupy on the server or workstation. Note:A folder or file can be compressed or encrypted, but not both. New Technology File System (NTFS)
File System Evolution The above summarizes the evolution of the file system from the introduction of the original FAT16 with DOS to the newer NTFS5, which was introduced with Windows 2000. Note: There are other file systems not mentioned above, that are in use today by other popular operating systems such as Novell Netware, MacOS, Unix, and Linux.
Partitioning and Formatting When installing DOS or one of the Windows 9x operating systems, the hard drive must be partitioned with either FDISK.EXE, or with a third-party utility like Partition Magic.
Partitioning and Formatting Windows NT, 2000 and XP provide a different way to prepare a hard drive for the OS installation. You can use an unformatted, unpartitioned hard drive during installation. Partitions can be created or deleted in the Setup program. The setup process uses the NTFS partitioning program DiskPart to do this.
NT Hardware Requirements Minimum system requirements for Windows NT Workstation Computer/Processor: Pentium or faster processor. Memory: At least 16 megabytes (MB) of RAM; 32 MB recommended Hard Disk: 110 MB of available hard disk space. Drive: CD-ROM drive or access to a CD-ROM over a computer network. Display: VGA or higher-resolution display adapter. Keyboard: Mouse: Microsoft Mouse or compatible pointing device. CPU Support: Windows NT supports single and dual CPU systems.
2000 Hardware Requirements Minimum system requirements for Windows 2000 Professional Computer/Processor: 133 MHz or higher Pentium-compatible CPU. Memory: At least 64 megabytes (MB) of RAM; more memory generally improves responsiveness. Hard Disk: 2 GB with 650 MB free space. Drive: CD-ROM or DVD drive. Display: VGA or higher resolution monitor. Keyboard: Mouse: Microsoft Mouse or compatible pointing device. CPU Support: Windows 2000 Professional supports single and dual CPU systems.
Installing Windows 2000 Before installing or upgrading your system to Windows 2000 you should always check for hardware and software compatibility. Check the Hardware Compatibility List (HCL) on the installation CD-ROM (HCL.TXT) file in the Support folder. Or better yet, go to www.microsoft.com/whdc/hcl to check the most current list. You can search for a particular device or view the entire HCL.
Installing Windows 2000 From the Command Line Interface move into the I386 Folder on the 2000 Installation CD. Run WINNT32 /checkupgradeonly as shown above. This will produce a report named upgrade.txt located on the root of the C:\ Drive. It will tell you if there are any compatibility issues.
Installing Windows 2000 Upgrade report showing software compatibility issues. Antivirus and utility programs are specific to the operating system and must be compatible with the version you are using.
Installing Windows 2000 If the BIOS of the computer you are using does not support starting up from the CD-ROM you will need to use the boot disks that come with the 2000 CD. If these are not available you can create them from the Install CD. From a DOS prompt the path is D:\BOOTDISK\MAKEBOOT.EXE MAKEBT32.EXE is the GUI version of the program and is Run from Windows.
Installing Windows 2000 To install Windows 2000, you need to run the appropriate Windows 2000 Setup program, either Winnt.exe or Winnt32.exe. Winnt.exe and Winnt32.exe are both referred to as "Setup." The type of setup that you need to run is determined as follows: * For a clean installation on a computer running MS-DOS or Microsoft Windows 3.x, run Winnt.exe from the MS-DOS command line. * For a clean installation or upgrade from Windows NT, Windows 95 or Windows 98, run Winnt32.exe from within the current OS. Note: Windows ME is not upgradeable to Windows 2000 but is supported by Windows XP.
Installing Windows 2000 The Windows 2000 Professional Setup Screen
Installing Windows 2000 The Windows 2000 License Agreement End User License Agreement (EULA) – Press F8 to agree.
Installing Windows 2000 The Hard Drive Partitioning Screen
Installing Windows 2000 The Formatting Screen – Choose either NTFS or FAT. FAT Partitions that are over 2GB will automatically be formatted as FAT32. Smaller partitions are formatted as FAT16.
Installing Windows 2000 Setup extracts and copies files to a RAM Disk.
Installing Windows 2000 The Regional Settings Screen – This is for Language and Keyboard settings.
Installing Windows 2000 Enter your name and company information.
Installing Windows 2000 Enter the 25 character product key.
Installing Windows 2000 For passwords, a length of at least 8 characters is recommended. Mixing upper and lower case, adding in numbers and special characters, and not using words found in the dictionary helps to make a password more secure. Passwords are limited to 127 characters with NTFS.
Installing Windows 2000 Enter the correct time, date and time zone.
Installing Windows 2000 Network component installation.
Installing Windows 2000 Network setup – Choose Typical settings to have Windows automatically install the basic components you will need for file sharing, local area networking and internet access.
Installing Windows 2000 You need to choose whether this computer is part of a workgroup or a domain. Check with your network administrator for this information.
Installing Windows 2000 Finishing the installation.
Installing Windows 2000 Remove any disks from your drives and click on Finish to restart the computer.
Installing Windows 2000 The Windows 2000 Professional Startup Screen
Windows 2000 Boot Process The Preboot Sequence The first step in the boot process is the POST. Then the computer locates the boot device and loads the Master Boot Record (MBR) into memory. The MBR locates the active partition and loads it into memory. The Boot Sequencein the Windows NT Family has 5 files, *3 are required. * NTLDRstarts the file system and reads the BOOT.INI file * BOOT.INIenables the on-screen display of the boot menu and gives the path to the OS. BOOTSECT.DOS is created for dual booting. * NTDETECTgathers information about the computer hardware NTBOOTDD.SYS is created when using SCSI hard drives.
Windows 2000 Boot Process The Kernel Load Phasebegins by loading theNTOSKRNL.EXEfollowed by theHAL.DLLfile.At this point the NTLDR reads the SYSTEM registry key into RAM and selects the hardware configuration stored in the Registry. The Kernel Initialization PhaseThe kernel initializes, recognizing everything that was previously loaded. Then the NTLDR gives control to the operating system kernel. Device drivers are loaded and Services are started. NTOSKRNL.EXE loads the WINLOGON.EXE program which displays the Windows 2000 logon screen. The final step in the bootup process begins with the logon screen. A boot is not complete until a user logs on. Once a user logs on, the clone of the Current Control Set value is copied to the Last Known Good control set value in the Registry.