Download
1 / 28
290 likes | 447 Views
Introduction to Windows Presentation Foundation (WPF). Dr. Frank McCown COMP 445 – GUI Programming. WPF History. Work began in early 2000’s by Microsoft under code name “Avalon” Effort to provide a clearer separation between the interface and business logic Avalon renamed WPF in July 2005

E N D
Introduction to Windows Presentation Foundation (WPF) Dr. Frank McCown COMP 445 – GUI Programming
WPF History • Work began in early 2000’s by Microsoft under code name “Avalon” • Effort to provide a clearer separation between the interface and business logic • Avalon renamed WPF in July 2005 • WPF released in 2006 as part of .NET Framework 3.0 • Silverlight (released in 2007) is a subset of WPF • Windows Phone 7 (released in 2010) uses Silverlight or XNA to write apps http://channel9.msdn.com/posts/Charles/Michael-Wallent-Advent-and-Evolution-of-WPF/ http://www.eweek.com/c/a/Windows/Microsoft-Gives-Avalon-Indigo-Official-Names/
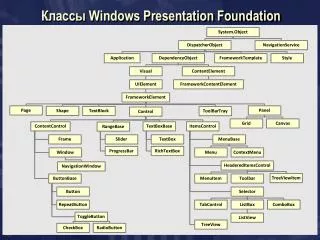
WPF Features • Works on top of DirectX to provide more advanced UI features • Support for 2D and 3D graphics, audio, and video • GUI appearance and content manipulated with XAML • WPF controls can be embedded in Windows Forms app and vice versa • Uses vector-based graphics for resolution independence • WPF apps can stand alone or run in Internet Explorer
Bringing it all together… http://windowsclient.net/wpf/white-papers/when-to-adopt-wpf.aspx
Extensible Application Markup Language (XAML) • Pronounced “zammel” • XML-based markup language for defining and arranging GUI controls • Can be manually generated/edited or edited by Visual Studio
Example XAML Document Window1.xaml <Window x:Class="WPF_HelloWindows.Window1” xmlns="http://schemas.microsoft.com/winfx/2006/xaml/presentation" xmlns:x="http://schemas.microsoft.com/winfx/2006/xaml" Title="Hello WPF" Height="150" Width="250"> <Grid Background="AntiqueWhite" > <Label Name="label1"VerticalAlignment="Center" HorizontalAlignment="Center">Hello, WPF!</Label> </Grid> </Window>
Control Layout • Windows Forms: Set absolute (x,y) position • WPF: Set relative position in its layout container • Controls grow/shrink as window grows/shrinks • Control properties: • Width, Height • MinWidth, MinHeight, MaxWidth, MaxHeight • Margin: space around control’s edges (L,T,R,B) • HorizontalAlignment(Left, Center, Right, or Stretch) • VerticalAlignment (Top, Center, Bottom, or Stretch)
Alignment Introduction to WPF Layout by Christian Moser http://www.wpftutorial.net/LayoutProperties.html
Padding and Margin • The Margin is the extra space around the control. • The Padding is extra space inside the control. • The Padding of an outer control is the Margin of an inner control. Introduction to WPF Layout by Christian Moser http://www.wpftutorial.net/LayoutProperties.html
Common Layouts • Grid • Canvas • StackPanel • DockPanel • WrapPanel
Grid Layout Layout is defined by a grid of rows and columns with elements placed in cells. Grid Panel by Christian Moser http://www.wpftutorial.net/GridLayout.html
Canvas Layout Elements are placed in relation to the distance from the top and left edges of the Canvas. Canvas Panel by Christian Moser http://www.wpftutorial.net/Canvas.html
StackPanel Layout Elements are arranged in a single column or row. StackPanel by Christian Moser http://www.wpftutorial.net/StackPanel.html
DockPanel Layout Elements are positioned based on the edge they are docked to. Dock Panel by Christian Moser http://www.wpftutorial.net/DockPanel.html
WrapPanel Layout A wrapping StackPanel where elements are wrapped to the next row or column. Wrap Panel by Christian Moser http://www.wpftutorial.net/WrapPanel.html
Event Handling <Button Height="23" Margin="78,12,78,0" Name="button1"VerticalAlignment="Top" Click="button1_Click">Press Me</Button> // Code from Windows1.xaml.cs public partial class Window1 : Window { public Window1() { InitializeComponent(); } private void button1_Click(object sender, RoutedEventArgse) { label1.Content = "Button pressed!"; } }
Event Routing • All WPF events are routed events • Can travel up (from child to parent) • Can travel down (from parent to child) • Three types of routed events • Direct events: Don’t travel up or down • Bubbling events: Travel up (Source to Window) • Tunneling events: Travel down (top of containment hierarchy to Source)
Bubbling Event Example <GroupBox Name="myGroupBox" Header="Bubbling Example“ MouseLeftButtonUp="Bubbling"> <Label Name="myLabel" MouseLeftButtonUp="Bubbling">Click Me</Label> </GroupBox> private void Bubbling(object sender, MouseButtonEventArgs e) {// Label notified of event first, then GroupBox } Bubbling event
Tunneling Event Example <GroupBox Name="myGroupBox" Header="Bubbling Example“ PreviewMouseLeftButtonUp="Tunneling"> <Label Name="myLabel" PreviewMouseLeftButtonUp="Tunneling">Click Me</Label> </GroupBox> private void Tunneling(object sender, MouseButtonEventArgs e) {// GroupBox notified of event first, then Label } Tunneling event
Commands • Any action or task that may be triggered by different user interactions • Example: File Exit from the menu and Exit button may both need to execute the same command • Commands can better synchronize a tasks’ availability • Example: If copy command requires text to be highlighted, all controls using this command can be disabled if no text is highlighted • Some common built-in commands: New, Open, Save, Close, Cut, Copy, Paste • Can create your own custom commands
Command Example <Window x:Class="WPF_HelloWindows.Window1" xmlns="http://schemas.microsoft.com/winfx/2006/xaml/presentation" xmlns:x="http://schemas.microsoft.com/winfx/2006/xaml" Title="Hello WPF" Height="150" Width="250"> <Window.CommandBindings> <CommandBinding Command="Close" Executed="closeCommand_Executed" /> </Window.CommandBindings> <Grid Background="AntiqueWhite" > <Button Height="23" Margin=“80,0,80,14" Name="button1" VerticalAlignment="Bottom“ Command="Close">Press Me</Button> <Menu Name="menu1" Height="23"VerticalAlignment="Top"> <MenuItem Header="File" > <MenuItem Header="Exit" Command="Close"/> </MenuItem> </Menu> </Grid> </Window> Called by Menu and Button
Styles • WPF style is a collection of reusable property-value & event-handler definitions • Concept is similar to style sheets for HTML • Same Style might be applied to different types of controls • Styles are WPF resources • Reusable objects defined for entire application
Styles Example <Window.Resources> <Style x:Key="SliderStyle" > <Setter Property="Slider.Minimum" Value="0" /> <Setter Property="Slider.Maximum" Value="255" /> <Setter Property="Slider.IsSnapToTickEnabled" Value="True" /> <EventSetter Event="Slider.ValueChanged" Handler="slider_ValueChanged" /> </Style> </Window.Resources> <Slider Name="redSlider" Style="{StaticResourceSliderStyle}" /> <Slider Name="greenSlider" Style="{StaticResourceSliderStyle}" /> <Slider Name="blueSlider" Style="{StaticResourceSliderStyle}" />
Control Templates • Appearance of WPF controls determined by a control template • Control template is a hierarchy of visual elements • All visual controls use a default control template • Changes to a control’s control template can redefine the appearance of the control without changing its functionality Button | Border | ContentPresenter | String Displays single element
Control Template Example <Window.Resources> <ControlTemplate x:Key=“MyButtonTemplate"TargetType="Button"> <Border Name="Border"BorderThickness="2"CornerRadius="10" BorderBrush="BlueViolet"> <ContentPresenterHorizontalAlignment="Center" VerticalAlignment="Center" TextBlock.FontWeight="Bold" TextBlock.Foreground="Firebrick" Content="{TemplateBinding Content}" /> </Border> </ControlTemplate> </Window.Resources> <Button Name="button1" Width="100" Height="30">Button 1</Button> <Button Name="button2" Width="100" Height="30" Template="{StaticResourceMyButtonTemplate}"> Button 2</Button>
Triggers • Triggers can be used to change a control’s appearance when it enters a certain state • Can be used with Styles or Control Templates • Must be defined in Style.Triggers or ControlTemplate.Triggers
Style with Trigger Example <Window.Resources> <Style x:Key="MyButtonStyle" > <Setter Property="Button.Opacity" Value="0.5" /> <Style.Triggers> <Trigger Property="Button.IsMouseOver" Value="True"> <Setter Property="Button.Opacity" Value="1" /> </Trigger> </Style.Triggers> </Style> </Window.Resources> <Button Name="mybutton"Width="100" Height="30" Style="{StaticResourceMyButtonStyle}">Push Me</Button>
Control Template with Trigger Example <Window.Resources> <ControlTemplate x:Key=“MyButtonTemplate"TargetType="Button"> <Border Name="Border"BorderThickness="2"CornerRadius="10" BorderBrush="BlueViolet"> <ContentPresenterHorizontalAlignment="Center" VerticalAlignment="Center" TextBlock.FontWeight="Bold" TextBlock.Foreground="Firebrick" Content="{TemplateBinding Content}" /> </Border> <ControlTemplate.Triggers> <Trigger Property="IsMouseOver" Value="True"> <SetterTargetName="Border" Property="Background" Value="LightBlue" /> </Trigger> </ControlTemplate.Triggers> </ControlTemplate> </Window.Resources> <Button Name="button2"Width="100" Height="30" Template="{StaticResourceMyButtonTemplate}">Button 2</Button> trigger