Download
1 / 7
70 likes | 188 Views
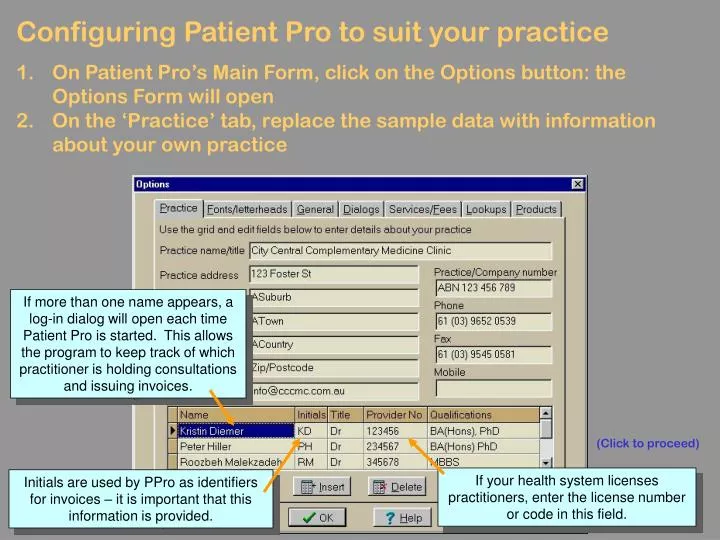
Configuring Patient Pro to suit your practice On Patient Pro’s Main Form, click on the Options button: the Options Form will open On the ‘Practice’ tab, replace the sample data with information about your own practice.

E N D
Configuring Patient Pro to suit your practice • On Patient Pro’s Main Form, click on the Options button: the Options Form will open • On the ‘Practice’ tab, replace the sample data with information about your own practice If more than one name appears, a log-in dialog will open each time Patient Pro is started. This allows the program to keep track of which practitioner is holding consultations and issuing invoices. (Click to proceed) If your health system licenses practitioners, enter the license number or code in this field. Initials are used by PPro as identifiers for invoices – it is important that this information is provided.
On the ‘Fonts/Letterheads tab, select a default font for memos and set up templates for use in prescriptions, letters and certificates • Tip: having designed one heading, you can copy and paste it into the templates for the other document types Patient Pro can produce lists of “overdue” invoices. If you want it to use a value greater or less than 31days, enter a new value here. Click on a radio button to indicate the default paper size used by your printer (Click to proceed)
On the ‘General’ tab, you can choose to: • Customize labels • Have “Tax Invoice” as the heading for invoices (Australia only) • Suppress any or all of Patient Pro’s warnings Click on this button for an explanation of label customization and the suppression of Patient Pro’s default warnings. (Click to proceed)
On the ‘Dialogs’ tab, you can choose to: • Prevent the display of Patient Pro’s informational dialog boxes • Enable/disable automated backup of your data (Click to proceed)
On the ‘Services/Fees’ tab, delete the sample data from the grids and re-enter information reflecting the way your practice charges its patients • Note: The data in these grids are used as lookups when you are issuing invoices. Click on these buttons to delete the current record (line of data) from the grid above. Click on these buttons to insert a new, blank record (line of data) into the grid above. Click on this button to get information on Patient Pro’s “rounding principles”. (Click to proceed)
There is nothing you initially need to do on the ‘Lookups’ tab. • Use it later if you wish to correct misspellings or delete items from any of Patient Pro’s lookup lists. You can change the lookup list displayed in the grid just by clicking on one of the radio buttons above. (Click to proceed)
If you sell any products to your patients, delete the sample data and enter information on the products you supply. • Click on the ‘OK’ button to return to Patient Pro’s Main Form. The data in the grid are used in a lookup combo when issuing invoices If necessary, change the tax rate percentage here. (Click to conclude)